Home Blog Page 2

Markdown: How to Add A New Line

markdown new line

markdown new line

When working with Markdown, understanding how to create new lines is essential for proper formatting and readability. This guide will explain everything you need to know about creating line breaks in Markdown documents.

What is a Markdown New Line?

In Markdown, creating new lines isn’t as straightforward as simply pressing the Enter key. Markdown has specific syntax requirements for line breaks that differ from traditional word processors.

How to Create a New Line in Markdown

There are several methods to create a new line in Markdown:

1. The Double Space Method

The most common way to create a line break in Markdown is by adding two spaces at the end of a line before pressing Enter:

<span class="">This is the first line.··
</span><span class="">This is the second line.</span>

(Note: The “··” represents two spaces that aren’t visible in the rendered output)

2. The Backslash Method

You can also use a backslash at the end of a line to force a line break:

<span class="">This is the first line.\
</span><span class="">This is the second line.</span>

3. HTML Break Tag

For guaranteed compatibility across all Markdown renderers, you can use the HTML

&lt;br&gt;

tag:

<span class="">This is the first line.<span class="token tag punctuation">&lt;</span><span class="token tag">br</span><span class="token tag punctuation">&gt;</span>
</span><span class="">This is the second line.</span>

Common Issues

Many newcomers to Markdown struggle with line breaks because:

  • The double space method isn’t visible in the editor
  • Different Markdown flavors handle line breaks differently
  • Some Markdown editors automatically trim trailing spaces

Creating New Lines in Different Markdown Environments

Different platforms have varying implementations of Markdown:

  • GitHub Flavored Markdown (GFM) supports the double space method
  • CommonMark requires two spaces for line breaks
  • Some blogging platforms like WordPress may handle line breaks automatically

Best Practices for Line Breaks

For the most consistent results across platforms:

  • 1. HTML

    &lt;br&gt;

    for Portability:

    The

    &lt;br&gt;

    tag forces a line break, ensuring consistency across browsers and platforms. Use it when precise line control is vital, like in addresses or poems. Avoid overuse to maintain clean HTML.

    2. Double Spaces in Documentation:

    In plain text and markdown, double spaces at line ends often create breaks. This is readable, but not universally supported. Best for simple documentation, not HTML.

    3. Test Before Publishing:

    Platforms interpret line breaks differently. Always test your content in the target environment to guarantee correct formatting and prevent unexpected layout issues.

Creating Paragraph Breaks

To create a paragraph break (with extra spacing), simply leave a blank line between paragraphs:

<span class="">This is paragraph one.
</span>
<span class="">This is paragraph two.</span>

Understanding the nuances of line breaks in Markdown will make your documents more readable and ensure they render correctly across different platforms and applications.

Similar Articles

https://www.markdownguide.org/basic-syntax/

https://dev.to/cassidoo/making-a-single-line-break-in-markdown-3db1 

More Articles from Unixmen


How to Update Ubuntu

update ubuntu

update ubuntu

Updating your Ubuntu system is crucial for maintaining security, fixing bugs, and accessing new features. This article will guide you through the various methods to update Ubuntu, from basic command-line options to graphical interfaces.

Why Regular Updates Matter

Keeping your Ubuntu system updated provides several benefits:

  • Security patches that protect against vulnerabilities
  • Bug fixes for smoother operation
  • Access to new features and improvements
  • Better hardware compatibility
  • Longer-term system stability

Command-Line Update Methods

The Basic Update Process

The simplest way to update Ubuntu via the terminal is:

sudo apt update
sudo apt upgrade

The first command refreshes your package lists, while the second installs available updates.

Comprehensive System Updates

For a more thorough update, including kernel updates and package removals:

sudo apt update
sudo apt full-upgrade

Security Updates Only

If you only want security-related updates:

sudo apt update
sudo apt upgrade -s
sudo unattended-upgrade --dry-run

Graphical Interface Updates

Software Updater

Ubuntu’s built-in Software Updater provides a user-friendly way to update:

  1. Click on the “Activities” button in the top-left corner
  2. Search for “Software Updater”
  3. Launch the application and follow the prompts

Software & Updates Settings

For more control over update settings:

  1. Open “Settings” > “Software & Updates”
  2. Navigate to the “Updates” tab
  3. Configure how often Ubuntu checks for updates and what types to install

Upgrading Ubuntu to a New Version

Using the Update Manager

To upgrade to a newer Ubuntu version:

sudo do-release-upgrade

For a graphical interface, use:

  1. Open Software Updater
  2. Click “Settings”
  3. Set “Notify me of a new Ubuntu version” to your preference
  4. When a new version is available, you’ll be notified

Scheduled Updates

For automatic updates:

sudo apt install unattended-upgrades
sudo dpkg-reconfigure unattended-upgrades

This configures your system to install security updates automatically.

Troubleshooting Common Update Issues

Package Locks

If you encounter “unable to acquire the dpkg frontend lock”:

sudo killall apt apt-get
sudo rm /var/lib/apt/lists/lock
sudo rm /var/cache/apt/archives/lock
sudo rm /var/lib/dpkg/lock

Repository Issues

If repositories aren’t responding:

  1. Navigate to “Software & Updates”
  2. Under “Ubuntu Software,” change the download server

Insufficient Space

For disk space issues:

sudo apt clean
sudo apt autoremove

Best Practices for Ubuntu Updates

  1. Regular Schedule: Update at least weekly for security
  2. Backups: Always back up important data before major updates
  3. Changelogs: Review update notes for critical changes
  4. Timing: Schedule updates during low-usage periods
  5. Testing: For servers, test updates in a development environment first

Summary

In summation, regularly updating your Ubuntu system is essential for security and performance. Whether you prefer the command line or graphical interfaces, Ubuntu provides flexible options to keep your system current and protected.

Similar Articles

https://ubuntu.com/server/docs/how-to-upgrade-your-release/

https://www.cyberciti.biz/faq/upgrade-update-ubuntu-using-terminal/

More Articles from Unixmen

How to Type Emojis in Ubuntu Linux

add emojis ubuntu

add emojis ubuntu

Emojis have become an essential part of modern digital communication, adding emotion and context to our messages. While typing emojis is straightforward on mobile devices, doing so on Ubuntu and other Linux distributions can be less obvious. This guide covers multiple methods on how to type emojis in Ubuntu, from keyboard shortcuts to dedicated applications.

Why Use Emojis on Ubuntu?

Emojis aren’t just for casual conversations. They can enhance:

  • Professional communications (when used appropriately)
  • Documentation
  • Social media posts
  • Blog articles
  • Desktop applications
  • Terminal customizations

Method 1: Character Map (Pre-installed)

Ubuntu comes with a Character Map utility that includes emojis:

  1. Press the Super (Windows) key and search for “Character Map”
  2. Open the application
  3. In the search box, type “emoji” or browse categories
  4. Double-click an emoji to select it
  5. Click “Copy” to copy it to your clipboard
  6. Paste it where needed using Ctrl+V

Pros: No installation required Cons: Slower to use for frequent emoji needs

Method 2: How to Type Emojis Using Keyboard Shortcuts

Ubuntu provides a built-in keyboard shortcut for emoji insertion:

  1. Press Ctrl+Shift+E or Ctrl+. (period) in most applications
  2. An emoji picker window will appear
  3. Browse or search for your desired emoji
  4. Click to insert it directly into your text

Note: This shortcut works in most GTK applications (like Firefox, GNOME applications) but may not work in all software.

Method 3: Emoji Selector Extension

For GNOME desktop users:

  1. Open the “Software” application
  2. Search for “Extensions”
  3. Install GNOME Extensions app if not already installed
  4. Visit extensions.gnome.org in Firefox
  5. Search for “Emoji Selector”
  6. Install the extension
  7. Access emojis from the top panel

Pros: Always accessible from the panel Cons: Only works in GNOME desktop environment

Method 4: EmojiOne Picker

A dedicated emoji application:

sudo apt install emoji-picker

After installation, launch it from your applications menu or by running:

emoji-picker

Pros: Full-featured dedicated application Cons: Requires installation

Method 5: Using the Compose Key

Set up a compose key to create emoji sequences:

  1. Go to Settings > Keyboard > Keyboard Shortcuts > Typing
  2. Set a Compose Key (Right Alt is common)
  3. Use combinations like:
    • Compose + : + ) for 😊
    • Compose + : + ( for 😞

Pros: Works system-wide Cons: Limited emoji selection, requires memorizing combinations

Method 6: Copy-Paste from the Web

A simple fallback option:

  1. Visit a website like Emojipedia
  2. Browse or search for emojis
  3. Copy and paste as needed

Pros: Access to all emojis with descriptions Cons: Requires internet access, less convenient

Method 7: Using Terminal and Commands

For terminal lovers, you can install

emote

:

sudo snap install emote

Then launch it from the terminal:

emote

Or set up a keyboard shortcut to launch it quickly.

Method 8: IBus Emoji

For those using IBus input method:

  1. Install IBus if not already installed:
    sudo apt install ibus
  2. Configure IBus to start at login:
    im-config -n ibus
  3. Log out and back in
  4. Press Ctrl+Shift+e to access the emoji picker in text fields

Troubleshooting Emoji Display Issues

If emojis appear as boxes or don’t display correctly:

  1. Install font support:
    sudo apt install fonts-noto-color-emoji
  2. Update font cache:
    fc-cache -f -v
  3. Log out and back in

Using Emojis in Specific Applications

In the Terminal

Most modern terminal emulators support emoji display. Try:

echo "Hello 👋 Ubuntu!"

In LibreOffice

Use the Insert > Special Character menu or the keyboard shortcuts mentioned above.

In Code Editors like VS Code

Most code editors support emoji input through the standard keyboard shortcuts or by copy-pasting.

Summary

Ubuntu offers multiple ways to type and use emojis, from built-in utilities to specialized applications. Choose the method that best fits your workflow, whether you prefer keyboard shortcuts, graphical selectors, or terminal-based solutions.

By incorporating these methods into your Ubuntu usage, you can enhance your communications with the visual expressiveness that emojis provide, bringing your Linux experience closer to what you might be used to on mobile devices.

More From Unixmen

Similar Articles

https://askubuntu.com/questions/1045915/how-to-insert-an-emoji-into-a-text-in-ubuntu-18-04-and-later/

http://www.omgubuntu.co.uk/2018/06/use-emoji-linux-ubuntu-apps

grep: Multiple String Search Feature

multiple string grep search

grep multiple string blog banner image

The “grep” command is short for “Global Regular Expression Print”. This is a powerful tool in Unix-based systems used to search and filter text based on specific patterns. If you work with too many text-based files like logs, you will find it difficult to search for multiple strings in parallel. “grep” has the ability to search for multiple strings simultaneously, streamlining the process of extracting relevant information from files or command outputs. In this article, let us explain the variants of grep, instructions on how to use grep multiple string search, practical examples, and some best practices. Let’s get started!

“grep” and Its Variants

At Unixmen, we always start with the basics. So, before diving into searching for multiple strings, it’s necessary to understand the basic usage of “grep” and its variants:

  • grep: Searches files for lines that match a given pattern using basic regular expressions.
  • egrep: Equivalent to “grep -E”, it interprets patterns as extended regular expressions, allowing for more complex searches. Note that “egrep” is deprecated but still widely used.
  • fgrep: Equivalent to “grep -F”, it searches for fixed strings rather than interpreting patterns as regular expressions.

You are probably wondering why we have two functions for doing the same job. egrep and grep -E do the same task and similarly, fgrep and grep -F have the same functionality. This is a part of a consistency exercise to make sure all commands have a similar pattern. At Unixmen, we recommend using grep -E and grep -F instead of egrep and fgrep respectively so that your code is future-proof.

Now, let’s get back to the topic. For example, to search for the word “error” in a file named “logfile.txt”, your code will look like:

grep "error" logfile.txt

How to Search for Multiple Strings with grep

There are multiple approaches to use grep to search for multiple strings. Let us learn each approach with some examples.

Using Multiple “-e” Options

The “-e`” option lets you specify multiple patterns. Each pattern is provided as an argument to “-e”:

grep -e "string1" -e "string2" filename

This command searches for lines containing either “string1” or “string2” in the specified file.

Using Extended Regular Expressions with “-E”

By enabling extended regular expressions with the “-E” option, you can use the pipe symbol “|” to separate multiple patterns within a single quoted string:

grep -E "string1|string2" filename

Alternatively, you can use the “egrep” command, which is equivalent to grep -E, but we do not recommend it considering egrep is deprecated.

egrep "pattern1|pattern2" filename

Both commands will match lines containing either “pattern1” or “pattern2”.

Using Basic Regular Expressions (RegEx) with Escaped Pipe

In basic regular expressions, the pipe symbol “|” is not recognized as a special character unless escaped. Therefore, you can use:

grep "pattern1\|pattern2" filename

This approach searches for lines containing either “pattern1” or “pattern2” in the specified file.

Practical Examples

Now that we know the basics and the multiple methods to use grep to search multiple strings, let us look at some real-world applications.

How to Search for Multiple Words in a File

If you have a file named “unixmen.txt” containing the following lines:

alpha bravo charlie
delta fox golf
kilo lima mike

To search for lines containing either “alpha” or “kilo”, you can use:

grep -E "apple|kiwi" sample.txt

The output will be:

apple banana cherry
kiwi lemon mango

Searching for Multiple Patterns in Command Output

You can also use grep to filter the output of other commands. For example, to search for processes containing either “bash” or “ssh” in their names, you can use:

ps aux | grep -E "bash|ssh"

This command will display all running processes that include “bash” or “ssh” in their command line.

Case-Insensitive Searches

To perform case-insensitive searches, add the “-i” option:

grep -i -e "string1" -e "string2" filename

This command matches lines containing “string1” or “string2” regardless of case.

How to Count Number of Matches

To count the number of lines that match any of the specified patterns, use the “-c” option:

grep -c -e "string1" -e "string2" filename

This command outputs the number of matching lines.

Displaying Only Matching Parts of Lines

To display only the matching parts of lines, use the “-o” option:

grep -o -e "string1" -e "string2" filename

This command prints only the matched strings, one per line.

Searching Recursively in Directories

To search for patterns in all files within a directory and its subdirectories, use the “-r” (short for recursive) option:

grep -r -e "pattern1" -e "pattern2" /path/to/directory

This command searches for the specified patterns in all files under the given directory.

How to Use awk for Multiple String Searches

While “grep” is powerful, there are scenarios where “awk” might be more suitable, especially when searching for multiple patterns with complex conditions. For example, to search for lines containing both “string1” and “string2”, you can use:

awk '/string1/ && /string2/' filename

This command displays lines that contain both “string1” and “string2”.

Wrapping Up with Some Best Practices

Now that we have covered everything there is to learn about using grep to search multiple strings, it may feel a little overwhelming. Here’s why it is worth the effort.

“grep” can be easily integrated into scripts to automate repetitive tasks, like finding specific keywords across multiple files or generating reports. It’s widely available on Unix-like systems and can often be found on Windows through tools like Git Bash or WSL. Knowing how to use “grep” makes your skills portable across systems. Mastering grep enhances your problem-solving capabilities, whether you’re debugging code, parsing logs, or extracting specific information from files. By leveraging regular expressions, grep enables complex pattern matching, which expands its functionality beyond simple string searches.

In short, learning grep is like gaining a superpower for text processing. Once you learn it, you’ll wonder how you ever managed without it!

Related Articles

.bashrc: The Configuration File of Linux Terminal

bashrc blog

bashrc blog image

Today at Unixmen, we are about to explain everything there is about the “.bashrc” file. This file serves as a script that initializes settings for interactive Bash shell sessions. The bashrc file is typically located in your home directory as a hidden file (“~/.bashrc”). This file lets you customize your shell environment, enhancing both efficiency and personalization. Let’s get started!

Why is the bashrc File Required?

Whenever a new interactive non-login Bash shell is launched like when you open a new terminal window, the “.bashrc” file is executed. This execution sets up the environment according to user-defined configurations, which includes:

  • Aliases: Shortcuts for longer commands to streamline command-line operations.
  • Functions: Custom scripts that can be called within the shell to perform specific tasks.
  • Environment variables: Settings that define system behaviour, such as the “PATH” variable, which determines where the system looks for executable files.
  • Prompt customization: Modifying the appearance of the command prompt to display information like the current directory or git branch.

By configuring these elements in “.bashrc” file, you can automate repetitive tasks, set up their preferred working environment, and ensure consistency across sessions.

How to Edit the “.bashrc” File

The “.bashrc” file resides in the your home directory and is hidden by default. Follow these instructions to view and edit this file:

  • Launch your terminal application. In other words, open the terminal window.
  • Navigate to the home directory by executing the “cd ~” command.
  • Use your preferred text editor to open the file. For example, to use “nano” to open the file, execute the command: “nano .bashrc”.

We encourage you to always create a backup of the .bashrc file before you make any changes to it. Execute this command to create a backup of the file:

cp ~/.bashrc ~/.bashrc_backup

When you encounter any errors, this precaution allows you to restore the original settings if needed.

Common Customizations (Modifications) to .bashrc File

Here are some typical modifications the tech community makes to their “.bashrc” file:

How to Add Aliases

Aliases create shortcuts for longer commands, saving time and reducing typing errors. For instance:

alias ll='ls -alF'
alias gs='git status'

When you add these lines to “.bashrc”, typing “ll” in the terminal will execute “ls -alF”, and “gs” will execute “git status”. In simpler terms, you are creating shortcuts in the terminal.

Defining Functions

If you are familiar with Python, you would already know the advantages of defining functions (Tip: If you want to learn Python, two great resources are Stanford’s Code in Place program and PythonCentral). Functions allow for more complex command sequences. For example, here is a function to navigate up multiple directory levels:

up() {
local d=""
limit=$1
for ((i=1 ; i <= limit ; i++))
do
d="../$d"
done
d=$(echo $d | sed 's/\/$//')
cd $d
}

Adding this function lets you type “up 3” to move up three directory levels.

How to Export Environment Variables

Setting environment variables can configure system behaviour. For example, adding a directory to the “PATH”:

export PATH=$PATH:/path/to/directory

This addition lets the executables in “/path/to/directory” be run from any location in the terminal.

Customizing the Prompt

The appearance of the command prompt can be customized to display useful information. For example, execute this command display the username (“\u”), hostname (“\h”), and current working directory (“\W”).

export PS1="\u@\h \W \$ "

How to Apply Changes

After editing and saving the .bashrc file, apply the changes to the current terminal session by sourcing the file. To apply the changes, execute the command:

source ~/.bashrc

Alternatively, closing and reopening the terminal will also load the new configurations.

Wrapping Up with Some Best Practices

That is all there is to learn about the bashrc file. Here are some best practices to make sure you do not encounter any errors.

  • Always add comments to your .bashrc file to document the purpose of each customization. This practice aids in understanding and maintaining the file.
  • For extensive configurations, consider sourcing external scripts from within .bashrc to keep the file organized.
  • Be very careful when you add commands that could alter system behaviour or performance. Test new configurations in a separate terminal session before applying them globally.

By effectively utilizing the “.bashrc” file, you can create a tailored and efficient command-line environment that aligns with their workflow and preferences.

Related Articles

Windows Linux Subsystem (WSL): Run Linux on Windows

wsl blog

windows linux subsystem tutorial

The Windows Subsystem for Linux (WSL) is a powerful tool that allows you to run a Linux environment directly on Windows. WSL gives you seamless integration between the two most common operating systems. One of the key features of WSL is the ability to access and manage files across both Windows and Linux platforms. Today at Unixmen, we will walk you through the methods to access Windows files from Linux within WSL and vice versa. Let’s get started!

How to Access Windows Files from WSL

In WSL, Windows drives are mounted under the “/mnt” directory, allowing Linux to interact with the Windows file system. Here’s how you can navigate to your Windows files:

Step 1: Locate the Windows Drive

Windows drives are mounted as “/mnt/<drive_letter>”. For example, the C: drive is accessible at “/mnt/c”.

Step 2: Navigate to Your User Directory

To access your Windows user profile, use the following commands:

cd /mnt/c/Users/<Your_Windows_Username>

Replace “<Your_Windows_Username>” with your actual Windows username.

Step 3: List the Contents

Once you are in your user directory, you can list the contents using:

ls

This will display all files and folders in your Windows user directory.

By navigating through “/mnt/c/”, you can access any file or folder on your Windows C: drive. This integration lets you manipulate Windows files using Linux commands within WSL.

Steps to Access WSL Files from Windows

In Windows accessing files stored within the WSL environment is very straightforward. Here is how you can do it:

Using File Explorer:

  1. Open File Explorer.
  2. In the address bar, type “\\wsl$” and press the Enter key.
  3. You’ll see a list of installed Linux distributions.
  4. Navigate to your desired distribution to access its file system.

Direct Access to Home Directory:

For quick access to your WSL home directory, navigate to:

\\wsl$\<Your_Distribution>\home\<Your_Linux_Username>

Replace “<Your_Distribution>” with the name of your Linux distribution (e.g., Ubuntu) and “<Your_Linux_Username>” with your Linux username.

This method allows you to seamlessly transfer files between Windows and WSL environments using the familiar Windows interface.

Best Practices

At Unixmen, we recommend these best practices for better file management between Windows and WSL.

  • File location: For optimal performance, store project files within the WSL file system when you work primarily with Linux tools. If you need to use Windows tools on the same files, consider storing them in the Windows file system and accessing them from WSL.
  • Permissions: Be mindful of file permissions. Files created in the Windows file system may have different permissions when accessed from WSL.
  • Path conversions: Use the “wslpath” utility to convert Windows paths to WSL paths and vice versa:
wslpath 'C:\Users\Your_Windows_Username\file.txt'

This command will output the equivalent WSL path.

Wrapping Up

By understanding these methods and best practices, you can effectively manage and navigate files between Windows and Linux environments within WSL, enhancing your workflow and productivity.

Related Links

Pip: Uninstall Packages Instructions with Best Practices

pip uninstall package blog

pip uninstall package

If you work with Python a lot, you might be familiar with the process of constantly installing packages. But what happens when you decide that a package is no longer required? That is when you use “pip” to uninstall packages. The “pip” tool, which is Python’s package installer, offers a straightforward method to uninstall packages.

Today at Unixmen, we will walk you through the process, ensuring even beginners can confidently manage their Python packages. Let’s get started!

What is pip and Its Role in Python Package Management

“pip” team named their product interestingly because it stands for “Pip Installs Packages”. It is the standard package manager for Python. It lets you install, update, and remove Python packages from the Python Package Index (PyPI) and other indexes. You will need package management to be as efficient as possible because that ensures your projects remain organized and free from unnecessary or conflicting dependencies.

How to Uninstall a Single Package with “pip”

Let us start with simple steps. Here is how you can remove a package using pip. First, open your system’s command line interface (CLI or terminal):

  • On Windows, search for “cmd” or “Command Prompt” in the Start menu.
    On macOS or Linux, open the Terminal application.
  • Type the following command, replacing “package_name” with the name of the package you wish to uninstall:
pip uninstall package_name

For example, to uninstall the `requests` package:

pip uninstall requests

As a precaution, always confirm the uninstallation process. “pip” will display a list of files to be removed and prompt for confirmation like this:

Proceed (y/n)?

When you see this prompt, type “y” and press the Enter key to proceed. This process makes sure that the specified package is removed from your Python environment.

Uninstall Multiple Packages Simultaneously

Let’s take it to the next level. Now that we are familiar with uninstalling a single package, let us learn how to uninstall multiple packages at once. When you need to uninstall multiple packages at once, “pip” allows you to do so by listing the package names separated by spaces. Here is how you can do it:

pip uninstall package1 package2 package3

For example, to uninstall both “numpy” and “pandas”:

pip uninstall numpy pandas

As expected, when this command is executed, a prompt will appear for confirmation before removing each package.

How to Uninstall Packages Without Confirmation

When you are confident that you are uninstalling the correct package, the confirmation prompts will be a little irritating. To solve this and bypass the confirmation prompts, use the “-y”flag:

pip uninstall -y package_name

What is being done here is you are instructing the command prompt that it has confirmation with the “-y” flag. This is particularly useful in scripting or automated workflows where manual intervention is impractical.

Uninstalling All Installed Packages

To remove all installed packages and achieve a clean slate, you can use the following command:

pip freeze | xargs pip uninstall -y

Here’s a breakdown of the command:

  • “pip freeze” lists all installed packages.
  • “xargs” takes this list and passes each package name to “pip uninstall -y”, which uninstalls them without requiring confirmation.

Be very careful when you are executing this command. This will remove all packages in your environment. Ensure this is your intended action before proceeding.

Best Practices for Managing Python Packages

We have covered almost everything when it comes to using pip to uninstall packages. Before we wrap up, let us learn the best practices as well.

  • Always use virtual environments to manage project-specific dependencies without interfering with system-wide packages. Tools like “venv” (included with Python 3.3 and later) or “virtualenv” can help you create isolated environments.
  • Periodically check for and remove unused packages to keep your environment clean and efficient.
  • Documentation can be boring for most of the beginners but always maintain a “requirements.txt” file for each project, listing all necessary packages and their versions. This practice aids in reproducibility and collaboration.
  • Prefer installing packages within virtual environments rather than globally to avoid potential conflicts and permission issues.

Wrapping Up

Managing Python packages is crucial for maintaining a streamlined and conflict-free development environment. The “pip uninstall” command provides a simple yet powerful means to remove unnecessary or problematic packages. By understanding and utilizing the various options and best practices outlined in this guide, even beginners can confidently navigate Python package management.

Related Articles

fstab: Storage Resource Configuration File

fstab blog

fstab tutorial

Today at Unixmen, we are about to explain a key configuration file that defines how disk partitions, devices, and remote filesystems are mounted and integrated into the system’s directory structure. The file we are talking about is the “/etc/fstab”. By automating the mounting process at boot time, fstab ensures consistent and reliable access to various storage resources.

In this article, we will explain the structure, common mount options, best practices, and the common pitfalls learners are prone to face. Let’s get started!

Structure of the “/etc/fstab” File

Each line in the “fstab” file represents a filesystem and contains six fields, each separated by spaces or tabs. Here are the components:

  • Filesystem: Specifies the device or remote filesystem to be mounted, identified by device name (for example: “/dev/sda1”) or UUID.
  • Mounting point: The directory where the filesystem will be mounted, such as “/”, “/home”, or “/mnt/data”.
  • Filesystem type: Indicates the type of filesystem, like “ext4”, “vfat”, or “nfs”.
  • Options: Comma-separated list of mount options that control the behaviour of the filesystem like “defaults”, “noatime”, “ro”.
  • Dump: A binary value (0 or 1) used by the “dump” utility to decide if the filesystem needs to be backed up.
  • Pass: An integer (0, 1, or 2) that determines the order in which “fsck” checks the filesystem during boot.

Some of the Common Mount Options

Let us look at some of the common mount options:

  • defaults: This option applies the default settings: “rw”, “suid”, “dev”, “exec”, “auto”, “nouser”, and “async”.
  • noauto: Prevents the filesystem from being mounted automatically at boot.
  • user: Allows any user to mount the filesystem.
  • nouser: Restricts mounting to the superuser.
  • ro: Mounts the filesystem as read-only.
  • rw: Mounts the filesystem as read-write.
  • sync: Ensures that input and output operations are done synchronously.
  • noexec: Prevents execution of binaries on the mounted filesystem.

As usual, let us understand the concept of “fstab” with an example. Here is a sample entry:

UUID=123e4567-e89b-12d3-a456-426614174000 /mnt/data ext4 defaults 0 2

Let us break down this example a little.

  • UUID=123e4567-e89b-12d3-a456-426614174000: Specifies the unique identifier of the filesystem.
  • /mnt/data: Designates the mount point.
  • ext4: Indicates the filesystem type.
  • defaults: Applies default mount options.
  • 0: Excludes the filesystem from “dump” backups.
  • 2: Sets the “fsck” order. Non-root filesystems are typically assigned “2”.

Best Practices

While the fstab file is a pretty straightforward component, here are some best practices to help you work more efficiently.

  • Always use UUIDs or labels: Employing UUIDs or filesystem labels instead of device names (like “/dev/unixmen”) enhances reliability, especially when device names change due to hardware modifications.
  • Create backups before editing: Always create a backup of the “fstab” file before making changes to prevent system boot issues.
  • Verify entries: After editing “fstab”, test the configuration with “mount -a” to ensure all filesystems mount correctly without errors.

Common Pitfalls You May Face

Misconfigurations in this file can lead to various issues, affecting system stability and accessibility. Common problems you could face include:

Incorrect device identification: Using device names like “/dev/sda1” can be problematic, especially when hardware changes cause device reordering. This can result in the system attempting to mount the wrong partition. Using an incorrect Universally Unique Identifier (UUID) can prevent the system from locating and mounting the intended filesystem, leading to boot failures.

Misconfigured mount options: Specifying unsupported or invalid mount options can cause mounting failures. For example, using “errors=remount-rw” instead of the correct “errors=remount-ro” will cause system boot issues.

File system type mismatch: Specifying an incorrect file system type can prevent proper mounting. For example, specifying an “ext4” partition as “xfs” in “fstab” will result in mounting errors.

Wrapping Up

You could have noticed that the basics of fstab does not feel that complex, but we included a thorough section for the best practices and challenges. This is because identifying the exact cause of fstab error is little difficult for the untrained eye. The error messages can be vague and non-specific. Determining the proper log fail for troubleshooting is another pain. We recommend including the “nofail” option, so that the system boots even if the device is unavailable. Now you are ready to work with the fstab file!

Related Articles


Linux SQL Server Database Recovery: Restoring Corrupt Databases

Microsoft MS SQL server supports Linux operating systems, including Red Hat Enterprise Linux, Ubuntu, and container images on Virtual machine platforms like Kubernetes, Docker engine, and OpenShift. Regardless of the platform on which you are using SQL Server, the databases are prone to corruption and inconsistencies. If your MDF/NDF files on a Linux system get corrupted for any reason, you can repair them. In this post, we’ll discuss the procedure to repair and restore a corrupt SQL database on a Linux system.

Causes of corruption in MDF/NDF files in Linux:

The SQL database files stored in Linux system can get corrupted due to one of the following reasons:

  • Sudden system shutdown.
  • Bugs in the Server
  • The system’s hard drive, where the database files are saved, has bad sectors.
  • The operating system suddenly crashes at the time you are working on the database.
  • Hardware or malware infection.
  • The system runs out of space.

Ways to repair and restore corrupt SQL databases in Linux

To repair the corrupt SQL database file stored on Linux system, you can use SQL Server management studio on Ubuntu or Red hat enterprise itself Or use a professional SQL repair tool.

Steps to repair a corrupt SQL database on a Linux system:

  • First, launch the SQL Server on your Linux system by the below steps:
  • Open the terminal by Ctrl+Alt+T or ALT +F2
  • Next, run the command below with the application name and then press the Enter key.

sudo systemctl start mssql-server

  • In SSMS, follow the below steps to restore and repair the database file on Linux system:

Step 1- If you have an updated Backup file, you can use it to restore the corrupt Database. Here’s the command:

BACKUP DATABASE [AdventureWorks2019] TO DISK = N’C:\backups\DBTesting.bak’ WITH DIFFERENTIAL, NOFORMAT, NOINIT, NAME = N’AdventureWorks2019-Full Database Backup’, SKIP, NOREWIND, NOUNLOAD, STATS = 10

GO

Step 2- If you have no backup, then, with Admin rights, run the DBCC CHECKDB command on SQL Server Management Studio (SSMS). Here the corrupted database name is “DBTesting”. Before using the command, first change the status to SET SINGLE_USER. Here is the command:

ALTER DATABASE DBTesting SET SINGLE_USER

DBCC CHECKDB (‘DBTesting’, REPAIR_REBUILD)

GO

  • alter database
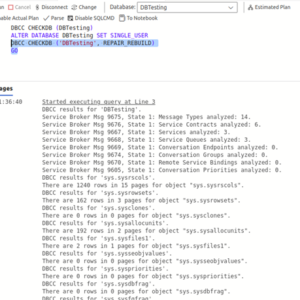
If REPAIR_REBUILD tool fails to repair the problematic MDF file then you can try the below REPAIR_ALLOW_DATA_LOSS command of DBCC CHECKDB command:

DBCC CHECKDB (N ’Dbtesting’, REPAIR_ALLOW_DATA_LOSS) WITH ALL_ERRORMSGS, NO_INFOMSGS;

GO

  • repair rebuild
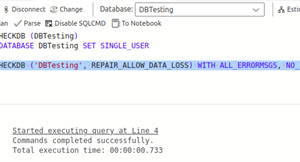
Next, change the mode of the database from SINGLE_USER to MULTI_USER by executing the below command:

ALTER DATABASE DBTesting SET MULTI_USER

set multi user
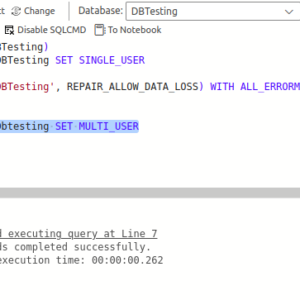
Using the above command can help you repair corrupt MDF file but it may removes majority of the data pages containing inconsistent data while repairing. Due to which, you can lose your data.
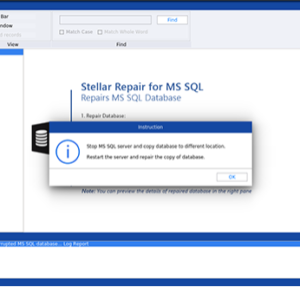
Step 3-Use a Professional SQL Repair tool:

If you don’t want to risk data in database then install a professional MS SQL recovery tool such as Stellar Repair for MSSQL. The tool is equipped with enhanced algorithms that can help you repair corrupt or inconsistent MDF/NDF file even in Linux system. Here are the steps to install and launch Stellar Repair for MS SQL:

  • First open Terminal on Linux/Ubuntu
  • Next, run the below command:

$ sudo apt install app_name  

Here: Add the absolute path of the Stellar Repair for MSSQL tool.

  • Next, launch the application in your Ubuntu using the below steps:
  • On your desktop, find, and click
  • In the Activities overview window, locate the Stellar Repair for MS SQL application and press the Enter key.
  • Enter the system password to authenticate.
  • Next, select the database in Stellar Repair for MS SQL’s user interface by clicking on Select Database.

To Conclude

If you are working on an SQL Server installed on a Linux system on the Virtual machine, your system suddenly crashes and the MDF file gets corrupted. In this case or any other scenarios where the SQL database file become inaccessible on Linux system, you can repair it using the two methods described above. To repair corrupt MDF files quickly, without data loss and file size restrictions, you can use the help of a professional MS SQL Repair tool. The tool supports repairing MDF files in both Windows and Linux systems.

Best Way to Document Harmful Content for Removal

linux documentHave you ever searched your name or your brand and found content that you didn’t expect to see? 

Maybe a page that doesn’t represent you well or something you want to keep track of for your records? 

If you’re using Linux or Unix, you’re in a great position to take control of that situation. With just a few simple tools, you can save, organize, and monitor any kind of web content with ease. 

This guide walks you through how to do that, step by step, using tools built right into your system.

This isn’t just about removing content. It’s also about staying informed, being proactive, and using the strengths of Linux and Unix to help you manage your digital presence in a reliable way.

Let’s take a look at how you can start documenting web content using your system.

Why Organizing Online Content Is a Smart Move

When something important appears online—like an article that mentions you, a review of your product, or even a discussion thread—it helps to keep a copy for reference. Many platforms and services ask for details if you want them to update or review content. Having all the right information at your fingertips can make things smoother.

Good records also help with transparency. You’ll know exactly what was published and when, and you’ll have everything you need if you ever want to take action on it.

Linux and Unix systems are perfect for this kind of work because they give you flexible tools to collect and manage web content without needing extra software. Everything you need is already available or easily installable.

Start by Saving the Page with wget

The first step is to make sure you have a full copy of the page you’re interested in. This isn’t just about saving a screenshot—it’s about capturing the full experience of the page, including images, links, and layout.

You can do this with a built-in tool called wget. It’s easy to use and very reliable.

Here’s a basic command:

css

CopyEdit

wget –mirror –convert-links –adjust-extension –page-requisites –no-parent https://example.com/the-page

This command downloads the full version of the page and saves it to your computer. You can organize your saved pages by date, using a folder name like saved_pages_2025-04-10 so everything stays neat and searchable.

If you don’t have wget already, most systems let you install it quickly with a package manager like apt or yum.

Keep a Log of Your Terminal Session

If you’re working in the terminal, it’s helpful to keep a record of everything you do while gathering your content. This shows a clear trail of how you accessed the information.

The script command helps with this. It starts logging everything that happens in your terminal into a text file.

Just type:

perl

CopyEdit

script session_log_$(date +%F_%H-%M-%S).txt

Then go ahead and run your commands, visit links, or collect files. When you’re done, just type exit to stop the log. This gives you a timestamped file that shows everything you did during that session, which can be useful if you want to look back later.

Capture Screenshots with a Timestamp

Screenshots are one of the easiest ways to show what you saw on a page. In Linux or Unix, there are a couple of simple tools for this.

If you’re using a graphical environment, scrot is a great tool for quick screenshots:

nginx

CopyEdit

scrot ‘%Y-%m-%d_%H-%M-%S.png’ -e ‘mv $f ~/screenshots/’

If you have ImageMagick installed, you can use:

perl

CopyEdit

import -window root ~/screenshots/$(date +%F_%H-%M-%S).png

These tools save screenshots with the date and time in the filename, which makes it super easy to sort and find them later. You can also create a folder called screenshots in your home directory to keep things tidy.

Use Checksums to Confirm File Integrity

When you’re saving evidence or tracking content over time, it’s a good idea to keep track of your files’ integrity. A simple way to do this is by creating a hash value for each file.

Linux and Unix systems come with a tool called sha256sum that makes this easy.

Here’s how you can use it:

bash

CopyEdit

sha256sum saved_page.html > hash_log.txt

This creates a unique signature for the file. If you ever need to prove that the file hasn’t changed, you can compare the current hash with the original one. It’s a good way to maintain confidence in your saved content.

Organize Your Files in Folders

The key to staying organized is to keep everything related to one event or day in the same folder. You can create a structure like this:

bash

CopyEdit

~/web_monitoring/

  2025-04-10/

    saved_page.html

    screenshot1.png

    session_log.txt

    hash_log.txt

This kind of structure makes it easy to find and access your saved pages later. You can even back these folders up to cloud storage or an external drive for safekeeping.

Set Up a Simple Monitor Script

If you want to stay on top of new mentions or changes to a particular site or keyword, you can create a simple watch script using the command line.

One popular method is to use curl to grab search results, then filter them with tools like grep.

For example:

bash

CopyEdit

curl -s “https://www.google.com/search?q=your+name” > ~/search_logs/google_$(date +%F).html

You can review the saved file manually or use commands to highlight certain keywords. You can also compare today’s results with yesterday’s using the diff command to spot new mentions. Additionally if needed you can also go for how do you delete a google search result.

To automate this, just create a cron job that runs the script every day:

nginx

CopyEdit

crontab -e

Then add a line like this:

ruby

CopyEdit

0 7 * * * /home/user/scripts/search_watch.sh

This runs the script at 7 a.m. daily and stores the results in a folder you choose. Over time, you’ll build a personal archive of search results that you can refer to anytime.

Prepare Your Submission Package

If you ever need to contact a website or a service provider about a page, it’s helpful to have everything ready in one place. That way, you can share what you’ve collected clearly and professionally.

Here’s what you might include:

  • The exact URL of the page
  • A brief explanation of why you’re reaching out
  • A copy of the page you saved
  • One or more screenshots
  • A summary of what you’re requesting

Some platforms also have forms or tools you can use. For example, search engines may provide an online form for submitting requests.

If you want to contact a site directly, you can use the whois command to find the owner or hosting provider:

nginx

CopyEdit

whois example.com

This will give you useful contact information or point you toward the company that hosts the site.

Automate Your Process with Cron

Once you have everything set up, you can automate the entire workflow using cron jobs. These scheduled tasks let your system do the work while you focus on other things.

For example, you can schedule daily page saves, keyword searches, or hash checks. This makes your documentation process consistent and thorough, without any extra effort after setup.

Linux and Unix give you the tools to turn this into a fully automated system. It’s a great way to stay prepared and organized using technology you already have.

Final Thoughts

Linux and Unix users have a unique advantage when it comes to documenting web content. With simple tools like wget, script, and scrot, you can create a complete, organized snapshot of any page or event online. These tools aren’t just powerful—they’re also flexible and easy to use once you get the hang of them.

WEBM to MP3: How can You Convert In Linux

methods to convert webm to mp3 file

WEBM is one of the most popular video formats used for web streaming. MP3 is one of the formats used for audio playback. There will be times where you will need to extract audio from a WEBM file and covert it to a MP3 file. With Linux, there are command-line tools for almost everything and this use case is not an exception. In this guide, we will explain different methods to convert WEBM to MP3 using ffmpeg, sox, and a few online tools.

Why Should You Convert WEBM to MP3?

Let us see some use cases where you will have to convert a WEBM file to MP3 file:

  • You need only the audio from a web video
  • Your media player does not play WEBM file
  • Convert a speech recording from video to audio format
  • Reduce file size for storage and sharing

How to Convert WEBM to MP3 Using ffmpeg

Let us use Linux’s in-built tool “ffmpeg” to extract audio from a WEBM file.

How to Install ffmpeg

If your Linux system already has ffmpeg, you can skip this step. If your device doesn’t have this command-line tool installed, execute the appropriate command based on the distribution:

sudo apt install ffmpeg # For Debian and Ubuntu
sudo dnf install ffmpeg # For Fedora
sudo pacman -S ffmpeg # For Arch Linux

Convert with Default Settings

To convert a WEBM file to MP3, execute this command:

ffmpeg -i WEBMFileName.webm -q:a 0 -map a MP3FileOutput.mp3

How to Convert and Set a Specific Bitrate

To set a bitrate while converting WEBM to MP3, execute this command:

ffmpeg -i WEBMFileName.webm -b:a 192k MP3FileOutput.mp3

How to Extract Only a Specific Part of Video to Audio

There will be times where you don’t have to extract the complete audio from a WEBM file. In those cases, specify the timestamp by following this syntax:

ffmpeg -i WEBMFileName.webm -ss 00:00:30 -to 00:01:30 -q:a 0 -map a MP3Output.mp3

Executing this command extracts the audio between timestamps 30 seconds and one minute 30 seconds and saves it as a MP3 file.

Advanced WEBM to MP3 Conversion

Here is an alternative command that processes the WEBM file faster. This method uses “-vn” parameter to remove the video and uses the LAME MP3 encoder (indicated by the “-acodec libmp3lame” parameter) and sets a quality scale of 4. This balances the file size and quality.

ffmpeg -i input.webm -vn -acodec libmp3lame -q:a 4 output.mp3

How to Convert WEBM to MP3 Using sox

The “sox” tool is an “ffmpeg” alternative. To install sox, execute the command:

sudo apt install sox libsox-fmt-all

This command works best for Debian and Ubuntu distros. If the above command does not work, use the ffmpeg tool explained earlier.

To extract audio from the WEBM file, use the command:

sox WEBMFileName.webm AudioFile.mp3

How to Use avconv to Extract Audio

Some Linux distributions provide “avconv”, part of the libav-tools package, as an alternative to ffmpeg. Here is how you can use install and use it to extract MP3 audio from a WEBM file:

sudo apt install libav-tools
avconv -i VideoFile.webm -q:a 0 -map a AudioFile.mp3

How to Convert WEBM to MP3 Using Online Tools

If you do not have a Linux device at the moment, prefer a graphical user interface, or in a hurry to get the audio extracted from WEBM files, you can use any of these web-based converters:

How to Check MP3 File Properties

Once you have converted the WEBM file to a MP3 file, it is a good practice to check the properties or details of the MP3 file. To do that, execute the command:

ffmpeg -i ExtractedAudioFile.mp3

One of the best practices is to check the audio bitrate and format by executing the command:

mediainfo ExtractedAudioFile.mp3

How to Automate WEBM to MP3 Conversion

The simple answer to this problem is by using scripts. Auto converting video files to audio files will help you if you frequently convert a large number of files. Here is a sample script to get you started. You can tweak this script to your requirements based on the command we just explained earlier.

for file in *.webm; do
ffmpeg -i "$file" -q:a 0 -map a "${file%.webm}.mp3"
done

Next step is to save this script with the name “convert-webm.sh” and make it executable.

chmod +x convert-webm.sh

To run this script in a directory with WEBM files, navigate to the required directory in the terminal window and run the command:

./convert-webm.sh

Key Takeaways

Extracting audio from a WEBM file and saving it as MP3 file is very easy if you have a Linux device. Using tools like ffmpeg, sox, and avconv, this seemingly daunting task gets over in matter of a few seconds. If you frequently do this, consider creating a script and run it on the directory containing the required WEBM files. With these techniques, you can extract and save high-quality audio files from a WEBM video file.

We have explained more about ffmpeg module in our detailed guide to TS files article. We believe it will be useful for you.

Linux Tips and Tricks: With Recent Updates

linux tips and tricks

recent linux tips and tricks

Working with Linux is easy if you know how to use commands, scripts, and directories to your advantage. Let us give you some Linux tips and tricks to mov It is no secret that tech-savvy people prefer Linux distributions to Windows operating system because of reasons like:

  • Open source
  • Unlimited customizations
  • Multiple tools to choose from

In this detailed guide, let us take you through the latest Linux tips and tricks so that you can use your Linux systems to its fullest potentials.

Tip 1: How to Navigate Quickly Between Directories

Use these tips to navigate between your directories:

How to return to the previous directory: Use “cd -” command to switch back to your last working directory. This helps you save time because you need not type the entire path of the previous directory.

How to navigate to home directory: Alternatively, you can use “cd” or “cd ~” to return to your home directory from anywhere in the terminal window.

Tip 2: How to Utilize Tab Completion

Whenever you are typing a command or filename, press the “Tab” key in your keyboard to auto-complete it. This helps you reduce errors and save time. For example, if you type “cd Doc”, pressing the “Tab” key will auto complete the command to “cd Documents/”.

Tip 3: How to Run Multiple Commands in Sequence

To run commands in a sequence, use the “;” separator. This helps you run commands sequentially, irrespective of the result of previous commands. Here is an example:

command1; command2; command3

What should you do if the second command should be run only after the success of the first command? It is easy. Simply replace “;” with “&&”. Here is an example:

command1 && command2

Consider another example. How can you structure your commands in such a way that the second command should be run only when the first command fails? Simple. Replace “&&” with “||”. Here is an example to understand better:

command1 || command2

Tip 4: How to List Directory Efficiently

Instead of typing “ls -l” to list the contents of a directory in long format, use the shorthand “ll” and it will give you the same result.

Tip 5: Use Command History to Your Advantage

Let’s face it. Most of the times, we work with only a few commands, repeated again and again. In those cases, your command history and your previous commands are the two things you will need the most. To do this, let us see some tricks.

Press Ctrl + R and start typing to search through your command history. Press the keys again to cycle through the matches.

To repeat the command you executed last, use “!!” or “!n”. Replace “n” with the command’s position in your command history.

Tip 6: Move Processes to Background and Foreground

To send a process to background, simply append “&” to a command. This pushes the process to the background. Here is an example syntax:

command1 &

To move a foreground process to background, first suspend the foreground process by pressing Ctrl + Z, and then use “bg” (short for background) to resume the process in background.

To bring a background process to foreground, use “fg” (short for foreground). This brings the background process to foreground.

Tip 7: How to Create and Use Aliases

If you frequently use a selective few commands, you can create aliases for them. Add “.bashrc” or “.zshrc” to your shell configuration file. Here is an example to understand better. We are going to assign the alias “update” to run two commands in sequence:

alias update='sudo apt update && sudo apt upgrade'

Once you have added the alias, reload the configuration with “source ~/.bashrc” or the appropriate file to start using the alias.

Tip 8: How to Redirect the Output of a Command to a File

The next trick we are going to learn in our list of Linux tips and tricks is the simple operator, that will redirect the command output to a file and overwrite existing content: >

Use the “>” operator to redirect command output to a file. Here is an example syntax:

command123 > file.txt

To append the output to a file, use “>>”. Here is how you can do it:

command123 >> file.txt

Tip 9: How to use Wildcards for Batch Operations

Wildcards are operators that help in performing multiple operations on multiple files. Here are some wildcards that will help you often:

  • Asterisk (`*`): Represents zero or more characters. For example, `rm *.txt` deletes all `.txt` files in the directory.
  • Question Mark (`?`): Represents a single character. For example, `ls file?.txt` lists files like `file1.txt`, `file2.txt`, etc.

Tip 10: How to Monitor System Resource Usage

Next in our Linux tips and tricks list, let us see how to view the real-time system resource usage, including CPU, memory, and network utilization. To do this, you can run “top” command. Press “q” key to exit the “top” interface.

Wrapping Up

These are our top 10 Linux tips and tricks. By incorporating these tips into your workflow, you can navigate the Linux command line more efficiently and effectively.

Related Articles

Open-Source Photoshop Alternatives: Top 5 list

top 5 open source photoshop alternatives

One of the major advantages of using Unix-based operating systems is the availability of robust open-source alternatives for most of the paid tools you are used to. The growing demand has led to the open-source community churning out more and more useful tools every day. Today, let us see an open-source alternative for Adobe Photoshop. For those who used different image editing tools, Photoshop is a popular image editing tool with loads of features that can help even beginners to edit pictures with ease.

Let us see some open source photoshop alternatives today, their key features, and how they are unique.

GIMP: GNU Image Manipulation Program

You might have seen the logo of this tool: a happy animal holding a paint brush in its jaws. GIMP is one of the most renowned open-source image editors. It is also available on other operating systems like macOS and Windows, in addition to Linux. It is loaded to the brim with features, making it a great open-source alternative to Photoshop.

Key Features of GIMP

  • Highly customizable: GIMP gives you the flexibility to modify the layout and functionality so suit your personal workflow preferences.
  • Enhanced picture enhancement capabilities: It offers in-built tools for high-quality image manipulation, like retouch and restore images.
  • Extensive file formats support: GIMP supports numerous formats of files making it the only tool you will need for your image editing tasks.
  • Integrations (plugins): In addition to the host of features GIMP provides, there is also an option to get enhanced capabilities by choosing them from GIMP’s plugin repository.

If you are familiar with Photoshop, GIMP provides a very similar environment with its comprehensive suite of tools. Another advantage of GIMP is its vast and helpful online community. The community makes sure the regular updates are provided and numerous tutorials for each skill level and challenge.

Krita

Krita was initially designed to be a painting and illustration tool but now with the features it accumulated over the years, it is now a versatile image editing tool.

Key Features of Krita

  • Brush stabilizers: If you are an artist who prefers smooth strokes, Krita offers brush stabilizers which makes this tool ideal for you.
  • Support for vector art: You can create and manipulate vector graphics, making it suitable for illustrations and comics.
  • Robust layer management: Krita provides layer management, including masks and blending modes.
  • Support for PSD format: Krita supports Photoshop’s file format “PSD”, making it a great tool for collaboration across platforms.

Krita’s user interface is very simple. But do not let that fool you. It has powerful features that makes it one of the top open-source alternatives for Photoshop. Krita provides a free, professional-grade painting program and a warm and supportive community.

Inkscape

Inkscape used to be a vector graphics editor. Now it offers capabilities that provide raster image editing, making it a useful tool for designers.

Key Features of Inkscape

  • Flexible drawing: You can create freehand drawings with a range of customizable brushes.
  • Path operations: Inkscape provides advanced path manipulation allows for complex graphic designs.
  • Object creation tools: Inkscape provides a range of tools for drawing, shaping, and text manipulation.
  • File formats supported: Supports exporting to various formats, including PNG and PDF.

Inkscape is particularly useful for tasks involving logo design, technical illustrations, and web graphics. Its open-source nature ensures that it remains a continually improving tool, built over the years by contributions from a global community of developers and artists.

Darktable

Darktable doubles as a virtual light-table and a darkroom for photographers. This helps in providing a non-destructive editing workflow.

Key Features of Darktable

  • Image processing capabilities: Darktable supports a wide range of cameras and allows for high-quality RAW image development.
  • Non-destructive editing: Whenever you edit an image, the edits are stored in a separate database, keeping your original image unaltered.
  • Tethered shooting: If you know your way around basic photography, you can control camera settings and capture images directly from the software.
  • Enhanced colour management: Darktable offers precise control over colour profiles and adjustments.

Though Darktable is buit for photographers, it has evolved as an open-source alternative for RAW development and photo management. Its feature-rich platform ensures that users have comprehensive control over their photographic workflow.

MyPaint

This is a nimble and straightforward painting application. This tool is primarily designed to cater to the needs of digital artists focusing on digital sketching.

Key Features of MyPaint

  • Extensive brush collection: MyPaint offers a variety of brushes to choose from, simulating the traditional media.
  • Unlimited canvas: This is one of the few tools that offers unlimited canvas and you don’t have to worry about canvas boundaries.
  • UI with least distraction: Provides a full-screen mode to allow you to focus only on your work.
  • Compatibility with hardware: MyPaint offers support for pressure-sensitive graphic tablets for a natural drawing experience.

MyPaint’s simplicity and efficiency make it an excellent open-source alternative for Photoshop. This tool is for artists seeking a focused environment for sketching and painting.

Key Takeaways

The open-source community offers a diverse array of powerful alternatives to Adobe Photoshop, each tailored to specific creative needs. Whether you’re a photographer, illustrator, or graphic designer, these tools provide robust functionalities to support your efforts on Unix-based systems.

By integrating these tools into your workflow, you can achieve professional-grade results without the constraints of proprietary software.

Related Articles

How to add watermark to your images with Python

TS File: Guide to Learn Transport Stream Files in Linux

ts files walkthroughTS file is a standard format for video and audio data transmission. TS file stands for transport stream file. This format of file is commonly used for broadcasting, video streaming, and storing media content in a structured format.

In this detailed guide, let us explain what a TS file is, how it works, and how to work with them in Linux systems.

What is a TS File

A TS file is a video format used to store MPEG-2 compressed video and audio. It is primarily used to:

  • Broadcast television video (DVB ad ATSC)
  • Streaming services
  • Blu-ray discs
  • Video recording systems

Transport stream files ensure error resilience and support numerous data streams. This makes them ideal to transmit over unreliable networks.

How to Play TS Files in Linux

You can use many media players to play TS files, but we recommend open-source media players. Here are some of them:

VLC Media Player

To use VLC media player to open a transport stream file named “unixmen”, execute this command:

vlc unixmen.ts

MPV Player

If you would like to use MPV player to play a transport stream file named “unixmen”, execute this command:

mpv unixmen.ts

MPlayer

Another open-source alternative we recommend is the MPlayer. To play using MPlayer, execute this command:

mplayer file.ts

How to Convert a TS File

With the “ffmpeg” component to convert a transport stream file to other formats.

How To Convert a TS File to MP4

To convert a transport stream file named “unixmen” to MP4 format, execute this command:

ffmpeg -i unixmen.ts -c:v copy -c:a copy unixmen.mp4

How Can You Convert a TS File to MKV

Execute this command to convert a transport stream file named “fedora” to MKV:

ffmpeg -i fedora.ts -c:v copy -c:a copy fedora.mkv

How to Edit a TS File

To cut or trim down a transport stream video file named “kali” between 10 seconds and 1 minute without re-encoding, follow this syntax:

ffmpeg -i kali.ts -ss 00:00:10 -to 00:01:00 -c copy kali.ts

How to Merge Multiple TS Files

To combine multiple transport stream files into one in a sequence, use this syntax:

cat part1.ts part2.ts part3.ts > FinalOutputFile.ts

If you would prefer the ffmpeg module for an even better and cleaner merge, execute this syntax:

ffmpeg -i "concat:part1.ts|part2.ts|part3.ts" -c copy FinalOutputFile.ts

How to Extract Audio Only from a TS File

To extract the audio from a transport stream file, execute the command:

ffmpeg -i InputVideoFile.ts -q:a 0 -map a FinalOutputFile.mp3

How to Check the Details of TS File

To view the metadata and codec details of a transport stream video file, execute the command:

ffmpeg -i FinalOutputFile.ts

What are the Advantages of TS Files

Here are some reasons why transport stream files are preferred by the tech community:

  • Better error correction
  • Enhanced synchronization support
  • Support for multiple audio, video, and subtitle streams
  • Compatibility with most media players and editing tools

Wrapping Up

The transport stream files are reliable format for video storage and transmission. Broadcasting and media distribution industries widely use this file format. You can use tools like VLC, MPlayer, and ffmpeg, to play, convert, and edit transport stream files. Working with transport stream files in Linux systems is so easy.

We hope we have made it easy to understand TS files and their handling in Linux. Let us know if you are stuck somewhere and need our guidance.

Related Articles

How Does Open-Source Code Influence the Development of Bots?

Open-Source CodeWhen people think of the word ‘bots’, they often think of it in negative terms. Bots, of course, are one of the biggest threats to companies in 2025, with security incidents involving bots rising by 88% last year alone. But if you’re running a business, there are two types of bots you should know about: malicious bots and beneficial bots. 

While malicious bots are often associated with cyberattacks, fraud, and data theft, beneficial bots can be powerful tools to fight against them, enhancing your cybersecurity and working to automate protection across the board. Both are developed and proliferated by the same thing: open-source code. 

Open-Source Code Influencing the Development of Bots

Looking specifically at Linux for a moment, one of the first things to know about this system is that it’s completely free, unlike Windows or macOS, which require a paid license. Part of the reason for this is because it’s open source, which means users can modify, distribute, and customise the Linux operating system as and when it’s needed. 

Open source software, of course, has a number of benefits, including stability, reliability, and security – all of which are traits that have defined Linux and Unix systems for years, and have also been utilised in the world of bot creation and moderation

In this landscape, collaboration is key. From an ethical side of things, there are many instances where companies will formulate enhanced security bots, and then release that code to assist developers in the same field. 

Approximately two and a half years ago, for instance, the data science team behind DataDome.co – one of the leading cybersecurity companies specialising in bot detection – open-sourced ‘Sliceline’, a machine learning package designed for model debugging, which subsequently helped developers to analyse and improve their own machine learning models, thereby advancing the field of AI-driven cybersecurity.

But that’s not to say open-source code is all-round a positive thing. The same open-source frameworks that developers use to enhance bot protection are, of course, also accessible to cybercriminals, who can then modify and deploy them for their own malicious purposes. Bots designed for credential stuffing, web scraping, and DDoS attacks, for instance, can all be created using open-source tools, so this dual-use nature highlights a significant challenge in the cybersecurity space.

Keeping Open-Source a Force for Good

Thankfully, there are many things being done to stop malicious criminals from exploiting open-source code, with many companies adopting a multi-layered approach. The first is the strengthening of licensing and terms of use. 

At one point in time, open-source software, including Linux, was largely unrestricted, allowing anyone to access and redistribute code without much IT compliance or oversight. 

However, as the risks of misuse have become more apparent, especially with the rise of malicious bot activities, companies and open-source communities have been strengthening their licensing agreements, ensuring that everyone using the code must comply with ethical standards – something that is particularly important for Linux, which powers everything from personal computers to enterprise servers, making security and responsible use a top priority.

To give an example, a company can choose to apply for a licence that restricts the use of the software in unauthorised data collection, or in systems that may cause harm to users. Legal consequences for violating these terms are then imposed to deter any misuse. As well as this, more developers and users of open-source code are being trained about the potential misuse of tools, helping to foster a more responsible community. 

Over the last few years, a number of workshops, certifications, and online courses have been made available to increase threat intelligence, and spread awareness of the risks of malicious actors, providing the best practices for securing APIs, implementing rate limits, and designing open-source code that operates within ethical boundaries. 

It’s also worth noting that, because bot development has become far more advanced in recent years, bot detection has similarly improved. Looking back at DataDome for a moment, this is a company that prioritises machine learning and AI to detect bot activities, utilising open-source machine learning models to create advanced detection systems that learn from malicious bots, and continuously improve when monitoring traffic. 

This doesn’t mean the threat of malicious bots is over, of course, but it does help companies to identify suspicious behaviours more effectively – and provide ongoing updates to stay ahead of cybercriminals – which helps to mitigate the negatives of open-source code influencing bad bot development.

Conclusion

The question of open-source code influencing the development of bots is an intricate one, but as a whole, it has opened up the cybersecurity landscape to make it easy for anyone to protect themselves. Developers with limited coding expertise, for instance, can modify existing open-source bot frameworks to perform certain tasks, which essentially lowers the barriers to entry and fosters more growth – especially in the AI bot-detection field. 

But it is a double-edged sword. The important thing for any company in 2025 is to recognise which bots are a force for good, and make sure they implement them with the appropriate solutions. Malicious bots are always going to be an issue, and so long as the security landscape is evolving, the threat landscape will be evolving too. This is why it’s so important to protect yourself, and make sure you have all the defences in place to fight new dangers.

LUKS: Detailed Guide to Linux Unified Key Setup

luks tutorial

how to use luks to encrypt data

LUKS (Linux Unified Key Setup) is the default encryption method for Linux distributions. It provides robust full-disk encryption. If you put security at the forefront of all tech decisions you make (as you should), learning about data encryption is essential. In this detailed guide, let us explain what LUKS is, how LUKS works, and how to set it up in your Linux system.

What is LUKS?

Linux Unified Key Setup is a disk encryption specification. This is specifically designed for Linux (like BitLocker that comes in-built for latest Windows systems). It provides:

  • Support for passphrase
  • Key file authentication
  • Metadata storage within the encrypted partition
  • Multiple key slots for different user passwords
  • Twofish, Serpent, or AES providing strong encryption

LUKS is mostly used in Linux distributions like Ubuntu, Debian, Fedora, and Arch Linux.

How LUKS Works

Linux Unified Key Setup encrypts entire disks or partitions by operating at the block device level. To do this, it uses:

  • dm-crypt: This is the underlying encryption mechanism
  • PBKDF2: This is for key strengthening and protection against brute force attacks
  • Key slots: These store multiple decryption passwords

How to Set Up LUKS Encryption

Follow these instructions in the same sequence we have listed here to set up LUKS encryption in Linux system.

Install the Required Packages

Make sure you have “cryptsetup” module installed. You can do this by executing these commands:

sudo apt install cryptsetup # For Debian or Ubuntu systems
sudo dnf install cryptsetup # For Fedora
sudo pacman -S cryptsetup # For Arch Linux

Encrypt a Partition with LUKS

To encrypt a partition, first let us select a partition. To do this, execute this command but replace the “PartitionPath” placeholder with the directory you want to encrypt.

sudo cryptsetup luksFormat /Partition/Path

Confirm and enter a suitable and strong passphrase. A guideline is to use something that contains a mix of alphabets, numerals, and special characters. Choose a passphrase that is easy for you to remember, like “IGot2Dogs@Home”.

Open the Encrypted Partition

To open the encrypted partition, execute this command:

sudo cryptsetup open /dev/sdX TheEncryptedVolume

Once this command is executed, the encrypted partition is mapped to “/dev/mapper/TheEncryptedVolume”. A quick reminder that “TheEncryptedVolume” is just a placeholder.

Format the Encrypted Volume

To format the encrypted volume, run this command after replacing “TheEncryptedVolume” with the path to the encrypted volume:

sudo mkfs.ext4 /dev/mapper/TheEncryptedVolume

Mount the Encrypted Partition

The final step in setting up LUKS is to mount the encrypted partition. Let us use the mount command to do this:

sudo mount /dev/mapper/TheEncryptedVolume /mnt

How to Unlock LUKS on Boot (Automounting)

You can automatically unlock a drive encrypted by LUKS on boot by using the crypttab module. To do this, follow these three simple steps:

Find the UUID of the encrypted partition:

blkid /dev/ParitionName

Edit “/etc/crypttab” and add

TheEncryptedVolume UUID=<TheUUIDWeJustFound> none luks

Update the initramfs by executing the command (for Debian and Ubuntu systems):

sudo update-initramfs -u

How to Manage LUKS Keys

Here are some instructions to effectively manage your LUKS Keys.

To Add a New Passphrase

Execute the command:

sudo cryptsetup luksAddKey /dev/PartitionName

How to Remove a Passphrase

To remove a passphrase you have created already, execute the command:

sudo cryptsetup luksRemoveKey /dev/PartitionName

How to Check LUKS Status

To check the status of your encrypted volume:

sudo cryptsetup status TheEncryptedVolume

Advantages of Using LUKS

Here are some advantages of using Linux Unified Key Setup:

  • Robust key management using industry standard encryption
  • Support for multiple authentication methods like passphrase or key file
  • Supports removable storage devices like USB drives
  • Compatible with most of the Linux distributions

Wrapping Up

Linux Unified Key Setup is the standard choice for those looking for a disk encryption solution for Linux. It provides a secure way to protect sensitive data. Whether you are trying to encrypt your personal laptop, office workstation, or a server disk, Linux Unified Key Setup provides confidentiality and security.

Related Articles

Difference between encryption and decryption

Java Versions: How to View and Switch Versions

java versions blog

java versions guideJava is everywhere in the tech community. Since its launch in 1995, with multiple versions, new features, performance improvements, and security patches, Java has evolved a lot. With these many versions, comes a new problem. Which Java version should you choose? By default, everyone thinks that the latest version is always the best.

Unless your organizational policy demands so, the latest version of any software package is not the best option for you. You have to know the advantages and disadvantages of each version, its compatibility with your tech environment, and so many more parameters.

To choose the right Java version, you should consider the stability, long-term support (LTS), and compatibility with your distro. In this article, let us explain the most common Java versions, their features, and best practices to select the best Java version for your device.

Different Java Versions Explained

Java is a stable and matured product. It follows a structured release cycle with each version being released every six months and LTS version being rolled out every three years. Here are the most commonly used Java versions:

Java SE 8: Old but Still the Gold Standard

This version was launched in 2014, but this is still one of the most widely used Java version. These are some of the reasons why this version is preferred by programmers:

  • This version introduced the Lambda expressions for functional programming
  • Introduced Stream API for handling different collections efficiently
  • Provided enhanced Date and Time API
  • Still provides long-term stability and preferred around the world.

Java SE 11: LTS version

This version was launched in 2018 and still being used worldwide. Let us see some of the reasons why:

  • Deprecated old APIs
  • Removed the Java EE modules
  • Introduced the var for local variable type inference
  • Enhanced GC (garbage collection) mechanisms
  • Still supported as an LTS release. Hence this is a popular choice for production environments.

Java SE 17: Second Latest LTS version (at the time of publishing)

This version is the one that:

  • Added pattern matching for switch
  • Provided enhanced performance with sealed classes and encapsulated JDK
  • Supported foreign function and memory API
  • Is recommended for modern applications by Linux community

Java SE 21: Latest LTS version

This comes feature packed with:

  • Virtual threads for better concurrency
  • Enhanced record patterns and pattern matching
  • Scoped Values API for better memory management
  • Cutting edge features

How to Choose the Right Java Version

Java 8 is preferred if:

  • If you still have a few legacy applications
  • You need a stable and widely supported Java version
  • Your organization still used older frameworks like 2.X.X series of Spring Boot

Use Java 11 if:

  • You require an LTS version with regular updates
  • You want both modern features with existing application compatibility
  • Your projects depend on containerized deployments and microservices

Use Java 17 if:

  • You are working on a new project and require an LTS version
  • You want recent security updates
  • You need an LTS version with improved concurrency and memory management

Use Java 21 if:

  • You are experimenting with new Java APIs and improvement
  • You want the latest features and enhancements
  • Your project requires advanced concurrency models

How to Check the Java Version

To check the version of Java installed in your system, run the following command in your terminal window:

java -version

How to Install and Manage Java Versions

Let us take you through some of the common ways to install and manage Java versions.

Install Java using SDKMAN

This works in Linux and macOS devices. Run the command:

curl -s "https://get.sdkman.io" | bash
source "$HOME/.sdkman/bin/sdkman-init.sh"
sdk install java 17.0.1-open

Install Java using apt

This method works in distros like Ubuntu and Debian. Execute the command:

sudo apt update
sudo apt install openjdk-17-jdk

How to Install Java using Yum

In devices that have the yum package manager, execute the command:

sudo yum install java-17-openjdk-devel

How to Switch Java Versions

If you use Linux or MacOS devices, execute the command:

sudo update-alternatives --config java

If you are working on Windows devices, execute:

setx JAVA_HOME "C:\Program Files\Java\jdk-17"

Key Takeaways

There is no universal right Java version. The best Java version depends on your project requirements, organizational policy, support requirements, and performance expectations. While Java 8 is a safe bet and can be used for legacy applications, Java 21 is perfect for developers experimenting with latest features. Keeping up with the Java’s release notes will help you in choosing and planning your projects well.

By understanding the differences between Java versions, you can make informed decisions on which Java version to install or switch to and get the most out of it.

We Think You Will Like


GPT or MBR: Which is Better for Your Linux Device

mbr or gpt blog

mbr or gpt differencesWhen you are configuring your SSD in a Linux system, one of the most important deciding factors is selecting the correct partition style. The question boils down to GPT or MBR? Which partition style to choose? This choice is very important because this affects the compatibility, performance, and system stability of your device.

In this guide, let us help you make the MBR or GPT decision, advantages of the style, limitations, and the best use cases for each type.

Understanding Each Partition Style

Let us start with the basics.

What is MBR

MBR is short for Master Boot Record. This was introduced in 1983. This stores the partition information and the bootloader data in the first sector of the storage device.

The key features of MBR include:

  • Supports 3 primary and 1 extended partition (total 4 primary partitions).
  • Works only on SSDs up to 2TB in size.
  • Uses the legacy BIOS based bootloader function.
  • Less resistance against data corruption because the partition information is stored in a single sector.

What is GPT

GPT stands for GUID Partition Table. It is a comparatively modern partitioning format that is part of the UEFI (unified extensible firmware interface) bootloader standard.

Here are some features that set GPT apart:

  • This supports 128 partitions in Windows and even more in Linux devices
  • This partition type can work on SSDs with more than 2TB capacity
  • Uses the UEFI based boot mode but can work with BIOS using the hybrid MBR
  • Stores multiple copies of the partition data across the SSD for better resistance against data corruption
  • Comes with secure boot and better error detection in most cases.

Major Differences: GPT or MBR

Feature MBR GPT
Supported Drive Size 2TB 9.4ZB (zeta bytes)
Maximum partitions limit 4 128
Boot mode Legacy BIOS UEFI or BIOS (using GRUB)
Data protection Lower Higher (multiple copies of partition table)
Compatibility Works on old distros Required for modern distros


What Should You Choose: GPT or MBR for Linux

Prefer the MBR style if:

  • Your device is running on old Linux distros that do not support UEFI yet
  • Your SSD capacity is less than 2TB
  • You need legacy BIOS boot support
  • Your system does not require more than 4 primary partitions.

Prefer the GPT style if:

  • You are using modern Linux distros like Ubuntu, Debian, Kali Linux, Amazon Linux, or SUSE.
  • Your SSD capacity is higher than 2TB.
  • You want better protection against data corruption, data integrity, and redundancy.
  • You need support for more than 4 partitions.
  • Your distribution uses UEFI boot mode.

Step by Step Instructions to Convert MBR to GPT in Linux

It is very important to follow these steps in sequence.

How to Check the Partition Type in Linux

  1. Open the Terminal window.
  2. Run the command: sudo fdisk -l
  3. Find your SSD and check if it uses MBR (mentioned as dos) or GPT (mentioned as gpt).

How to Convert MBR to GPT in Linux

Let us show you two methods to convert MBR to GPT in your Linux device.

Convert MBR to GPT Using gdisk

Install gdisk if you do not have it already. To do that, execute the command:

sudo apt install gdisk # For Debian and Ubuntu distros
sudo dnf install gdisk # For Fedora
sudo pacman -S gdisk # For Arch Linux

Next run the command after replacing “SSD” with your Drive identifier.

sudo gdisk /dev/sdSSD

Next enter “w” to write the changes and convert the disk to GPT.

How to Convert MBR to GPT Using Parted

Open the Terminal window and run the command:

sudo parted /dev/sdX

Inside the parted function, execute the command:

mklabel gpt

Execute “quit” to exit and apply the changes.

There will be multiple online tools and guides that will tell you that they are tools to convert MBR to GPT. Proceed at your own risk. If we find any other reliable alternative to convert MBR to GPT, we will update this article with the same. The safest approach is to back up data, format the disk, and then restore the files.

Key Takeaways

Now let’s come back to the original confusion: MBR or GPT. GPT is the preferred choice nowadays due to is support for large drives, better data redundancy, and compatibility with UEFI based bootloaders. MBR is still useful if you are using legacy BIOS bootloaders and older Linux distributions.

We hope we solved your MBR or GPT confusion and helped you take an informed decision. We have listed almost all GPT vs MBR differences in Linux. You can visit this discussion thread if your system runs on Ubuntu. We wish you all the best in ensuring optimal SSD performance and compatibility.

We Think You Will Like