
Vncserver is a remote display daemon that allows users several remote functionalities including:
- Virtual (headless) and fully parallel X sessions that run in the background (i.e. not on the physical monitor but virtually) on a machine. All applications running under the server may continue to run, even when the user disconnects.
- Direct control of the local X session(s) (i.e. X running on the physical monitor).
Machine: Vmware Centos 7 Guest
IP = 192.168.254.133
Install vnc server on CentOS 7
Add vnc user:
[root@root ~]# add pirat9
Set password for pirat9 user:
[root@root ~]# passwd pirat9
Lets Start:
 [root@pirat9 ~]# yum check-update
 [root@pirat9 ~]# yum groupinstall "GNOME Desktop"
 [root@pirat9 ~]# unlink /etc/systemd/system/default.target
 [root@pirat9 ~]# ln -sf /lib/systemd/system/graphical.target /etc/systemd/system/default.target
 [root@pirat9 ~]# reboot
After reboot, you will get Centos 7 desktop.
Now start installing VNC packages.
Step 1 » install VNC package.
[root@pirat9 ~]# yum install tigervnc-server xorg-x11-fonts-Type1 -y
Step 2 » Create a file ‘vncserver@:1.service’ in /etc/systemd/system/ directory by copying example config file /lib/systemd/system/vncserver@.service.
[root@pirat9 ~]# cp /lib/systemd/system/vncserver@.service /etc/systemd/system/vncserver@:1.service
Step 3 » Now open /etc/systemd/system/vncserver@:1.service file and replace with your username .
Find these lines:
 ExecStart=/sbin/runuser -l <USER> -c "/usr/bin/vncserver %i"
 PIDFile=/home/<USER>/.vnc/%H%i.pid
Replace (username as pirat9):
 ExecStart=/sbin/runuser -l pirat9 -c "/usr/bin/vncserver %i"
 PIDFile=/home/pirat9/.vnc/%H%i.pid
Or root user:
 ExecStart=/sbin/runuser -l root -c "/usr/bin/vncserver %i"
 PIDFile=/root/.vnc/%H%i.pid
Step 4 » Reload systemd for changes.
[root@pirat9 ~]# systemctl daemon-reload
Step 5 » Create VNC password for the user .
[root@pirat9 ~]# vncpasswd
Step 6 » Enable and start the service using the below commands.
Enable service at startup ( Permanent ).
 [root@pirat9 ~]# systemctl enable vncserver@:1.service
 Start the service .
 [root@pirat9 ~]# systemctl start vncserver@:1.service
Step 7 » Allow VNC service in firewall.
 [root@pirat9 ~]# firewall-cmd --permanent --add-service vnc-server
 [root@pirat9 ~]# systemctl restart firewalld.service
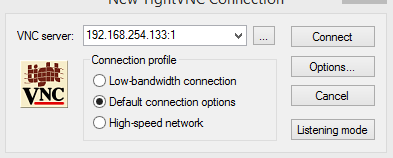
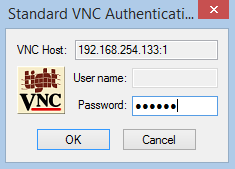
Now you can able to connect VNC server using IP and Port.
Done!

