
The Apache Hadoop software library is a framework that allows for the distributed processing of large data sets across clusters of computers using simple programming models The Apache™ Hadoop® project develops open-source software for reliable, scalable, distributed computing.
The project includes these modules:
- Hadoop Common: The common utilities that support the other Hadoop modules.
- Hadoop Distributed File System (HDFS™): A distributed file system that provides high-throughput access to application data.
- Hadoop YARN: A framework for job scheduling and cluster resource management.
- Hadoop MapReduce: A YARN-based system for parallel processing of large data sets.
This article will help you for step by step install and configure single node hadoop cluster using Hadoop on centos.
Install Java
Before installing hadoop make sure you have java installed on your system. Use this command to check the version of the installed Java.
java -version
java version "1.7.0_75"
Java(TM) SE Runtime Environment (build 1.7.0_75-b13)
Java HotSpot(TM) 64-Bit Server VM (build 24.75-b04, mixed mode)
To install or update Java use following step by step instructions.
First step is to download latest version of java from the Oracle official website.
cd /opt/
wget --no-cookies --no-check-certificate --header "Cookie: gpw_e24=http%3A%2F%2Fwww.oracle.com%2F; oraclelicense=accept-securebackup-cookie" "http://download.oracle.com/otn-pub/java/jdk/7u79-b15/jdk-7u79-linux-x64.tar.gz"
tar xzf jdk-7u79-linux-x64.tar.gz
Need to set up to use newer version of Java using alternatives. Use the following commands to do it.
cd /opt/jdk1.7.0_79/
alternatives --install /usr/bin/java java /opt/jdk1.7.0_79/bin/java 2
alternatives --config java
There are 3 programs which provide 'java'.

  Selection    Command
-----------------------------------------------
*  1           /opt/jdk1.7.0_60/bin/java
 + 2           /opt/jdk1.7.0_72/bin/java
   3           /opt/jdk1.7.0_79/bin/java

Enter to keep the current selection[+], or type selection number: 3 [Press Enter]
Now you may also required to set up javac and jar commands path using alternatives command.
alternatives --install /usr/bin/jar jar /opt/jdk1.7.0_79/bin/jar 2
alternatives --install /usr/bin/javac javac /opt/jdk1.7.0_79/bin/javac 2
alternatives --set jar /opt/jdk1.7.0_79/bin/jar
alternatives --set javac /opt/jdk1.7.0_79/bin/javac
The next step is to configure environment variables. Use following commands to set up these variable properly
- Setup JAVA_HOME Variable
export JAVA_HOME=/opt/jdk1.7.0_79
- Setup JRE_HOME Variable
export JRE_HOME=/opt/jdk1.7.0_79/jre
- Setup PATH Variable
export PATH=$PATH:/opt/jdk1.7.0_79/bin:/opt/jdk1.7.0_79/jre/bin
Installing Apache Hadoop
After setting up the java environment. Let stat installing Apache Hadoop.
The first step is to create a system user account to use for hadoop installation.
useradd hadoop
passwd hadoop
Now you need to configure the ssh keys for the user hadoop. Using following command to enable ssh login without password.
su - hadoop
ssh-keygen -t rsa
cat ~/.ssh/id_rsa.pub >> ~/.ssh/authorized_keys
chmod 0600 ~/.ssh/authorized_keys
exit
Now download hadoop latest available version from its official site hadoop.apache.org.
cd ~
wget http://apache.claz.org/hadoop/common/hadoop-2.6.0/hadoop-2.6.0.tar.gz
tar xzf hadoop-2.6.0.tar.gz
mv hadoop-2.6.0 hadoop
Now the next step is to set environment variable uses by hadoop.
Edit ~/.bashrc file and add the following listes of values at end of file.
export HADOOP_HOME=/home/hadoop/hadoop
export HADOOP_INSTALL=$HADOOP_HOME
export HADOOP_MAPRED_HOME=$HADOOP_HOME
export HADOOP_COMMON_HOME=$HADOOP_HOME
export HADOOP_HDFS_HOME=$HADOOP_HOME
export YARN_HOME=$HADOOP_HOME
export HADOOP_COMMON_LIB_NATIVE_DIR=$HADOOP_HOME/lib/native
export PATH=$PATH:$HADOOP_HOME/sbin:$HADOOP_HOME/bin
Then apply the changes in current running environment
source ~/.bashrc
edit $HADOOP_HOME/etc/hadoop/hadoop-env.sh file and set JAVA_HOME environment variable
export JAVA_HOME=/opt/jdk1.7.0_79/
Now you start with the configuration with basic hadoop single node cluster setup.
First edit hadoop configuration files and make following changes.
cd /home/hadoop/hadoop/etc/hadoop
Let’s start by editing core-site.xml
<configuration>
<property>
  <name>fs.default.name</name>
    <value>hdfs://localhost:9000</value>
</property>
</configuration>
Then Edit hdfs-site.xml:
<configuration>
<property>
 <name>dfs.replication</name>
 <value>1</value>
</property>

<property>
  <name>dfs.name.dir</name>
    <value>file:///home/hadoop/hadoopdata/hdfs/namenode</value>
</property>

<property>
  <name>dfs.data.dir</name>
    <value>file:///home/hadoop/hadoopdata/hdfs/datanode</value>
</property>
</configuration>
and edit mapred-site.xml:
<configuration>
 <property>
  <name>mapreduce.framework.name</name>
   <value>yarn</value>
 </property>
</configuration>
finally edit yarn-site.xml:
<configuration>
 <property>
  <name>yarn.nodemanager.aux-services</name>
    <value>mapreduce_shuffle</value>
 </property>
</configuration>
Now format the namenode using following command:
hdfs namenode -format
To start all hadoop services use the following command:
cd /home/hadoop/hadoop/sbin/
start-dfs.sh
start-yarn.sh
To check if all services are started well use ‘jps‘ command:
jps
You should see like this output.
26049 SecondaryNameNode
25929 DataNode
26399 Jps
26129 JobTracker
26249 TaskTracker
25807 NameNode
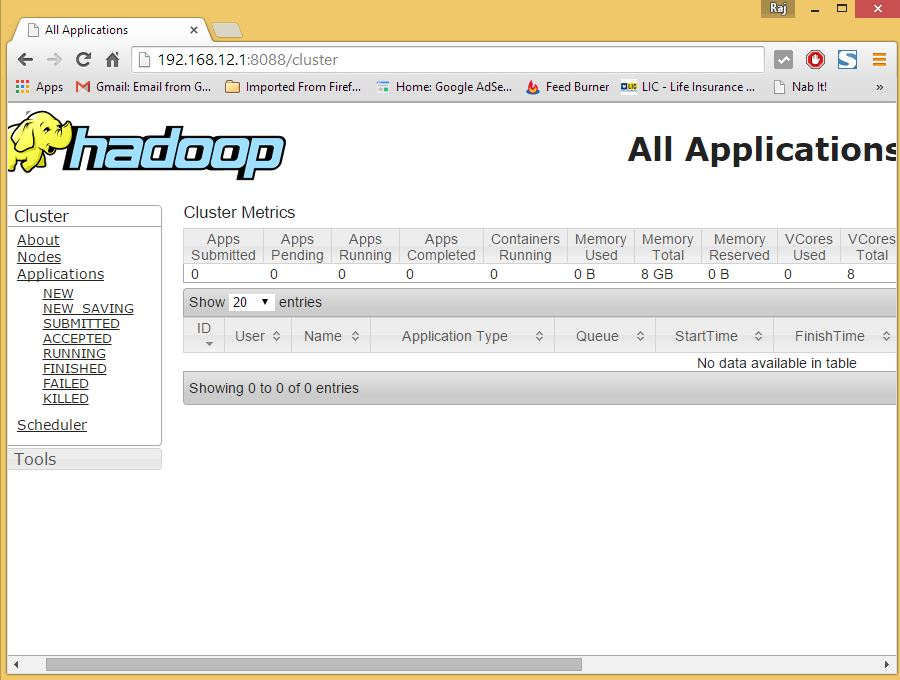
Now you can access to Hadoop Services in your Browser at: http://your-ip-address:8088/.
Thanks!!!


