
Introduction
You have a problem while monitoring your servers, switches or physical machines. Observium fits your need. As a free monitoring system, it helps you to monitor your servers remotely. It is an auto-discovering SNMP based network monitoring platform written in PHP which includes support for a wide range of network hardware and operating systems including Cisco, Windows, Linux, HP, NetApp and many other. I will give you the steps to follow while setting up an Observium server on Ubuntu 12.04.
- The observium Community is a free tool and licensed under the QPL Open Source license. This version is the best solution for small deployments. It gets security updates each 6 months.
- While the second version, the Observium Professional is distributed under SVN based release mechanism. And it gets daily security updates. This tool is the best for Service Provider and enterprises deployments.
For more information you can visit the offcial website of Observium.
System Requirements
In order to install Observium , it’s necessary to have a server with a fresh installation. The development of Observium takes place on Ubuntu LTS and Debian systems, so it’s recommended to install Observium on Ubuntu or Debian because may be issues with other platforms.
This article will guide you on how to install Observium on Ubuntu 12.04. For a small Observium installation is recommended to use 256MB for the memory and dual core for the process.
Installing Prerequisites
Before installing Observium you need to make sure to install all dependencies.
First step is to update your server
sudo apt-get update
Then you need to install all packages required to run Observium.
Observuim need this list of software the run correctly:
- LAMP server
- fping
- Net-SNMP 5.4+
- RRDtool 1.3+
- Graphviz
Requirements for optional features:
- Ipmitool – Only if you want to poll IPMI baseboard controllers on servers
- Libvirt-bin – Only if you want to monitor remote VM hosts using libvirt
sudo apt-get install libapache2-mod-php5 php5-cli php5-mysql php5-gd php5-mcrypt php5-json php-pear snmp fping mysql-server mysql-client python-mysqldb rrdtool subversion whois mtr-tiny ipmitool graphviz imagemagick libvirt ipmitool
Creation MySQL Database and User for Observium
Now you need to log into MySQL and create database for Observuim:
mysql -u root -p
After successful authenticated, you need to create the database.
CREATE DATABASE observium;
The database Name is Observium. You will need this information later.
Now, you should create the database administrator.
CREATE USER observiumadmin@localhost IDENTIFIED BY 'observiumpassword';
Next, you need to give this user permissions to administer the database you created.
GRANT ALL PRIVILEGES ON observium.* TO observiumadmin@localhost;
You need to flush the privilege information to disk to activate the new MySQL user:
FLUSH PRIVILEGES;
exit
Downloading and Installing Observium
Now that our system is ready, we can start the installation of Observium.
First step to do is, creating the directory Observium is going to operate out of:
mkdir -p /opt/observium && cd /opt
For the purpose of this tutorial, we’re going to be using the Community/Open Source Edition of Observium. Download and unpack it.
wget http://www.observium.org/observium-community-latest.tar.gz
tar zxvf observium-community-latest.tar.gz
Now go under Observium directory
cd observium
Copy the default configuration file ‘config.php.default‘ to ‘config.php‘ and fill out the database config options:
cp config.php.default config.php
nano config.php
/ Database config
$config['db_host'] = 'localhost';
$config['db_user'] = 'observiumadmin';
$config['db_pass'] = 'observiumpassword';
$config['db_name'] = 'observium';
Let’s setup the default schema for the MySQL Database:
php includes/update/update.php
Now you need to create directory to store rrd file and change permission to let apache write into the file .
mkdir rrd
chown apache:apache rrd
To help you troubleshooting on case of problem, you need to create logs file.
mkdir -p /var/log/observium
chown apache:apache /var/log/observium
Now you have to create the virtual host configuration for Observium
<VirtualHost *:80>
  DocumentRoot /opt/observium/html/
  ServerName  observium.domain.com
  CustomLog /var/log/observium/access_log combined
  ErrorLog /var/log/observium/error_log
  <Directory "/opt/observium/html/">
  AllowOverride All
  Options FollowSymLinks MultiViews
  </Directory>
  </VirtualHost>
Next, you need to enable rewrite functionality for your Apache server.
To enable mod_rewrite modules, type this command:
sudo a2enmod rewrite
This module will be enable the next after reboot of Apache service.
sudo service apache2 restart
Configuring Observium
Before log into the web interface, you need to create administrator account (level 10) to Observium
# cd /opt/observium
# ./adduser.php admin adminpassword 10
User admin added successfully.
Next set a cron jobs for the discovery and the poller jobs, create a new file ‘/etc/cron.d/observium‘ and add the following contents.
33  */6   * * *   root    /opt/observium/discovery.php -h all >> /dev/null 2>&1
*/5 *      * * *   root    /opt/observium/discovery.php -h new >> /dev/null 2>&1
*/5 *      * * *   root    /opt/observium/poller-wrapper.py 1 >> /dev/null 2>&1
Reload cron process to take new entries.
# /etc/init.d/cron reload
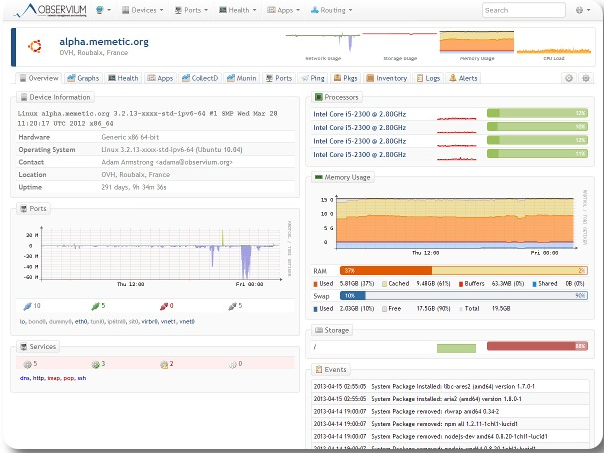
You’ve installed Observium Server! Log into Observium using your browser http://<Server IP> and be on your way.
Enjoy!


