
Vagrant is an open source tool to create multiple development environments for developers and system administrators, and development environments managed by Vagrant can run on local virtualized platforms such as VirtualBox or VMware, in the cloud via AWS or OpenStack, or in containers such as with Docker or raw LXC.. Using Vagrant, you can create easy to configure, reproducible, and portable work environments built on top of industry-standard technology. Vagrant works well on all Modern Linux distributions, Mac OS X, and Windows platforms.
Vagrant provides the disposable environment and consistent workflow to develop web applications, and test things like your own scripts, codes, Chef cookbooks, puppet modules, and more. Once you done all the things using vagrant, you can wrap up the box, and distribute it to others in your team or to the public. So that they can run their own development environments from the same configuration. It doesn’t matter whether you created the virtual environments in Linux, Windows or Mac. Everyone in your group can use the same virtual environments to develop and test their codes, programs etc.
Installation
As mentioned before, Vagrant needs virtualization tools like Oracle VirtualBox, VMWare, or AWS to manage the virtual machines. In this tutorial, I will be using Ubuntu 14.04 host system with Oracle VirtualBox to install and test Vagrant.
First, install Oracle VirtualBox, and make sure you’re able to create virtual machines using it. VirtualBox, installation is not that difficult, and is available on Ubuntu official repositories. To install virtualbox from Terminal enter the following command:
sudo apt-get install virtualbox
Or,
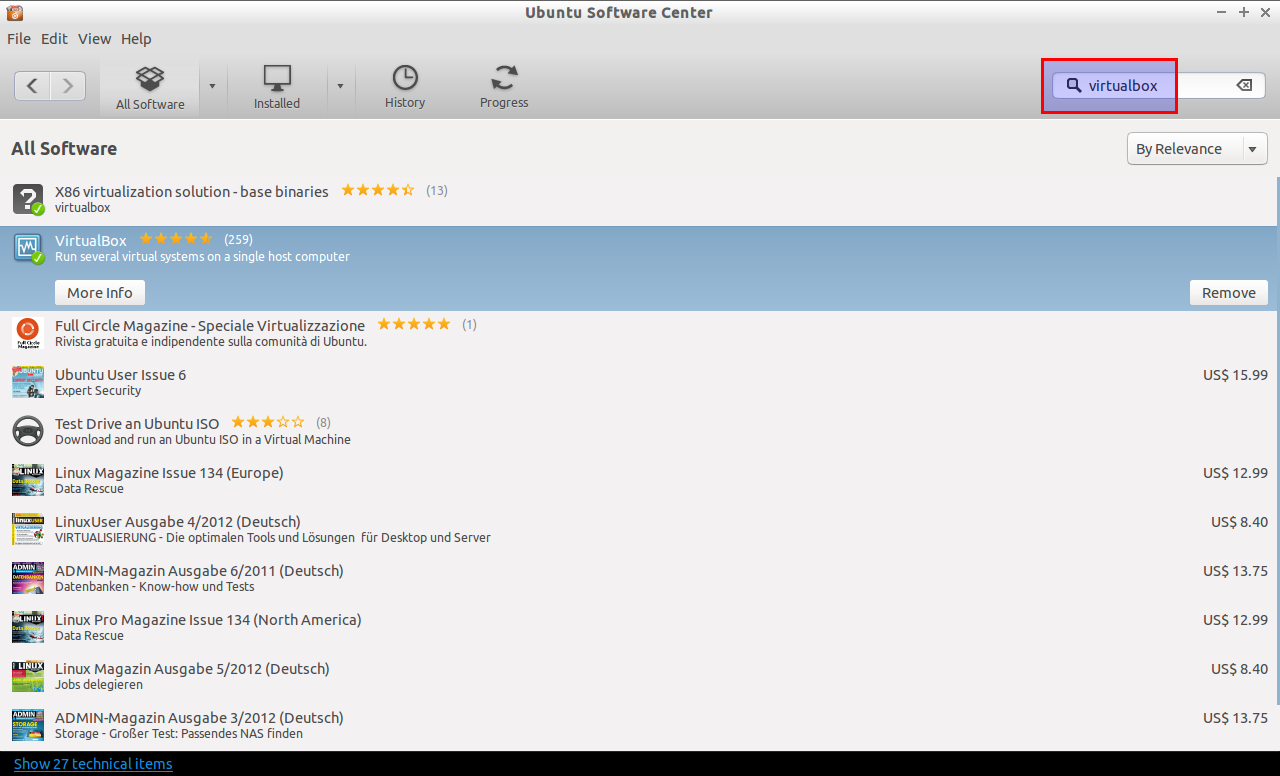
You can install it via Ubuntu Software Center. Open up the Ubuntu Software Center, search for the virtualbox package, and Install it.
Once you installed virtualbox, head over to Vagrant download page, and download and install the latest version depending upon the OS and architecture of your machine. In my case, I downloaded the 64bit installer file for my Ubuntu 14.04 desktop.
Vagrant installation is damn easy. After downloading the vagrant installer file, Install it on Ubuntu like system as shown below:
sudo dpkg -i vagrant_1.6.3_x86_64.deb
Usage
Vagrant virtual environments are called boxes. The boxes can be used by anyone on any platform that Vagrant supports to bring up an identical working environment.
You can download the ready made boxes either from the official Vagrant cloud page, or from the Vagrant community website.
Adding and downloading Boxes from the Vagrant Cloud:
First, let us add and create a Vagrant box from the official site. To do that go to the Vagrant Cloud page, and click the link “Discover Boxes”.
Search for the required boxes that suits to your virtualization tool. In my case, I am going to deploy CentOS 6.5 box for Oracle VirtualBox.
To do that, enter the following command:
vagrant box add chef/centos-6.5
Sample output:
==> box: Loading metadata for box 'chef/centos-6.5'
    box: URL: https://vagrantcloud.com/chef/centos-6.5
This box can work with multiple providers! The providers that it
can work with are listed below. Please review the list and choose
the provider you will be working with.

1) virtualbox
2) vmware_desktop

Enter your choice: 1
==> box: Adding box 'chef/centos-6.5' (v1.0.0) for provider: virtualbox
    box: Downloading: https://vagrantcloud.com/chef/centos-6.5/version/1/provider/virtualbox.box
[...]
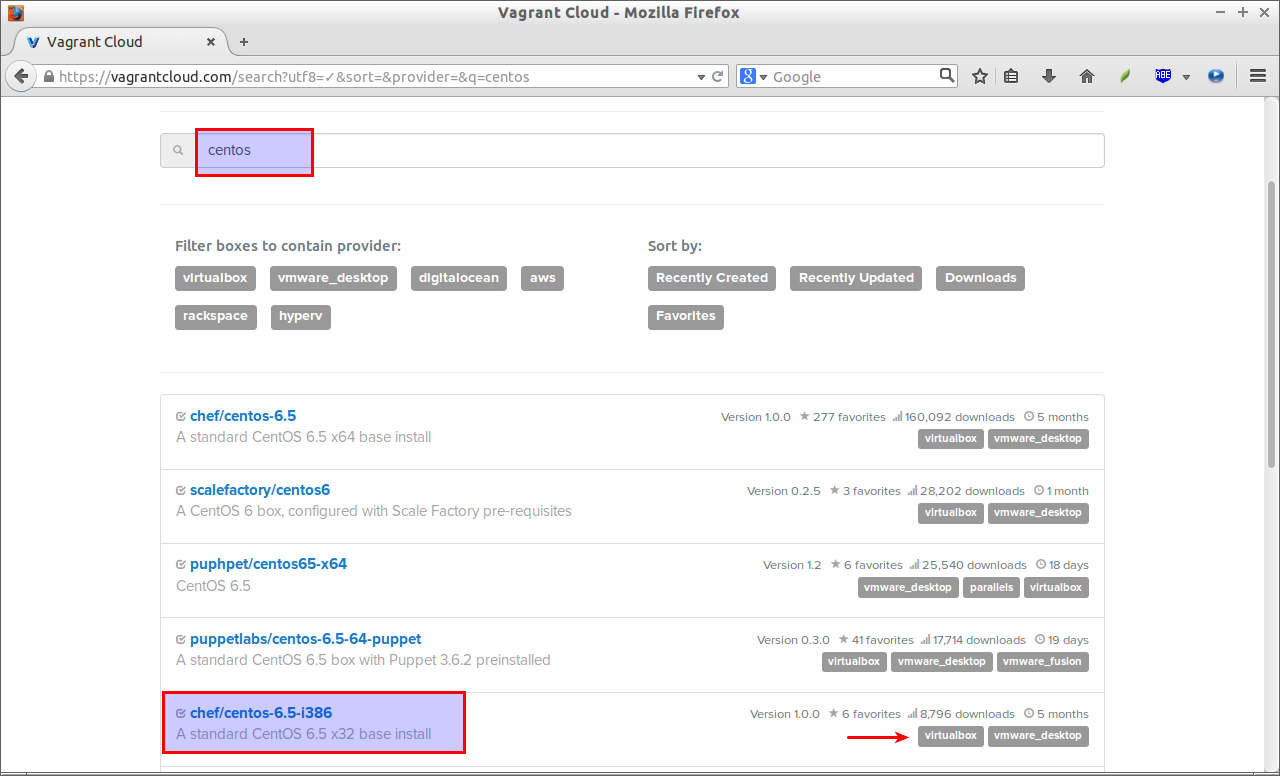
Or, you can directly choose the exact download URL of the Box, and download it. First, find the required box using the Discover boxes link on the top of the page. Select the desired box, and virtual environment. Refer the following screenshot.
Copy the code, and paste on your Terminal and hit enter key to start downloading the CentOS 6.5 Box template.
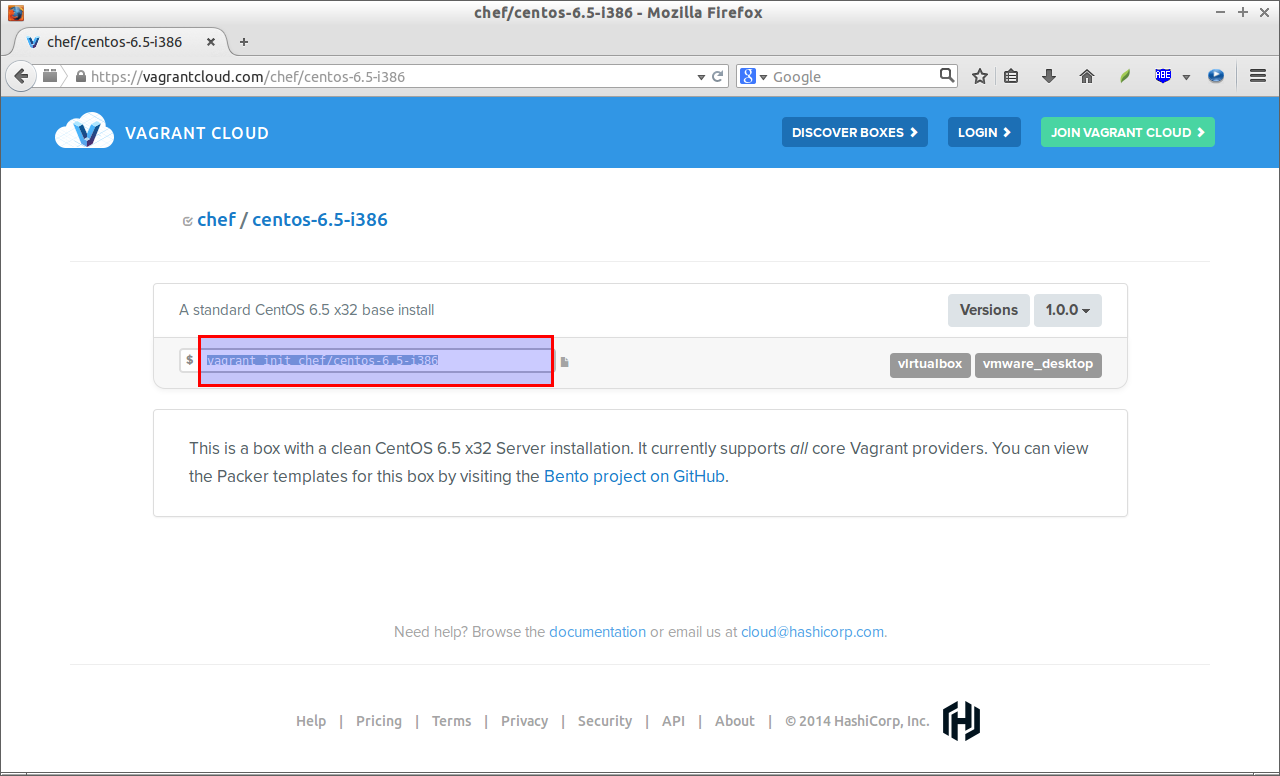
vagrant init chef/centos-6.5-i386
Sample output:
 A `Vagrantfile` has been placed in this directory. You are now
 ready to `vagrant up` your first virtual environment! Please read
 the comments in the Vagrantfile as well as documentation on
 `vagrantup.com` for more information on using Vagrant.
Then, run the following command to start downloading the CentOS 6.5 virtual environment.
vagrant up
Sample output:
 Bringing machine 'default' up with 'virtualbox' provider...
 ==> default: Box 'chef/centos-6.5-i386' could not be found. Attempting to find and install...
 default: Box Provider: virtualbox
 default: Box Version: >= 0
 ==> default: Loading metadata for box 'chef/centos-6.5-i386'
 default: URL: https://vagrantcloud.com/chef/centos-6.5-i386
 ==> default: Adding box 'chef/centos-6.5-i386' (v1.0.0) for provider: virtualbox
 default: Downloading: https://vagrantcloud.com/chef/centos-6.5-i386/version/1/provider/virtualbox.box
 ==> default: Successfully added box 'chef/centos-6.5-i386' (v1.0.0) for 'virtualbox'!
 ==> default: Importing base box 'chef/centos-6.5-i386'...
 ==> default: Matching MAC address for NAT networking...
 ==> default: Checking if box 'chef/centos-6.5-i386' is up to date...
 ==> default: Setting the name of the VM: sk_default_1407142400228_76387
 ==> default: Clearing any previously set network interfaces...
 ==> default: Preparing network interfaces based on configuration...
 default: Adapter 1: nat
 ==> default: Forwarding ports...
 default: 22 => 2222 (adapter 1)
 ==> default: Booting VM...
 ==> default: Waiting for machine to boot. This may take a few minutes...
 default: SSH address: 127.0.0.1:2222
 default: SSH username: vagrant
 default: SSH auth method: private key
 default: Warning: Connection timeout. Retrying...
 default: Warning: Connection timeout. Retrying...
 default: Warning: Connection timeout. Retrying...
 default: Warning: Remote connection disconnect. Retrying...
 default: Warning: Remote connection disconnect. Retrying...
 ==> default: Machine booted and ready!
 ==> default: Checking for guest additions in VM...
 ==> default: Mounting shared folders...
 default: /vagrant => /home/sk
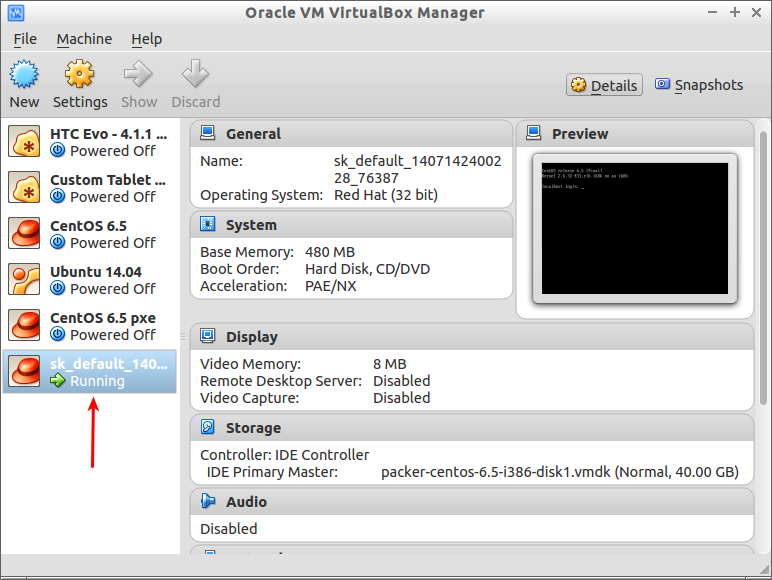
If you got the output like above, congratulations! You’ve successfully setup the CentOS virtual environment. You can verify it by SSH to your vagrant box or open up the virtualbox software, and you’ll there see the vagrant box has been added and run on.
Adding and downloading Boxes from the Vagrant Community website:
The images in this site are not tested by the Vagrant development team. Use them at your own risk.
First go the vagrantbox website, and pick any box of your choice.
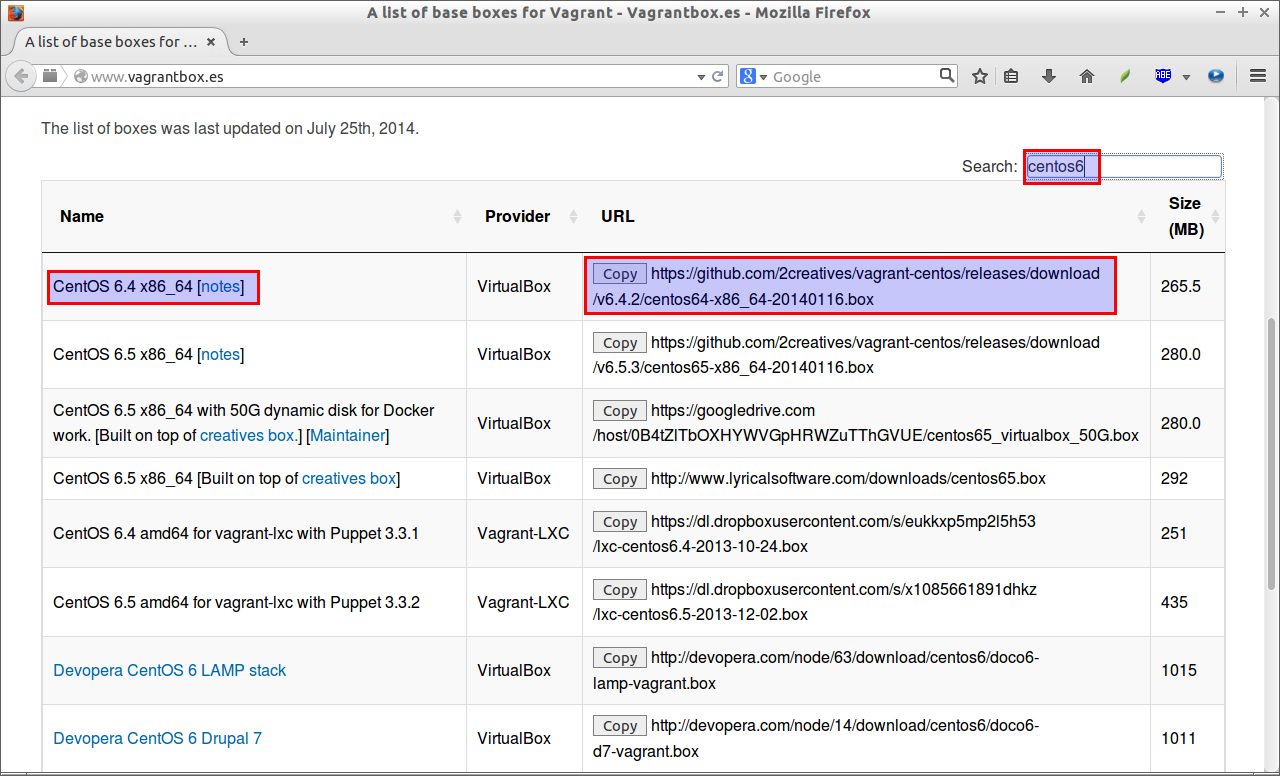
Copy the required Vagrant box URL. For example, let us add CentOS 6.4 64bit box:
vagrant box add centos-6.4 https://github.com/2creatives/vagrant-centos/releases/download/v6.4.2/centos64-x86_64-20140116.box
Initialize the box:
vagrant box init centos-6.4
And then, run the following command to start the virtual machine:
vagrant up
SSH To Vagrant boxes
Now, you can login to your Vagrant box as shown below. The default vagrant box username will be: vagrant, and the password of the root user will be: vagrant.
vagrant ssh
Sample output:
 Last login: Fri Mar  7 15:49:03 2014 from ddcwbbrt2-int-3-1.mckesson.com
 [vagrant@localhost ~]$
To switch to the root user, enter the command “su” without quotes, and the default password for root user is: vagrant.
Working On Vagrant Virtual Environments
You can use and work with the Vagrant boxes as the way you work with a normal physical machines. To find the list of Vagrant commands, enter the following command:
vagrant help
Sample output:
Usage: vagrant [options] <command> [<args>]

    -v, --version                    Print the version and exit.
    -h, --help                       Print this help.

Common commands:
     box             manages boxes: installation, removal, etc.
     connect         connect to a remotely shared Vagrant environment
     destroy         stops and deletes all traces of the vagrant machine
     global-status   outputs status Vagrant environments for this user
     halt            stops the vagrant machine
     help            shows the help for a subcommand
     init            initializes a new Vagrant environment by creating a Vagrantfile
     login           log in to Vagrant Cloud
     package         packages a running vagrant environment into a box
     plugin          manages plugins: install, uninstall, update, etc.
     provision       provisions the vagrant machine
     rdp             connects to machine via RDP
     reload          restarts vagrant machine, loads new Vagrantfile configuration
     resume          resume a suspended vagrant machine
     share           share your Vagrant environment with anyone in the world
     ssh             connects to machine via SSH
     ssh-config      outputs OpenSSH valid configuration to connect to the machine
     status          outputs status of the vagrant machine
     suspend         suspends the machine
     up              starts and provisions the vagrant environment
     version         prints current and latest Vagrant version

For help on any individual command run `vagrant COMMAND -h`

Additional subcommands are available, but are either more advanced
or not commonly used. To see all subcommands, run the command
`vagrant list-commands`.
To restart a Vagrant box, simply run the following command:
vagrant reload
Likewise, to shutdown a box, run the following command:
vagrant halt
To remove a virtual environment completely, run:
vagrant destroy
This will destroy all files except the Vagrantfile.
Creating New Vagrant Images
After testing or installing the codes or web applications on your Vagrant box, exit from the instance shell, and go back to the host shell.
Run the following command to create a new image:
vagrant package
Sample output:
==> default: Attempting graceful shutdown of VM...
==> default: Clearing any previously set forwarded ports...
==> default: Exporting VM...
==> default: Compressing package to: /home/sk/package.box
The new image will be created and saved in your current directory.
Now, stop and delete existing boxes, and delete the Vagrantfile too.
vagrant destroy
    default: Are you sure you want to destroy the 'default' VM? [y/N] y
==> default: Destroying VM and associated drives...
rm Vagrantfile
Register the newly create package with new name(Ex.test-vg):
vagrant box add test-vg package.box
Sample output:
==> box: Adding box 'test-vg' (v0) for provider:
    box: Downloading: file:///home/sk/package.box
==> box: Successfully added box 'test-vg' (v0) for 'virtualbox'!
Now, initialize the new vagrant box as shown below:
vagrant init test-vg
Sample output:
A `Vagrantfile` has been placed in this directory. You are now
ready to `vagrant up` your first virtual environment! Please read
the comments in the Vagrantfile as well as documentation on
`vagrantup.com` for more information on using Vagrant.
Finally, start the new vagrant box:
vagrant up
Sample output:
Bringing machine 'default' up with 'virtualbox' provider...
==> default: Importing base box 'test-vg'...
==> default: Matching MAC address for NAT networking...
==> default: Setting the name of the VM: sk_default_1407157058202_42993
==> default: Clearing any previously set network interfaces...
==> default: Preparing network interfaces based on configuration...
    default: Adapter 1: nat
==> default: Forwarding ports...
    default: 22 => 2222 (adapter 1)
==> default: Booting VM...
==> default: Waiting for machine to boot. This may take a few minutes...
    default: SSH address: 127.0.0.1:2222
    default: SSH username: vagrant
    default: SSH auth method: private key
    default: Warning: Connection timeout. Retrying...
    default: Warning: Connection timeout. Retrying...
    default: Warning: Connection timeout. Retrying...
    default: Warning: Connection timeout. Retrying...
    default: Warning: Remote connection disconnect. Retrying...
==> default: Machine booted and ready!
==> default: Checking for guest additions in VM...
==> default: Mounting shared folders...
    default: /vagrant => /home/sk
Start using the new box.
That’s all for now. Hope this tutorial gave you the basic installation and usage details of Vagrant application. Refer the Official documentation page to find out more.
Cheers!
Reference:


