
GoAccess is a free and open source web log analyzer program which is able to analyze and check the web server logs rapidly. It allow system administrators to have a fast and valuable HTTP statistics which require a visual server report. It is released under GPL so it is an open source tool besides it runs as a command line within Unix and Linux operating systems.
We will start our article by describing this tool and later explaining how to install it and how to use it as command line.
GoAccess Web Log Analyzer Features
As it was mentioned GoAccess is a free and open source web log analyzer. It has several features where we can list the following:
- It parses the specified web log file and outputs the data to the X terminal
- It allows any custom log format string
- It is able to rapidly analyze and view web server statistics in real time without having to generate an HTML report.
Prerequisites
Before starting the installation of this tool, it is required to do the following conditions:
- Debian 7 must be the operating system VPS
- User account on the VPS with “sudo
- Install Apache web server with active HTTP traffic
Installation
To make the installation of the GoAccess Web Log Analyzer, we will do as follow:
Update and upgrade system packages:
The following command must be used to have “ssh” into the server as a user which has “sudo” elevation privileges
ssh root@your_server_ip
And to update the packages, the “apt-get” is used as follow:
apt-get update
You can install the updates to the Debian system packages using:
apt-get upgrade
Install the build essential package:
To install the “build essential” package the same tool “apt-get” is used by typing:
apt-get install build-essential
This package “build essential” has various important subsidiary packages like “make” which is required to compile software in Debian and Linux.
Install GoAccess dependencies:
It is important to install GoAccess dependencies on your VPS by using:
sudo apt-get install libncursesw5-dev libglib2.0-dev libgeoip-dev libtokyocabinet-dev
Set up the build directory:
To install the GoAccess, you need to define your directory. The “/usr/local/src” is the suitable one where you can build your GoAccess software. You have also to give the read, write and execute permissions. Indeed, the following command is used to do that:
sudo chown $USER /usr/local/srcsudo chmod u+rwx /usr/local/src
To change to the chosen directory, the “cd” command is used:
cd /usr/local/src
Download and extract GoAccess source code:
To download GoAccess software, you have to use the following command:
wget http://tar.goaccess.io/goaccess-0.8.5.tar.gz
And you can extract and unpack the downloaded “.tar.gz” file by typing:
tar -zxvf goaccess-0.8.5.tar.gz
Compile and install the source code:
To be within the new directory, we will do as follow:
cd goaccess-0.8.5/
Then, type the following code to run the configure script:
./configure —enable-geoip —enable-utf8
Before the installation of the GoAccess, the makefile must be built by using:
make
Then type the following command in order to install GoAccess which will be executed by Debian to the system directories:
sudo make install
Edit the GoAccess config file:
Several comment will be deactivated to be able to use the other features of the tool. The GoAccess config file will be edited using the vig text editor by typing:
sudo vi /usr/local/etc/goaccess.conf
The comment starting by “#” will removed since the server ignore such information. So we will start by removing the “date-format” setting which is described as follow:
# Apache log date format. The following date format works with any
# of the Apache's log formats below.
##date-format %d/%b/%Y
To remove the “#” you have just to use the key “j” several times to drop your cursor on the “date-format” line. Then select the “#” and press “x” to delete it. If it is correctly deleted so you will have something like this:
# Apache log date format. The following date format works with any
# of the Apache's log formats below.
#date-format %d/%b/%Y
Then, we will remove the “log-format”. In our case, we are running Apache host which is not virtual host but if you are using a virtual hosts set up so you will not be able to use the following instructors.
For our case the same steps will be used while removing the “#” symbol.
# NCSA Combined Log Format#log-format %h %^[%d:%^] "%r" %s %b "%R" "%u"#
Then, you have to disconnect from your VPS using the “exit” command and then log back with your “sudo” user:
exit ssh root@your_server_ip
Locate the log files:
Generally, with Debian systems, the Apache log files are stocked in: “/var/log/apache2”. We need to know where the Apache stores its logs in order to be able to use them. To check are the contents of this directory you can type the following command:
ls /var/log/apache2
Run GoAccess:
The following command will enable you to run GoAccess on your Apache server:
goaccess -f/var/log/apache2/access.log -a
Don’t forget to substitute the “/var/log/apache2/access.log” by your own log file directory path if it is not the same.
After typing the above command, the GoAccess dashboard will appear.
Navigate GoAccess:
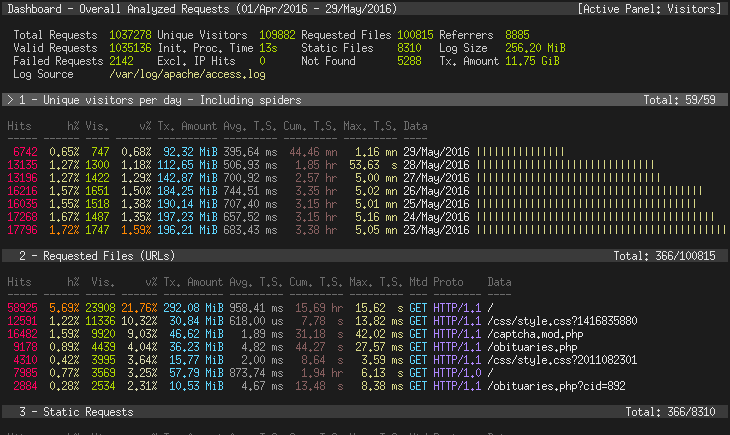
To be able to interact with GoAccess dashboard, you have to know some information which will help you to facilitate your work with GoAccess:
- To find the help window and get some helpful information, you have just to press the “F1” of “h” keys.
- The selected module on the dashboard could be expanded using the “o” or “enter”
- “j” is used to scroll down under an expanded active module, and “k” is used to scroll back up under the expanded active module.
- To see the set of the available options for the active module, you have to use “s” key.
- “q” is used to exit the program or the opened window.
- “g” is used to scroll to the last item of the dashboard screen.
- “F5” as it is known is used to refresh and redraw the dashboard.
- The “TAB” key will enable you to progress from one module to the following.
GoAccess modules:
Now after taking a basic background how to interact with the GoAccess dashboard, let us understand the signification of each module.
Within the dashboard, you can find the valid requests, invalid requests, time taken to analyze the provided data, URLs and many others information.
- Unique visitors: in this module, you will find the HTTP requests having the same IP, the same date and the same representative which are considered as a unique visitor.
- The requested files module indicate the most requested files on the web server.
- The requested static files include only static files the most frequently requested such as: “jpg”, “css”, “swf”, “js”, “gif “ and “png” files.
- HTTP 404 URLs module list the most HTTP 404: not found error requests
- On the operating system module the host’s operating system is shown and the OS usage is classified.
There are others modules we will not describe here but if you want to know the signification of one of a missing one leave a comment.
To add, you can move to your user’s home directory with “cd” and “~” command. You can print you current working directory by using the “pwd” command.
cd ~pwd
Conclusion
In this article the important steps to follow to install GoAccess were described. In fact, you will able to install GoAccess and to know how it works.


