
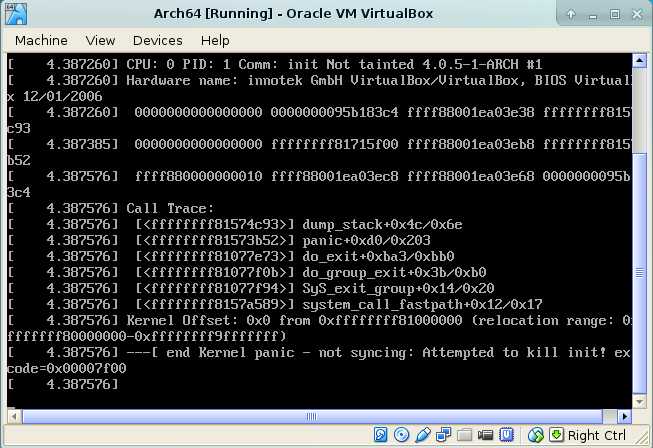
If you are Arch Linux user you may experienced kernel panic ! in operating systems which are based on Unix, kernel panic problem is not end of everything (however there is another type of breaking which is dead of OS !!) . Kernel panic happens because of some hardware actions such as a lot CPU working when RAM is not enough or pluging and unpluging the hardwares a lot and etc. Software reasons that kernel panic happens are giving administrator access to many users or installing and removing packages and files more than normal. In fact with software actions you make hardware problem and kernel panic happens for example you install graphic card driver in wrong way then you will find graphic problem and kernel can’t take it and get confused so kernel panic happens. These reasons were common reasons that kernel panic happens although it has other reasons !

Now lets see how we can solve kernel panic, my dear friend Arcush wrote an amazing article about kernel panic which it’s name is “Kernel panic, 11min” that I translated it in English for you, by the assumption that you didn’t delete files in pacman cache we continue this tutorial.
By supposition that kernel has problem syncing some packages/libraries because they are broken or etc we “chroot” and we install those packages again.
Note: If you have some data which are important for you get backup from them when you “chroot” although nothing would happen !!
Burn Arch Linux iso file on a DVD and then boot it, when your system is completely loaded use command below to get info about your partitions :
lsblk
Know we mount our partitions :
Note : Your partitions are different from me and commands below are just examples !
mount /dev/sda1 /mnt
mount /dev/sda2 /mnt/home
mkswap /dev/sda3
swapon /dev/sda3
Now we Chroot by following command :
arch-chroot /mnt
Note: before you Chroot you have :
root@archiso~#
But after Chroot you should have this mark :
sh-4.3#
If it didn’t changed you had problem in Chrooting !
We should be sure that Pacman is working correctly, maybe some libraries and packages that Pacman depends on them ruined so use command below :
pacman --version
The output should be like this :
|
.--. Pacman v4.2.1 - libalpm v9.0.1 / _.-' .-. .-. .-. Copyright (C) 2006-2014 Pacman Development Team \ '-. ' - ' ' - ' ' -' Copyright (C) 2002-2006 Judd Vinet '--' This program may be freely redistributed under the terms of the GNU General Public L |
If in the output you get error that a library or a package has problem you should reinstall that package/library, as an example the output found problem in a package/library which it’s name is unixmen so first we check if unixmen is in Pacman cache or not :
ls -l /var/cache/pacman/pkg/unixmen*
Now if you had the compressed file in Pacman cache go and search that where should this library/package be by default, for example this unixmen is a library and it should be in /lib/unixmen now by the commands below put this library there and extract it :
cp /var/cache/pacman/pkg/unixmen* /lib/unixmen
tar -xf /lib/unixmen/*
Now again check Pacman by following command to be sure that Pacman is working correctly :
pacman --version
Now we should reinstall Linux so search in Pacman cache to find Linux package, for example name of Linux package is :
linux-4.0.5-1-x86_64.pkg.tar.xz
Now we should reinstall this package by following command :
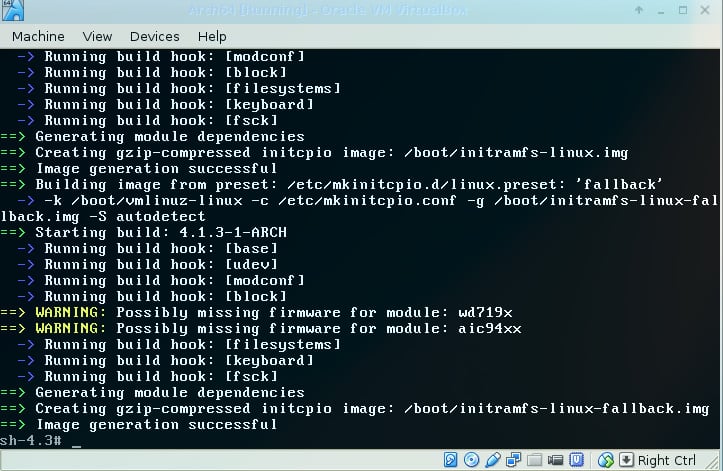
pacman -U /var/cache/pacman/pkg/linux-4.0.5-1-x86_64.pkg.tar.xz
End of process should be like this picture :
Now update and upgrade your system :
sudo pacman -Syu
After upgrading use following command :
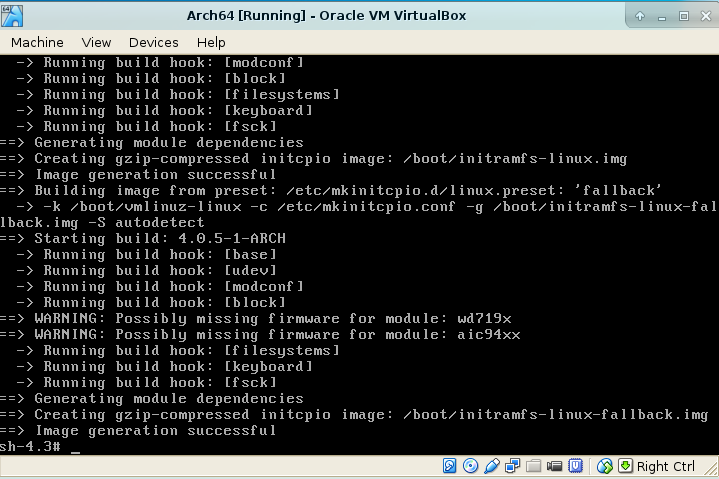
mkinitcpio -p linux
The output should be like this :

Now enter command below :
grub-mkconfig -o /boot/grub/grub.cfg
The output should be like this :

Now push ctrl+D buttons and enter following commands :
umount -R /mnt

reboot
Now Take the DVD out from your DVD writer and let your computer to boot from your Hard Disk, while system is booting you will see :
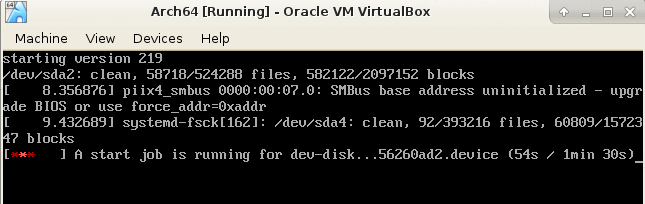
This means system is working correctly now and it will come up after about 1min and 30 seconds !!
I wish this article was useful for you 🙂


