
Openstack is a well known, rapidly growing cloud based system which empowers users to easily deploy and manage private and public cloud architecture. It is being used widely by many leading could services operators to cater the modern day computing needs of their customers. It is a feature rich system and implementing certain features requires some level of system administration experience. Today, we will review how to configure a site-to-site VPN using openstack. The following steps have been tested and implemented on a CentOS 7 system.
Install and configure VPNaaS
In order to use Openstack’s Site-to-Site VPN services, we need to first install and configure VPN component of neutron. Launch your system terminal and run following command to install VPN component. Please ensure that you are installing this component on your openstack Network Node.
[cc] yum install openswan openstack-neutron-vpn-agent [/cc]
Once the installation is complete, we need to configure it from within neutron configuration files. Enable VPNaas within neutron.conf file (/etc/neutron/neutron.conf) by adding the following line.
[cc] service_plugins = neutron.services.vpn.plugin.VPNDriverPlugin [/cc]
Next, edit the /usr/share/openstack-dashboard/openstack_dashboard/local/local_settings.py file in your favorite text editor and enable VPN here by adding the following line. This will let your openstack installation’s horizon dashboard to show “VPN” option under “Network” section.
[cc] ‘enable_VPNaaS’: True, [/cc]
That’s it, VPNaas Installation and configuration is complete, simply restart your web server alongwith neutron services for the changes to take effect.
[cc] systemctl restart httpd [/cc]
[cc] systemctl restart neutron-server [/cc]
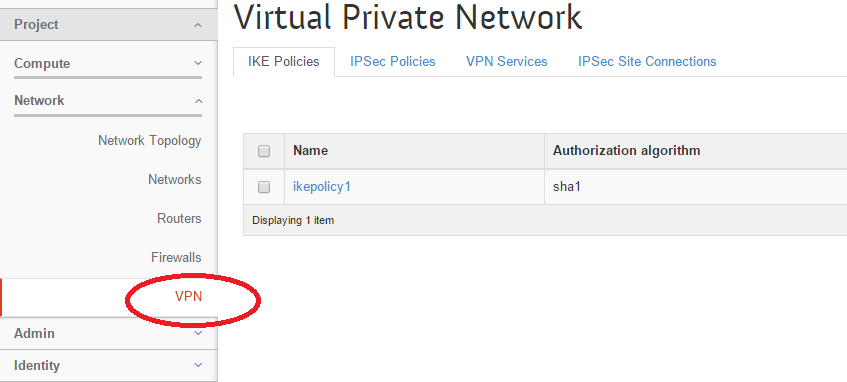
You should be able to see VPN option within openstack’s horizon dashboard now.
Configuring Site-to-Site VPN Connection
Let’s setup a site-to-site VPN connection now. We will carry out the operations from command line, but you can also perform these steps from Horizon dashboard. Here is the sequence of steps to perform on both ends to setup a Site-to-Site connection between them.
- Add an IKE Policy
- Add an IPSec Policy
- Add a VPN Service
- Add an IP Sec Site Connection
Run following command to add a IKE Policy, replace “ikepolicy” with whatever name you wish to assign to this policy.
[cc] neutron vpn-ikepolicy-create ikepolicy [/cc]
Run following command to add IPSec Policy; again replace “ipsecpolicy” with the name of your choice.
[cc] neutron vpn-ipsecpolicy-create ipsecpolicy [/cc]
Add a VPN Service now, lets assum “testVPN” is the name of VPN Service, “router1” is the external router on which this service applies and “subnet-1” is the subnet associated with this router.
[cc] neutron vpn-service-create –name testVPN –description “My vpn service” router1 subnet-1 [/cc]
On the final step, run following command to add IP Sec Site Connection. The general Syntax of this command is:
[cc] neutron ipsec-site-connection-create –name CONNECTION-NAME –vpnservice-id VPN-SERVICE-NAME –ikepolicy-id IKE-Policy-NAME –ipsecpolicy-id IPSEC-Policy-NAME –peer-address IP-ADDRESS-OF-PEER –peer-id PEER-ID –peer-cidr PEER-NETWORK ADDRESS –psk PSK-KEY [/cc]
Here is the command according to my test environment. Replace all required details according your own setup.
[cc] neutron ipsec-site-connection-create –name vpnconnection1 –vpnservice-id testVPN –ikepolicy-id ikepolicy –ipsecpolicy-id ipsecpolicy –peer-address 192.168.0.2 –peer-id 192.168.0.2 –peer-cidr 10.1.0.0/24 –psk secret [/cc]
That’s it, we are done, run following command to see the list of connections.
[cc] neutron ipsec-site-connection-list [/cc]
Repeat the same steps on the other side of your infrastructure and you will have a working Site-to-Site openstack VPN Setup. Enjoy!


