
Hello Friends, today we will discuss about setting up GlusterFS on popular Linux distributions like CentOS and Ubuntu. As you already know that distributed computing is the need of the hour, due to the growing needs of IT business, we need complex storage resources and an optimized approach to store and retrieve data from storage. One of the basic thing that differentiates distributed from centralized is no need of metadata as all the data is distributed among nodes or servers and can be accessed simply. Lets review basic concepts and setup instructions for GlusterFS.
What is GlusterFS?
GlusterFS is a distributed file system defined to be in user space. It is software based file system. GlusterFS consists of two parts; one is server component and another is client. An important term used in GlusterFS is “brick”. One must have good knowledge of these three terms if he/she wants to work on GlusterFS. Normally “brick” is defined as a storage file system that has been assigned a volume.
Advantages
GlusterFS has a lot of advantages over the conventional approaches but following four are the most important of them.
- Elimination of metadata concept
- Performance improvement
- Data size is reduced
- It doesn’t depend on kernel as it is running within user space.
In this article we will learn that how we can install Glusterfs and create distributed volume among two servers and a client. You can install as many servers as you want. We will start with the installation process then creating a pool and in the end a distributed volume.
Let’s suppose the IP’s of server and client
Server 1 IP address: 192.168.137.189
Server2 IP address: 192.168.21.191
Client IP address: 192.168.21.137.190
We will first configure the server then afterward the client. To install Glusterfs on server we need to add a repo in yum list.
[cc] wget -P /etc/yum.repos.d http://download.gluster.org/pub/gluster/glusterfs/LATEST/EPEL.repo/glusterfs-epel.repo [/cc]
Once yum respository has been updated, run following command to install GlusterFS server component.
[cc] yum install glusterfs glusterfs-fuse glusterfs-server [/cc]
Once the installation process is complete, run following command to configure newly installed glusterfs service to start automatically on system reboot/boot.
[cc] systemctl enable glusterd.service [/cc]
The above mentioned command will create some necessary symlinks, run following command to start GlusterFS service.
[cc] systemctl start glusterd.service [/cc]
Repeat the above mentioned process (Installing and starting GlusterFS service) on second server.
We are done with the installation of server components now. Its time to go ahead and prepare our client machine so it may be abole to communicate with GlusterFS servers.
Load and install necessary repositories in your system’s YUM package manager by running the following command.
[cc] yum install –disablerepo=* –enablerepo=glusterfs-epel glusterfs glusterfs-fuse [/cc]
So, by now both Server and client components are ready. Its time to proceed further with some tests to ensure that our GlusterFS is working as intended. Now we will check from server 1 -> server 2 by the following commands
From any Server machine, login to Gluster prompt by using the following command.
[cc] gluster [/cc]
Now lets probe the other Server using its IP: 192.168.21.191; Run following command inside “gluster” console.
[cc] peer probe 192.168.137.191 [/cc]
Here is the example output in case of successful communication.
![]() Use the following command within “gluster” console to check the status of both of your Servers.
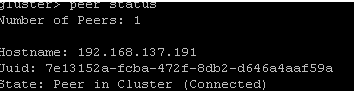
Use the following command within “gluster” console to check the status of both of your Servers.
[cc] peer status [/cc]
Following is the example output of the above command:
Congratulations, so far GlusterFS setup is working great. Now to start the distributed data process you have to create a folder for volume distribution by the following command.
[cc] mkdir /var/share [/cc]
Run the following command to create a volume; replace IPs with your actual server’s IP addresses.
[cc] gluster volume create vol_distributed transport tcp 192.168.137.189:/var/share 192.168.137.191:/var/share force [/cc]
That’s it, volume has been successfully created now, start it by using the following command.
[cc] gluster volume start vol_distributed [/cc]
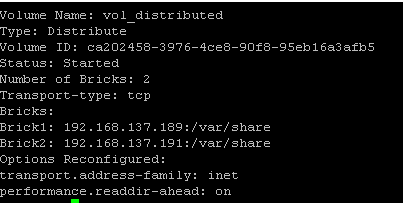
We can get the volume status by the following command on gluster console.
[cc] gluster> volume info [/cc]
In order to mount this volume on your client system, simply run following command.
[cc] mount -t glusterfs 192.168.137.189:/vol_distributed /var/ [/cc]
In order to verify that mount operation has been performed successfully, use “df -h” command on your client system and it should show you the volume.
Conclusion
Well, GlusterFS is a deep river and its pretty impossible to conclud it within just one article. One of the prominent advantages of this technique over conventional approaches is that; in case of disaster, data recovery is pretty simple and straightforward. It can be easily scaled as the replication of this data can be done to N bricks by adding more nodes and more data. We hope you enjoyed this article, do let us know in comments please!


