
Introduction
OpenCart is a popular open source shopping cart solution and provides elegantly written tools to establish a fully functional online store from scratch in a very short me with intuitive screens.It is a free open source ecommerce platform for online merchants.
OpenCart provides a professional and reliable foundation from which to build a successful online store. This foundation appeals to a wide variety of users; ranging from seasoned web developers looking for a user-friendly interface to use, to shop owners just launching their business online for the first time.
OpenCart has an extensive amount of features that gives you a strong hold over the customization of your store. With OpenCart’s tools, you can help your online shop live up to its fullest potential.
The objective of this article is to provide you with an understanding of installation and configuration of OpenCart.
Features
- Automatic Image Resizing
- Multiple Tax Rates
- Related Products
- Unlimited Information Pages
- Shipping Weight Calculation
- Discount Coupon System
- Search Engine Optimization (SEO)
- Unlimited Module Instance System
- Backup & Restore Tools
- Printable Invoices
- Sales Reports
- Error Logging
- And many.
Install OpenCart on Ubuntu 14.10
OpenCart is an widely used Open Source E-Commerce CMS which uses PHP & MySQL. It has its own Psuedo MVC structure and it is easier to handle and faster to setup. .
System Requirements
OpenCart requires certain technical requirements to be met for the store to operate properly. You should check to see that these server requirements are provided and installed on your web servers:
- Web Server (preferably Apache)
- PHP (at least 5.2)
- MySQL
- Curl
These extensions must be enabled for OpenCart to install properly on the web server.
Step 1: Install Prerequisites
Here, we will use Apache web server with Opencart. Before get started install OpenCart, you need to install a web server on Ubuntu (Apache, PHP, MySQL) called LAMP server, open terminal then running following commands:
sudo apt-get install lamp-server^
You need to enable curel and GD . It simply means that you need to install php5 libraries on your VPS. You can install these libraries by running this simple command:
sudo apt-get install php5-curl php5-gd
Step 2: Downloading and unzipping OpenCart archive
The latest version of OpenCart (v.2.0.0.1) can be downloaded from the OpenCart website (recommended) or directly from github.
To download open the terminal and type in the following command:
sudo wget https://github.com/opencart/opencart/archive/2.0.1.1.zipNow to unzip this folder, we will need to have Unzip module installed. In case you don’t have it, you can install it by inputting:
sudo apt-get install unzip
Now we will unzip this downloaded OpenCart zip file in the current directory:
unzip 2.0.1.1.zip
Now you need to navifate under Opencart file
cd opencart-20.1.1/You will find the upload folder inside.
We have to move the files & folders present in uploads folder into the root www folder. Type in the following command
mv -v upload/* /var/www
You can now find all the core files & folders of OpenCart directly sitting in your root www folder.
Step 3: Creating A MySQL Database & User
The next step is to create a database on the MySQL server for OpenCart to store a shop’s data on.
Open the terminal and run this command to log in to MySQL server (use the MySQL password you have entered during the installation of the LAMP Server):
mysql -u root -p
Create a database for Opencart.
create database opencartdb;
Create MySQL user adminstrator of Opencart.
create user adminopencart;
Now Give user: admim123 a password
set password for 'adminopencart' = password('admin123');
We will use this database information later when we are configuring OpenCart using the auto-installer
Set privileges usercube to access database opencartdb using this command:
grant all privileges on opencartdb.* to adminopencart@localhost
Now, Exit from MySQL server,by typing command:
FLUSH PRIVILEGES;
exit
Step 4: Renaming Config Files and Giving Ownership to Apache User
Now we need to rename the OpenCart config files from config-dist.php to config.php.
cp /var/www/config-dist.php /var/www/config.php
and also the file under admin folder.
cp /var/www/admin/config-dist.php /var/www/admin/config.php
We will give the ownership of our opencart files to the apache user by running the following command:
sudo chown www-data:www-data * -RStep 5: Web installation
With a new database freshly created, we are now ready to install OpenCart directly onto a website. You should open up a web browser and enter in the web address of where they uploaded OpenCart. You should be automatically greeted by the following page:

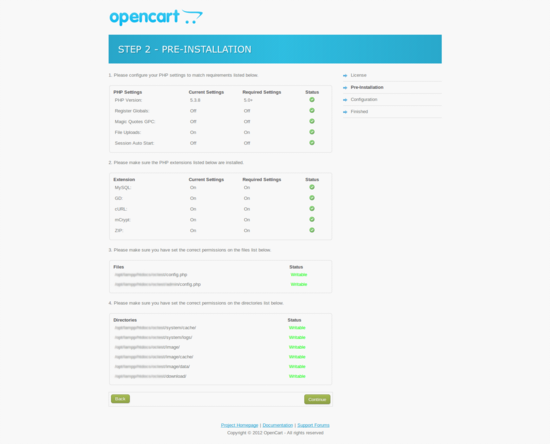
After accepting the terms and conditions, you should see a screen similar to this:
After that you need to add the database connection details (username/password, database name) established when you created the store’s database using MySQL Databases.

Once you have installed OpenCart, it is good practice and necessary from a security point of view to delete your install folder. We should be careful that only the install folder is to be deleted and not admin, catalog, or system folders. You can use the following command.
rm -rf /var/www/install/

Now that you have installed Opencart, you have a free alternative that will allow to build a successful online store on your website.
Enjoy!


