
Setting up a Cluster With Proxmox
In this article we try to make a cluster using Proxmox. These tests were performed with two nodes, although it is more interesting to make a cluster with at least three nodes.
For the system, we took the ISO Proxmox VE 3.1 from here.
The installation is the same for base, so no problems to remark (we just added Puppet for automated management configurations).
You can check here our article Proxmox Install Step by Step
The setup
Update:
For starters, you need an updated system of nodes. But since version 3 of Proxmox, publishers have changed the repository, so you have a version “without support”, we invite you to edit your sources.list
nano /etc/apt/sources.list
And edit :
deb https://enterprise.proxmox.com/debian wheezy pve-enterprise
By :
deb http://download.proxmox.com/debian wheezy pve-no-subscription
Then do a: (repo update, update the system, and then reboot at the end):
apt-get update && apt-get upgrade -y && reboot
Clustering:
Very simple to do, choose one of the nodes to be the master,
pvecm create name-of-cluster
Restarting pve cluster filesystem: pve-cluster[dcdb] notice: wrote new cluster config '/etc/cluster/cluster.conf'
Starting cluster:
    Checking if cluster has been disabled at boot... [  OK  ]
    Checking Network Manager... [  OK  ]
    Global setup... [  OK  ]
    Loading kernel modules... [  OK  ]
    Mounting configfs... [  OK  ]
   Starting cman... [  OK  ]
   Waiting for quorum... [  OK  ]
   Starting fenced... [  OK  ]
   Starting dlm_controld... [  OK  ]
   Tuning DLM kernel config... [  OK  ]
   Unfencing self... [  OK  ]
Then we check Cluster creation:
pvecm status
Version: 6.2.0
Config Version: 2
Cluster Name: unixmen-Cluster
Cluster Id: 52776
Cluster Member: Yes
Cluster Generation: 256
Membership state: Cluster-Member
Nodes: 1
Expected votes: 1
Total votes: 1
Node votes: 1
Quorum: 1
Active subsystems: 5
Flags:
Ports Bound: 0
Node name: srv-1
Node ID: 1
Multicast addresses: 239.192.206.246
Node addresses: 10.10.32.100
And we add the second server:
pvecm add 10.10.32.100
And valid exchange ssh keys:
The authenticity of host '10.10.32.100 (10.10.32.100)' can't be established.
ECDSA key fingerprint is xx:xx:xx:xx:xx:xx:xx:xx:xxx:xx:xx:xx:xx:xx:xx.
Are you sure you want to continue connecting (yes/no)? yes
root@10.10.32.100's password:
copy corosync auth key
stopping pve-cluster service
Stopping pve cluster filesystem: pve-cluster.
backup old database
Starting pve cluster filesystem : pve-clustercan't create shared ssh key database '/etc/pve/priv/authorized_keys'
Starting cluster:
   Checking if cluster has been disabled at boot... [  OK  ]
   Checking Network Manager... [  OK  ]
   Global setup... [  OK  ]
   Loading kernel modules... [  OK  ]
   Mounting configfs... [  OK  ]
   Starting cman... [  OK  ]
   Waiting for quorum... [  OK  ]
   Starting fenced... [  OK  ]
   Starting dlm_controld... [  OK  ]
   Tuning DLM kernel config... [  OK  ]
   Unfencing self... [  OK  ]
generating node certificates
merge known_hosts file
restart services
Restarting PVE Daemon: pvedaemon.
Restarting PVE API Proxy Server: pveproxy.
successfully added node 'yvain' to cluster.
We will check now the status of nodes:
pvecm nodes
Node  Sts   Inc   Joined               Name
   1   M    244   2014-02-13 16:36:02  srv-1
   2   M    256   2014-02-13 16:36:34  srv-2
You can also verify the presence of two nodes, by connecting to the web interface of any of your servers: https: // ipduserveur: 8006

Your cluster is now in place, before starting to play with, you have to add shared storage.
Storage:
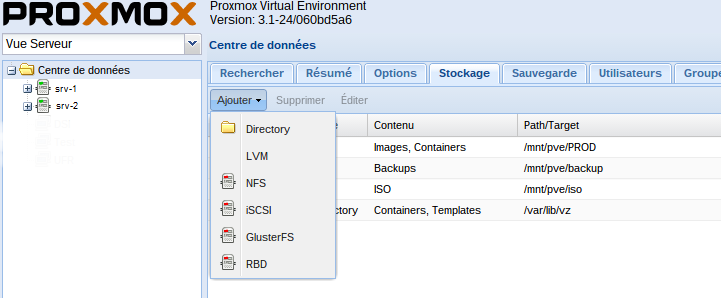
To change the storage, go to “data center” on the “Storage” tab and click “Add”:
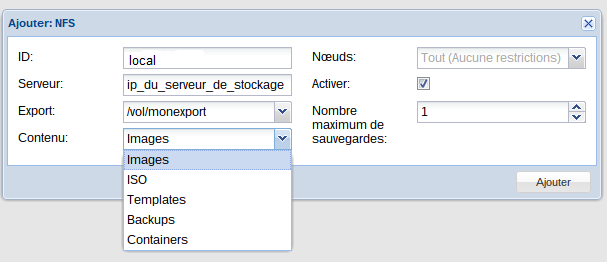
For simplicity we chose NFS mounts (although we intend to experiment with Ceph later):
The addition is quite simple (there just follow the instructions of the wizard), and you have the ability to assign storage resources to very specific uses: Storage VMs, ISOs, backups
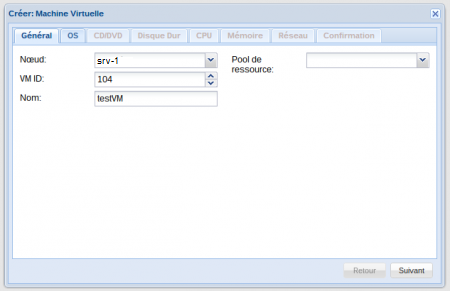
Once the VM is created, you can access its options, preferences … in the left menu, depending on the host on which it was started:
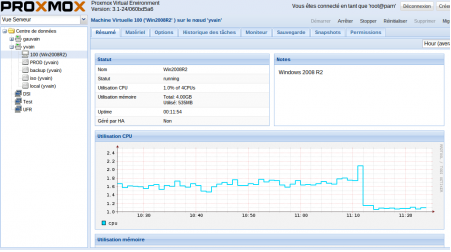
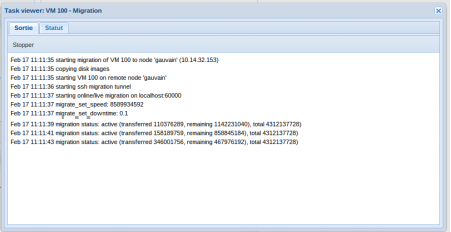
You can test live migration:
Improvements
For basic use, the default installation is fine, but for a professional environment, it is good to make some changes:
Network Settings
To use our VLANs and virtual IP for the cluster, I had to adapt the /etc/network/interfaces,
Here is what happens at home (that is adjusted according to your needs)
#loopback
auto lo
iface lo inet loopback

#déclaration ip virtuelle du cluster
auto lo:1
iface lo:1 inet static
        address 10.10.32.103
        netmask 255.255.255.255

#bonding with double attachement
auto bond0
iface bond0 inet manual
        slaves eth4 eth5
        bond_mode balance-xor
        bond_miimon 100
        bond_downdelay 200
        bond_updelay 200
        pre-up /bin/ip link set eth4 mtu 1500
        pre-up /bin/ip link set eth5 mtu 1500

#Default bridge interface
auto vmbr0
iface vmbr0 inet static
        bridge_ports bond0
        bridge_fd 0
        bridge_maxwait 0
        bridge_stp off
        address 10.10.32.103
        netmask 255.255.255.0
        network 10.10.32.0
        broadcast 10.10.32.255
        gateway 10.10.32.1
        dns-nameservers 10.10.32.30 10.10.32.130
        dns-search mondomaine

#declaration VLAN 7
auto vlan7
iface vlan7 inet manual
        vlan_raw_device bond0
        up /bin/ip link set vlan7 mtu 1500

#déclaration VLAN 72
auto vlan72
iface vlan72 inet manual
        vlan_raw_device bond0
        up /bin/ip link set vlan72 mtu 1500

#declaration VLAN 73
auto vlan73
iface vlan73 inet manual
        vlan_raw_device bond0
        up /bin/ip link set vlan73 mtu 1500


#VLAN interface bridge 72
auto vmbr72
iface vmbr72 inet static
        bridge_ports vlan72
        bridge_fd 0
        bridge_maxwait 0
        bridge_stp off
        address 10.14.31.54
        netmask 255.255.255.0
        network 10.14.31.0
        broadcast 10.14.31.255

#VLAN interface bridge 73
auto vmbr73
iface vmbr73 inet static
        bridge_ports vlan73
        bridge_fd 0
        bridge_maxwait 0
        bridge_stp off
        address 10.14.30.57
        netmask 255.255.255.0
        network 10.14.30.0
        broadcast 10.14.30.255
Failover with Keepalive
In order to failover, we obviously have a working installation of keepalive servers, and add a new instance
vrrp_instance VI_1 {
state MASTER
interface bond0
virtual_router_id 1
priority 100
advert_int 1
lvs_sync_daemon_interface bond0
authentication {
 auth_type PASS
 auth_pass password
}
virtual_ipaddress {
10.10.32.103/24 brd 10.10.32.255 dev bond0 # Proxmox
Then we will use the following commands to make the changes:
##############################################
## Proxmox
##############################################

virtual_server 10.10.32.103 443 {
    delay_loop 6
    lb_algo wlc
    lb_kind DR
    protocol TCP
    persistence_timeout 120

    sorry_server 10.10.32.103 443

    real_server 10.10.32.103 443 {
        weight 1
        TCP_CHECK {
            connect_timeout 3
        }
    }
}
virtual_server 10.10.32.103 5900 {
    delay_loop 6
    lb_algo wlc
    lb_kind DR
    protocol TCP
    persistence_timeout 120

    sorry_server 10.10.32.100 5900

    real_server 10.10.32.103 5900 {
        weight 1
        MISC_CHECK {
            misc_path "/usr/lib/nagios/plugins/check_tcp -H 10.10.32.103 -p 443"
        }
    }
}
The virtual cluster IP is 10.10.32.103.
As we said the master is 10.10.32.103 and keepalive via nagios did a test on port 443 of the master, if it does not respond in less than 3s, it switches to “HS” and it is the slave (10.14. 32.100)
this configuration is applied to port 443 and port 5900, used to the virtual console in VNC.
Adding a reverse proxy and SSL Certificate
Since version 3.0, Proxmox no longer uses Apache as the web server, but an internal process “pvcecluster” There are no changes possible..
We will insert a Nginx (lightweight, easily changeable and highly efficient)
apt-get install nginx-light
Then we will create the virtual host:
On port 443, you take into account the ssl certificate, created for the common domain servers (domain that points to the virtual cluster IP), then redirects locally on the 8006 port.
server {
        listen          80;
        server_name     proxmox.unixmen.com;
        rewrite         ^ https://$hostname.mondomaine.fr$request_uri? permanent;
}

server {
        listen                  443 ssl;
        server_name             proxmox.unixmen.com;
        ssl on;
        ssl_certificate         /etc/nginx/conf.d/cert-20434-proxmox.unixmen.com.pem;
        ssl_certificate_key     /etc/nginx/conf.d/proxmox.unixmen.com.key;
        location / { proxy_pass https://127.0.0.1:8006; }
}
We activate the configuration now:
rm -f /etc/nginx/sites-enabled/default
ln -sf /etc/nginx/sites-available/pveproxy /etc/nginx/sites-enabled/
we modify pveproxy, for that you need to create the following file:
nano /etc/default/pveproxy
ALLOW_FROM="127.0.0.1,10.10.32.103,10.10.32.100"
DENY_FROM="all"
POLICY="allow"
It is important to add the ips of the cluster nodes. Otherwise the web interface will no longer work properly (the other nodes can no longer question them).
It remains to restart what is necessary:
/etc/init.d/pveproxy restart
/etc/init.d/nginx restart
That’s all. Thank you.


