
Hi all.
Today we will come to know how we can secure our OpenSUSE 42.1 Server with the help of iptables. Now a days, security is the prime concern for servers. Every now and then, you will face problems with your LIVE or Production server’s security. If your server security is not high enough, then you will face real problem losing your data over internet.
Let’s get started then.
What is iptables?
First, we need to know what is iptables. Iptables is an application that allows a user to configure the firewall security tables provided by the Linux kernel firewall and the chains so that a user can add / remove firewall rules to it accordingly to meet his / her requirements. Iptables uses different kernel modules and different protocols so that user can take the best out of it. As for example, iptables is used for IPv4 ( IP version 4/32 bit ) and ip6tables for IPv6 ( IP version 6/64 bit ). Normally, iptables rules are configured by System Administrator. You must have root privileges to execute iptables rules. On openSUSE 42.1 Linux system, iptables can be found as preinstalled on /usr/sbin/iptables location. Every iptables rules are directly handled by the Linux Kernel itself and it is known as kernel duty. Whatever GUI tools or other security tools you are using to configure your server’s firewall security, at the end of the day, it is converted into iptables rules and supplied to the kernel to perform the operation.
Linux Kernel uses the Netfilter framework so that it can provide various networking-related operations which can be performed by using iptables. We will not cover those though.
Previously, ipchains was used in most of the Linux distributions for the same purpose. But, now a days, every Linux Kernel comes with iptables instead of ipchains.
Why OpenSUSE?
OpenSUSE is a very famous Linux distribution. It is widely used by System Admins now a days and too good for development purpose and for production environment. You can install this on your Laptop and enjoy the beauty of OpenSUSE. Beyond the distribution, the openSUSE Project provides a web portal for community involvement. It is built for software developers and system administrators, also has a user-friendly desktop, and feature-rich server environment. It has both KDE & GNOME Desktop environment.
Iptables version
To know your iptables version, type the following command in your terminal.
sudo iptables --version
Start & Stopping your firewall
To start or stop your iptables firewall on your OpenSUSE 42.1, type the following
sudo /sbin/rcSuSEfirewall2 stop
To start it again
sudo /sbin/rcSuSEfirewall2 start
Getting all iptables rules lists
To know all the rules that is currently present & active in your iprables, simply open a terminal and type the following.
sudo iptables -L
If there are no rules exits on the iptables means if there are no rules added so far in your iptables firewall, you will see something like the below image.
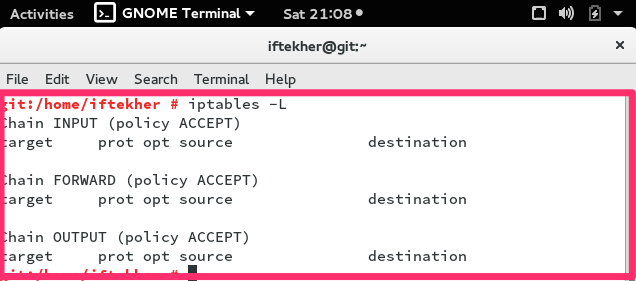
In this above picture, you can see that , there are three (3) chains and they are INPUT, FORWARD, OUTPUT and there are no rules exists. Actually I haven’t add one yet.
Type the following to know the status of the chains of your iptables firewall.
sudo iptables -S
With the above command, you can learn whether your chains are accepting or not.
Clear all iptables rules
To clear all the rules from your iptables firewall, please type the following. This is normally known as flushing your iptables rules.
sudo iptables -F
If you want to flush the INPUT chain only, or any individual chains, issue the below commands as per your requirements.
sudo iptables -F INPUT
sudo iptables -F OUTPUT
sudo iptables -F FORWARD
ACCEPT or DROP Chains
To accept or drop a particular chain, issue any of the following command on your terminal to meet your requirements.
iptables --policy INPUT DROP
The above rule will not accept anything that is incoming to that server. To revert it again back to ACCEPT, do the following
iptables --policy INPUT ACCEPT
Same goes for other chains as well like
iptables --policy OUTPUT DROP
iptables --policy FORWARD DROP
Note: By default, all chains of iptables ( INPUT, OUTPUT, FORWARD ) are in ACCEPT mode. This is known as Policy Chain Default Behavior.
Allowing any port
If you are running any web server on your host, then you must allow your iptables firewall so that your server listen or respond to port 80. By default web server runs on port 80. Let’s do that then.
sudo iptables -A INPUT -p tcp --dport 80 -j ACCEPT
On the above line, A stands for append means we are adding a new rule to the iptables list. INPUT stands for the INPUT chain. P stands for protocol and dport stands for destination port. By default any web server runs on port 80. Similarly, you can allow SSH port as well.
sudo iptables -A INPUT -p tcp --dport 22 -j ACCEPT
By default, SSH runs on port 22. But it’s good practise not to run SSH on port 22. Always run SSH on a different port. To run SSH on a different port, open /etc/ssh/sshd_config file on your favorite editor and change the port 22 to a other port.
Blocking any port
Say we want to block port 135. We can do it by
sudo iptables -A INPUT -p tcp --dport 135 -j DROP
if you want to block your server to initiate any SSH connection from the server to another host/server, issue the following command
sudo iptables -A OUTPUT -p tcp --dport 22 -j DROP
By doing so, no one can use your sever to initiate a SSH connection from the server. The OUPUT chain will filter and DROP any outgoing tcp connection towards another hosts.
Allowing specific IP with Port
sudo iptables -A INPUT -p tcp -s 0/0 --dport 22 -j ACCEPT
Here -s 0/0 stand for any incoming source with any IP addresses. So, there is no way your server is going to respond for a tcp packet which destination port is 22. If you want to allow only any particular IP then use the following one.
sudo iptables -A INPUT -p tcp -s 12.12.12.12/32 --dport 22 -j ACCEPT
On the above example, you are only allowing 12.12.12.12 IP address to connect to port SSH. Rest IP addresses will not be able to connect to port 22. Similarly you can allow by using CIDR values. Such as
sudo iptables -A INPUT -p tcp -s 12.12.12.0/24 --dport 22 -j ACCEPT
The above example show how you can allow a whole IP block for accepting connection on port 22. It will accept IP starting from 12.12.12.1 to 12.12.12.255.
If you want to block such IP addresses range, do the reverse by replacing ACCEPT by DROP like the following
sudo iptables -A INPUT -p tcp -s 12.12.12.0/24 --dport 22 -j DROP
So, it will not allow to get a connection on port 22 from from 12.12.12.1 to 12.12.12.255 IP addresses.
Blocking ICMP
If you want to block ICMP (ping) request to and from on your server, you can try the following. The first one will block not to send ICMP ping echo request to another host.
sudo iptables -A OUTPUT -p icmp --icmp-type 8 -j DROP
Now, try to ping google.com. Your OpenSUSE server will not be able to ping google.com.
If you want block the incoming ICMP (ping) echo request for your server, just type the following on your terminal.
sudo iptables -I INPUT -p icmp --icmp-type 8 -j DROP
Now, It will not reply to any ICMP ping echo request. Say, your server IP address is 13.13.13.13. And if you ping ping that IP of your server then you will see that your server is not responding for that ping request.
Blocking MySql / MariaDB Port
As Mysql is holding your database so you must protect your database from outside attach. Allow your trusted application server IP addresses only to connect with your MySQL server. To block other
sudo iptables -A INPUT -p tcp -s 192.168.1.0/24 --dport 3306 -m state --state NEW,ESTABLISHED -j ACCEPT
So, it will not take any MySql connection except 192.168.1.0/24 IP block. By default MySql runs on 3306 port.
Blocking SMTP
If you not running any mail server on your host server or if your server is not configured to act like a mail server, you must block SMTP so that your server is not sending any spam or any mail towards any domain. You must do this to block any outgoing mail from your server. To do so,
sudo iptables -A OUTPUT -p tcp --dport 25 -j DROP
Block DDoS
We all are familiar with the term DDoS. To get rid of it, issue the following command in your terminal.
iptables -A INPUT -p tcp --dport 80 -m limit --limit 20/minute --limit-burst 100 -j ACCEPT
You need to configure the numerical value to meet your requirements. This is just a standard to maintain.
You can protect more by
echo 1 > /proc/sys/net/ipv4/ip_forward
echo 1 > /proc/sys/net/ipv4/tcp_syncookies
echo 0 > /proc/sys/net/ipv4/conf/all/accept_redirects
echo 0 > /proc/sys/net/ipv4/conf/all/accept_source_route
echo 1 > /proc/sys/net/ipv4/conf/all/rp_filter
echo 1 > /proc/sys/net/ipv4/conf/lo/rp_filter
echo 1 > /proc/sys/net/ipv4/conf/lo/arp_ignore
echo 2 > /proc/sys/net/ipv4/conf/lo/arp_announce
echo 1 > /proc/sys/net/ipv4/conf/all/arp_ignore
echo 2 > /proc/sys/net/ipv4/conf/all/arp_announce
echo 0 > /proc/sys/net/ipv4/icmp_echo_ignore_all
echo 1 > /proc/sys/net/ipv4/icmp_echo_ignore_broadcasts
echo 30 > /proc/sys/net/ipv4/tcp_fin_timeout
echo 1800 > /proc/sys/net/ipv4/tcp_keepalive_time
echo 1 > /proc/sys/net/ipv4/tcp_window_scaling
echo 0 > /proc/sys/net/ipv4/tcp_sack
echo 1280 > /proc/sys/net/ipv4/tcp_max_syn_backlog
Blocking Port Scanning
There are hundred of people out there to scan your open ports of your server and try to break down your server security. To block it
sudo iptables -N block-scan
sudo iptables -A block-scan -p tcp —tcp-flags SYN,ACK,FIN,RST RST -m limit —limit 1/s -j RETURN
sudo iptables -A block-scan -j DROP
Here, block-scan is a name of a new chain.
Blocking Bad Ports
You may need to block some bad ports for your server as well. Here is how you can do this.
badport="135,136,137,138,139,445"
sudo iptables -A INPUT -p tcp -m multiport --dport $badport -j DROP
sudo iptables -A INPUT -p udp -m multiport --dport $badport -j DROP
You can add more ports according to your needs.
That’s all for today. Thank you. Hope you enjoy it.


