")
Log management, disk partition and LVM management for RHCSA-An introduction
Log management, disk partition and LVM management are important aspect from RHCSA point of view.This is the second tutorial of module-2 of RHCSA curriculum. We have discussed process management, software management, job scheduling and virtualisation tutorial in part-1 of Module-2 of RHCSA.
You can access following link to have a look on previous part of RHCSA module-2 published in this RHCSA series:
1. Log management with rsyslogd and journald in Red Hat Linux 7
Logs are created by various Linux process during various operations, there are multiple methods used in Red Hat Linux which are used in Red Hat Linux to mange logs. Logs can be generate by the running process itself somewhere on to the system. Another method is that systemctl start a process and keep track of that running process and store all of the logs related to the service in journald. Another classical method of storing logs is via using rsyslogd and all of the logs are written in /etc/log/ directory.
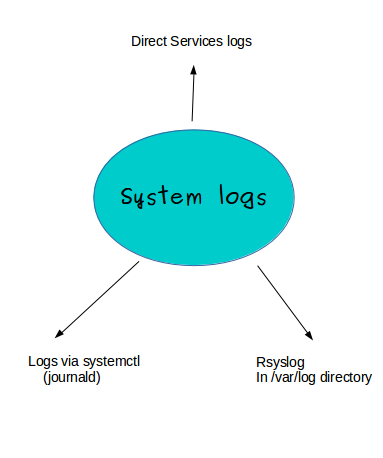
In RHEL 7 systemd is responsible for starting a process and if something goes wrong logs are stored in journald, rsyslog take care of processes when they are running in current.
Use journalctl to get a view fo logs from very begening of booting time
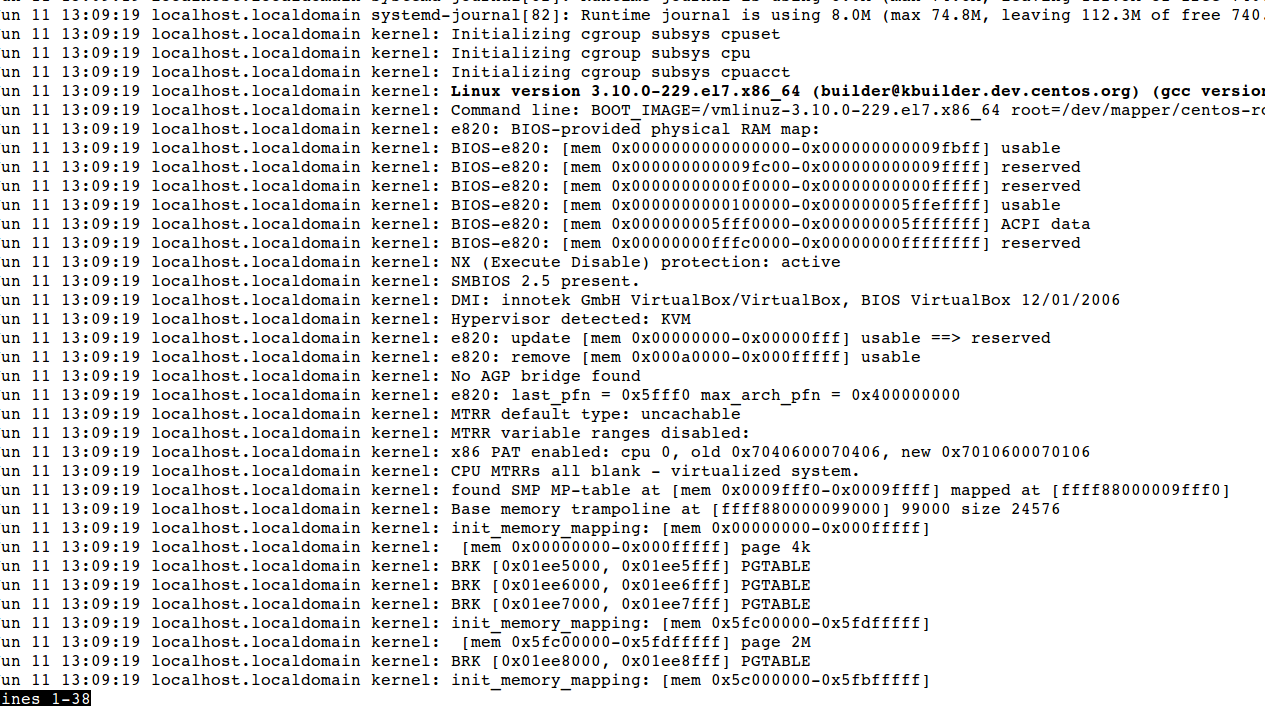
# journalctl
Get boot information with -b option
# journalctl -b
Use anotger filer to get a log view since yesterday
# journalctl –since=yesterday
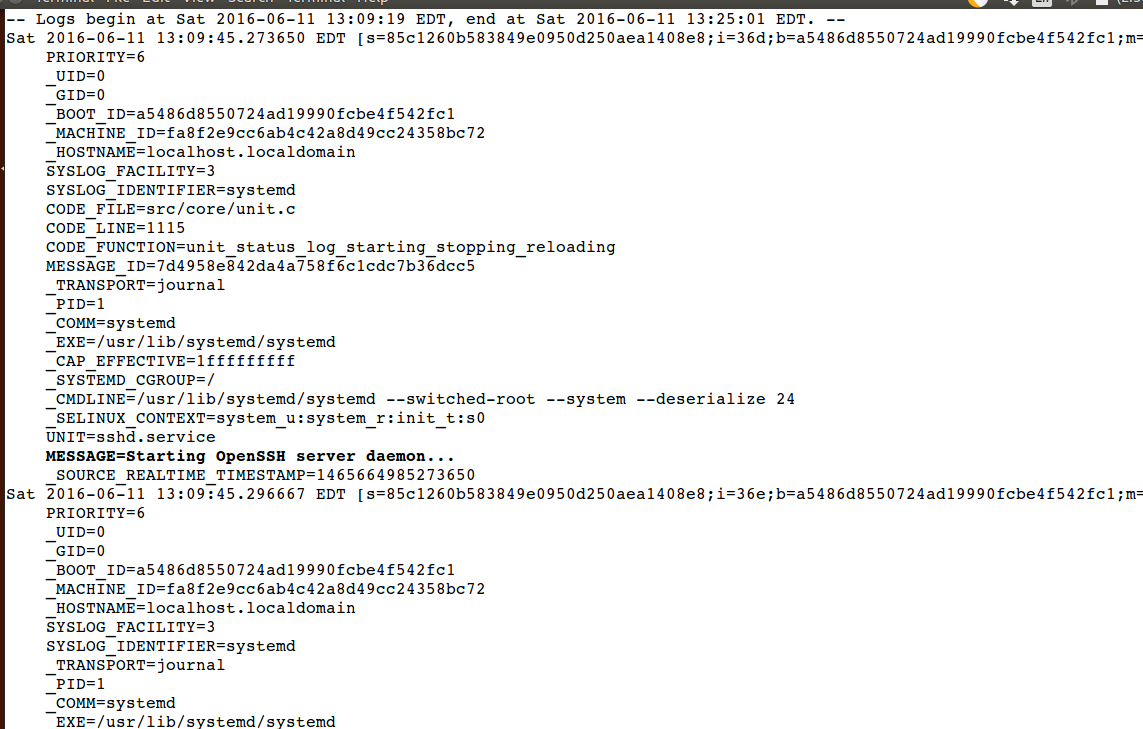
Journald gets its information from systemctl, let us get inofrmation of sshd service
# journalctl -u sshd --since=yesterday
Sample output

You can see recent sshd activity is logged
To get more detailed infomration use versbose option
# journalctl -u sshd --since=yesterday -o verbose
We can even use systemctl to get detailed information about an service
# systemctl status sshd -l

An important thing to keep in mind is that what if all of the logs keep getting stored on to the system, logs get generated every moment and you can get out of storage soon, therefore it is imortant to make sure after a specific time period old logs must got vanished and new logs file needs to created.
To manage that ageing of logs we configure logrotate.
Attempt ssh login with user with a wrong password, and have a look in log files
# vim /etc/logrotate.conf
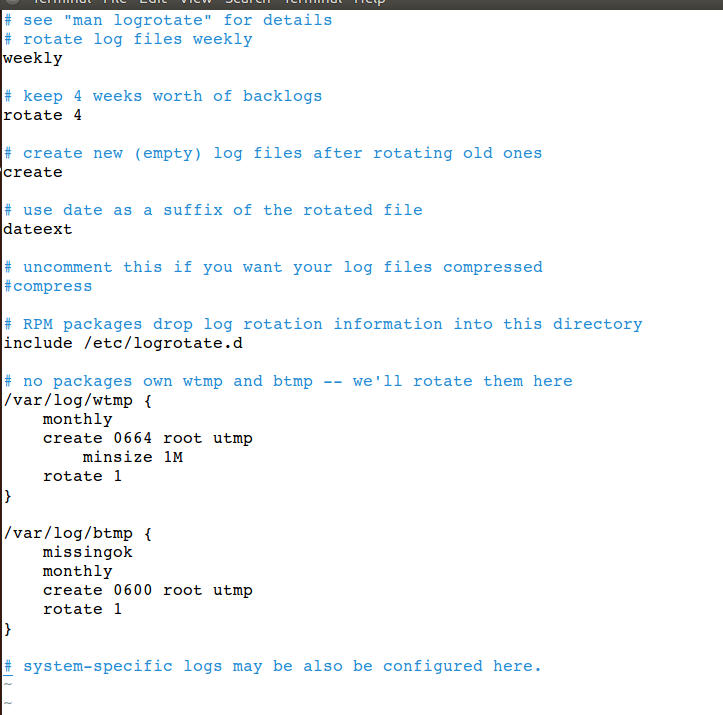
A pre-configured life span of logs will be one week, you can compress logs, or copy of old file cab be kept, you can configure your settings in this configuration file.
Logrotate run as cornjob, have a look
# cd /etc/cron.daily/ && ls

2. Managing disk partitions in Red Hat Linux 7
We have added a new virtual disk to describe disk partitioning in Linux, current disk status of system can be found in /proc/partition file, have a look
# cat /proc/partition
Sample output
major minor #blocks name
11 0 1048575 sr0
 8 0 52428800 sda
 8 1 512000 sda1
 8 2 51915776 sda2
 253 0 48721920 dm-0
 253 1 3145728 dm-1
 8 16 8388608 sdb
Newly created disk is listed as sdb, there is not any current partition with sdb.
Create a new partition on sdb with fdisk
# fdisk /dev/sdb
Sample output
Welcome to fdisk (util-linux 2.23.2).

Changes will remain in memory only, until you decide to write them.
Be careful before using the write command.

Device does not contain a recognized partition table
Building a new DOS disklabel with disk identifier 0x0ff4deb1.

Command (m for help):
You can see that there is no partition on sdb, type m for help
Command (m for help): m
Command action
 a toggle a bootable flag
 b edit bsd disklabel
 c toggle the dos compatibility flag
 d delete a partition
 g create a new empty GPT partition table
 G create an IRIX (SGI) partition table
 l list known partition types
 m print this menu
 n add a new partition
 o create a new empty DOS partition table
 p print the partition table
 q quit without saving changes
 s create a new empty Sun disklabel
 t change a partition's system id
 u change display/entry units
 v verify the partition table
 w write table to disk and exit
 x extra functionality (experts only)
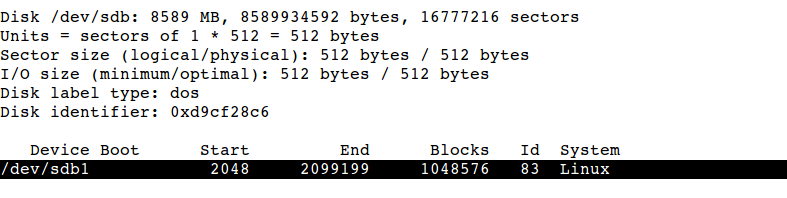
Type p to get current status of disk
Disk /dev/sdb: 8589 MB, 8589934592 bytes, 16777216 sectors
Units = sectors of 1 * 512 = 512 bytes
Sector size (logical/physical): 512 bytes / 512 bytes
I/O size (minimum/optimal): 512 bytes / 512 bytes
Disk label type: dos
Disk identifier: 0x0ff4deb1

Device Boot Start End Blocks Id System
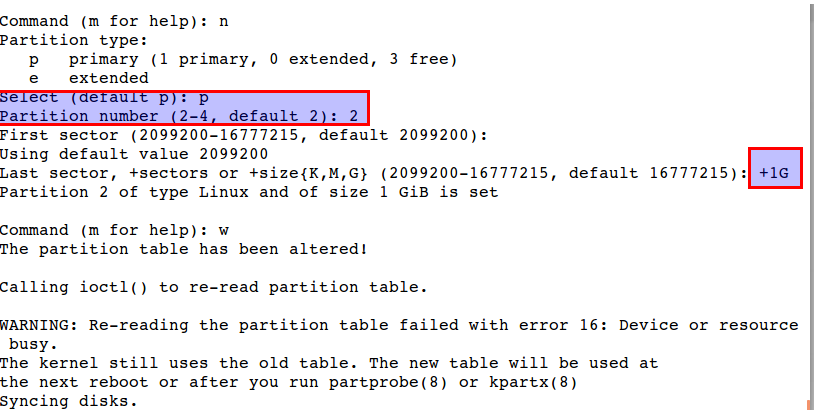
Press n to create a new partition
Partition type:
 p primary (0 primary, 0 extended, 4 free)
 e extended
Select (default p):
Select primary partition, which is default, press p
Select (default p): p
Partition number (1-4, default 1):
Press 1 to create first primary partition
First sector (2048-16777215, default 2048):
Using default value 2048
Last sector, +sectors or +size{K,M,G} (2048-16777215, default 16777215):
Create a last sector of suppose 1 GB, if you will press enter the entire disk will be selected which is not an good idea, let us create new partition.
Last sector, +sectors or +size{K,M,G} (2048-16777215, default 16777215): +1G
Partition 1 of type Linux and of size 1 GiB is set

Command (m for help):
Press p again and new disk has one partition
Press w to write the partition on disk and quit.
Command (m for help): w
The partition table has been altered!

Calling ioctl() to re-read partition table.
Syncing disks.
Disk partition is created, let us create some file system to that newly created disk partition, use mkfs to create a partition.
# mkfs
mkfs mkfs.cramfs mkfs.ext3 mkfs.fat mkfs.minix mkfs.vfat
mkfs.btrfs mkfs.ext2 mkfs.ext4 mkfs.gfs2 mkfs.msdos mkfs.xfs
There are may file system options are available.
# mkfs.xfs /dev/sdb1
Sample output
meta-data=/dev/sdb1 isize=256 agcount=4, agsize=65536 blks
 = sectsz=512 attr=2, projid32bit=1
 = crc=0 finobt=0
data = bsize=4096 blocks=262144, imaxpct=25
 = sunit=0 swidth=0 blks
naming =version 2 bsize=4096 ascii-ci=0 ftype=0
log =internal log bsize=4096 blocks=2560, version=2
= sectsz=512 sunit=0 blks, lazy-count=1
realtime =none extsz=4096 blocks=0, rtextents=0
If you needs to create windows compatible disk partition, use mkfs.vfat option.
Mount partition in /etc/fstab in Red Hat Linux 7
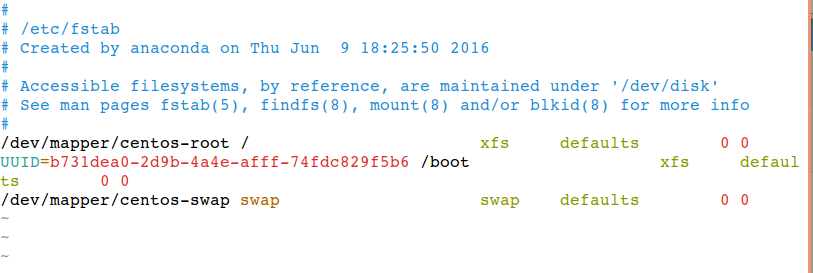
Open /etc/fstab file and have a look:
Every partition have their unique id, which can be listed with blkid
# blkid
 Create a new directory
# mkdir /mount
Let us mount created /dev/sdb1 partition to /mount
open /etc/fstab file
# vim /etc/ftab
Mount /deb/sdb1 to /mount with file system type xfs that we have created, keep rest of the things as default.
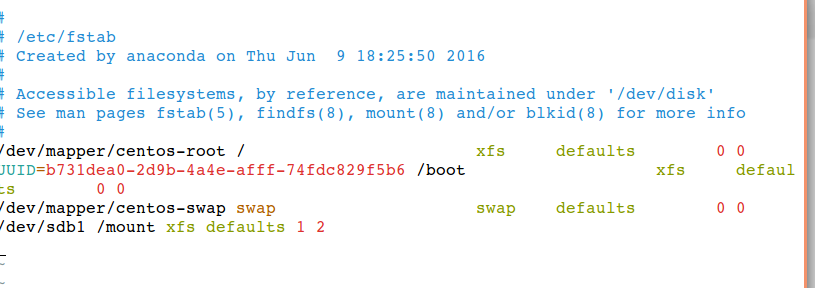
Save and exit and mount all partitions to activate that newly mounted file system.
# mount -a
Mount file system with UUID instead of partition name i.e. /dev/sdb1, use blkid to gerb your UUID, it is never going to be change so it is more secure and stable method to mount with UUID, copy that UUID.
Mount partition with UUID in /etc/fstab
# vim /etc/fstab
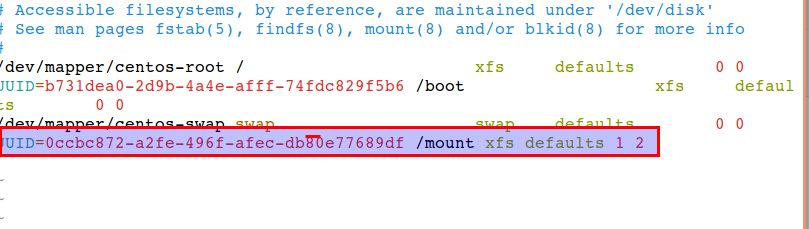
Use mount -a to remount this new UUID based partition and use df command to list partition, our newly created partition is listed there:
# df

Created encrypted partition is Red Hat Linux 7
Let us create another disk partition so create a new encrypted partition
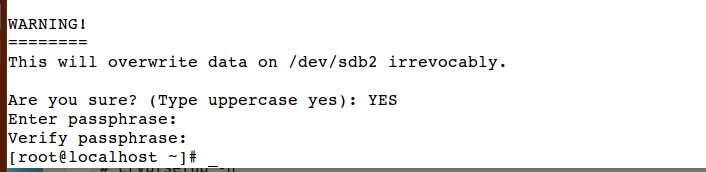
Create encrypted partition using cryptsetup.
# cryptsetup luksFormat /dev/sdb2
Type ‘YES’ in uppercase, use minimum 8 character complicated password.
Create a new mount point
# mkdir /secured
Open that encrypted partition and give a name to that partition e.g. secured
# cryptsetup luksOpen /dev/sdb2 secured
This partition will be stored in /dev/mapper/, have a look
# cd /dev/mapper && ls
![]()
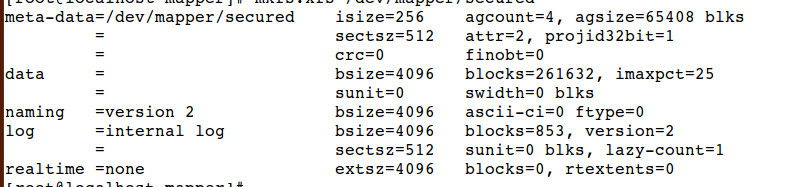
Path of that partition will be /dev/mapper/secured, let us create a file system for that encrypted partition.
# mkfs.xfs /dev/mapper/secured
Mount partition to /secured directory
# mount /dev/mapper/secured /secured/
Access this mounted encrypted partition.
# cd /secured && touch 1.txt
Close that secured device
Umount partition
# umount /secured
Close that device
# cryptsetup luksClose /dev/mapper/secured
Have a look in /dev/mapper again
# cd /dev/mapper && ls
That secured partion will not be visible anymore, as it is secured and not one will be able to access that encrypted partition.
To mount that partition, open file under /etc/ named as crypttab
# vim /etc/crypttab
Put entries as follows, secured is the name that we give to that secure partition i.e. /deb/sdb2
secured /dev/sdb2 none
Edit /etc/inittab as well
# vim /etc/inittab
Sample outlook
#
# /etc/fstab
# Created by anaconda on Thu Jun 9 18:25:50 2016
#
# Accessible filesystems, by reference, are maintained under '/dev/disk'
# See man pages fstab(5), findfs(8), mount(8) and/or blkid(8) for more info
#
/dev/mapper/centos-root / xfs defaults 0 0
UUID=b731dea0-2d9b-4a4e-afff-74fdc829f5b6 /boot xfs defaults 0 0
/dev/mapper/centos-swap swap swap defaults 0 0
UUID=0ccbc872-a2fe-496f-afec-db80e77689df /mount xfs defaults 1 2
/dev/mapper/secured /secured xfs defaults 0 0
Mount all partitions
# mount -a
Save and reboot the system, you will be asked for password
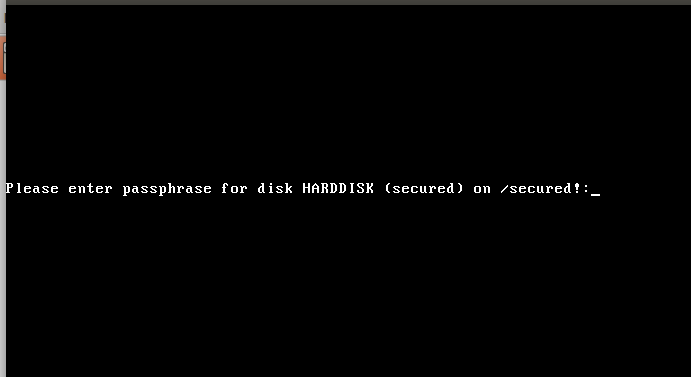
Give password which you have defined for secured device, only then you will be able to proceed.
So it could be an intresting way to even put an extra layer of security along with the root and grub security.
configure and managing LVM in Red Hat Linux 7
Create a LVM in Red Hat Linux 7
Logical volumes are more precised method to manage disk partitions, we can add more then one hard disk to logical volumes, we can easily resize them and they are easy to backup.
To create a new disk partition, create new partition using fdisk, change partition type, use l to get LVM code and create a new LVM type disk partition.
Create a physical volume with this new partition
# pvcreate /dev/sdb3
Verify that newly created physical volume
# pvs

Now create a volume group and let us give it a name umvg
# vgcreate umvg /dev/sdb3
Create a logical volume from this volume group of size of 512 MB and give a name to volume group
# lvcreate -n umlv -L 512M umvg
Create a file system on that newly created logical volume
# mkfs.xfs /dev/umvg/umlv
Resize a LVM in Red Hat Linux 7
Create a new partition using fdisk, assume we have now /dev/sdb4
# vgextend umvg /dev/sdb4
Extend logical volume group as well, -r option will create file system automatically, +100%FREE will consume available free disk space, you can see in output that size of logical volume will be extended.
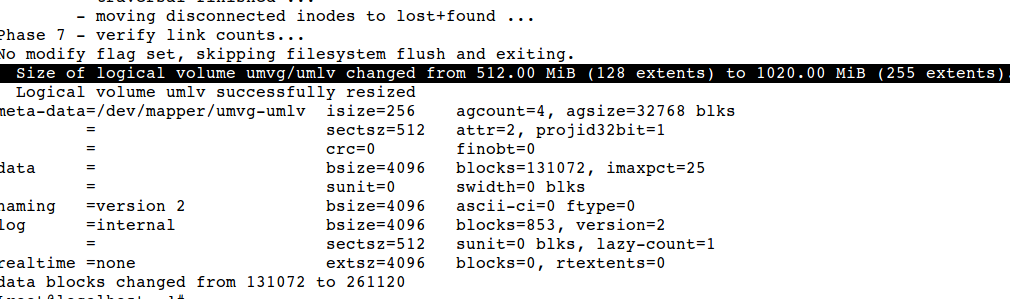
# lvextend -l +100%FREE -r /dev/umvg/umlv
Resize LVM size in Red Hat Linux 7
As we have extended volume size with LVM, let us reduce size as well.
Check file system first
# e2fsck /dev/umvg/umlv
Now reduce size of logical volume to 512 MB
# lvreduce -L 512M /dev/umvg/umlv
Sample output
WARNING: Reducing active logical volume to 512.00 MiB
 THIS MAY DESTROY YOUR DATA (filesystem etc.)
Do you really want to reduce umlv? [y/n]: y
 Size of logical volume umvg/umlv changed from 1020.00 MiB (255 extents) to 512.00 MiB (128 extents).
 Logical volume umlv successfully resized
Remount file systems
# mount -a
Have a look on latest status of lvm
# lvs

This was all about Disk management and logs management in Red Hat Linux 7.
Conclusion
The second module is over with this chapter, with next chapter we will begin with module-3 of RHCSA curriculum which will include Advanced System Administrations tasks. Stay tuned.


