
Developers are frequently looking for integrated developer environments (IDEs) that meet specific needs or those that offer a broad range of features and supported languages to use on the regular. There are tons of IDEs to choose from, each with a distinct set of functions, features and tools to streamline the workflow. There’s an IDE for practically any programming language you want to work with, while some IDEs support practically every language known to man either natively or by extending capabilities with plug-ins or add-ons. There are also many cross-IDE integrations, with tools building, enhancing and stacking for some of the most impressive, yet incredibly flexible, functionality in the development realm.
In this article article we will discuss the features and installation of following major IDEs on Linux.
1- MonoDevelop
2- SlickEdit
3- Netbeans
1) MonoDevelop:
MonoDevelop is an open source integrated development environment for Linux OS and Windows primarily for C# and other .NET languages, but is open to other programming languages too. MonoDevelop enables developers to quickly write desktop and web applications on Linux, Windows and Mac OS X. It also makes it easy for developers to port .NET applications created with Visual Studio to Linux and Mac OS X maintaining a single code base for all platforms.
Its supported languages are: C#, Visual Basic, Java (IKVM), C/C++, Python, Boo and Vala.
Key Features:
Following are the key features of MonoDevelop IDE.
- Support multiple-platform Linux, Windows and Mac OS X.
- Code completion support for C#, code templates and code folding.
- Fully customizable window layouts, user defined key bindings
- External tools for enhanced capabilities
- Customizable workspace to suit your preferred workflow
- Integrated debugger for Mono and native applications
- GTK# Visual Designer to asily build GTK# applications
- Create web projects with full code completion support and test on XSP, the Mono web server.
- Unit testing, packaging and deployment
- Fully object-oriented API
- Powerful add-in engine
Installing MonoDevelop on Linux:
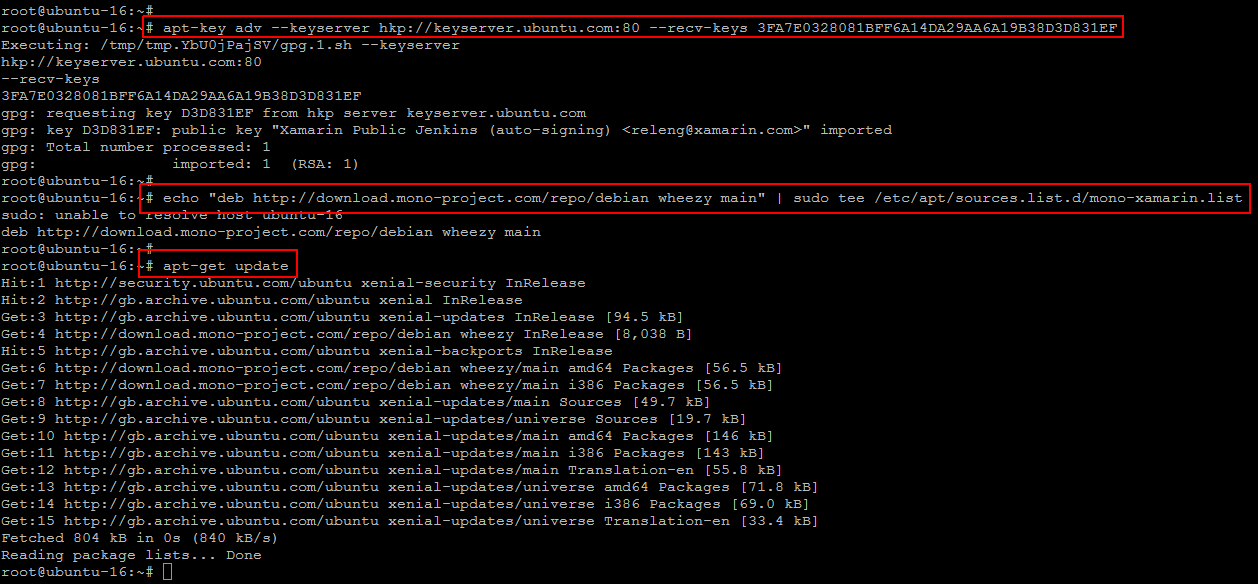
To install MonoDevelop on Debian and Ubuntu like systems, add the Mono Project GPG signing key and the package repository to your system using sudo or root user with below commands.
[cc]# apt-key adv –keyserver hkp://keyserver.ubuntu.com:80 –recv-keys 3FA7E0328081BFF6A14DA29AA6A19B38D3D831EF [/cc]
[cc]# echo “deb http://download.mono-project.com/repo/debian wheezy main” | sudo tee /etc/apt/sources.list.d/mono-xamarin.list [/cc]
[cc] # apt-get update [/cc]
For CentOS and Derivatives:
[cc]
# yum install yum-utils
#rpm –import “http://keyserver.ubuntu.com/pks/lookup?op=get&search=0x3FA7E0328081BFF6A14DA29AA6A19B38D3D831EF”
# yum-config-manager –add-repo http://download.mono-project.com/repo/centos/
[/cc]
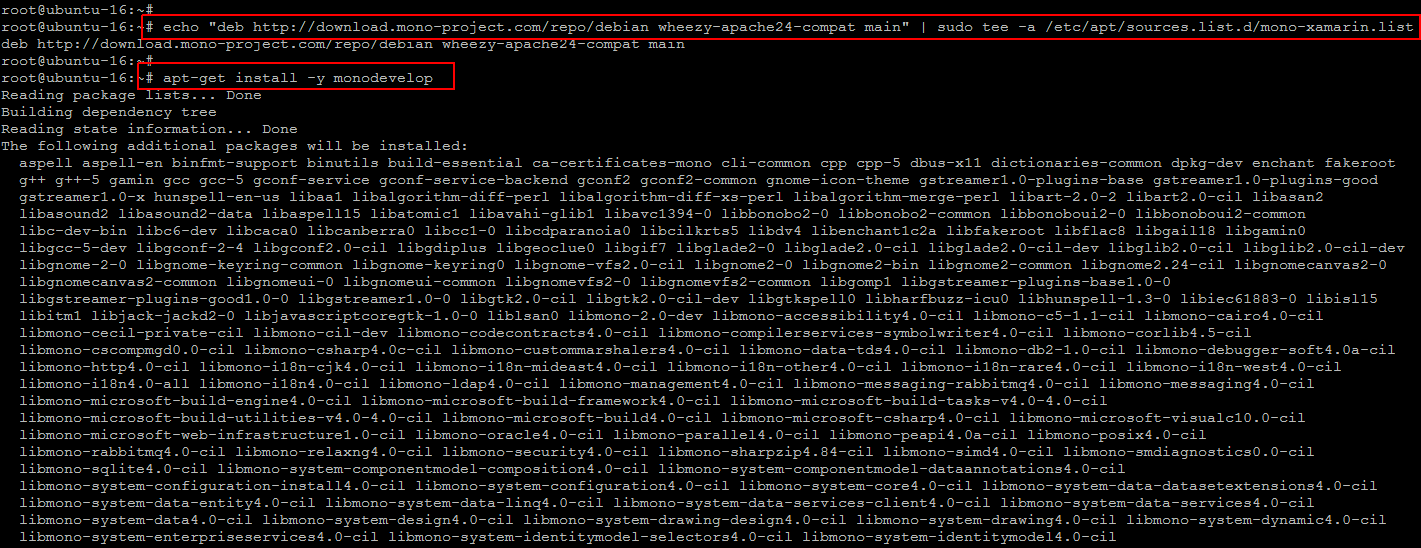
To enable ‘mod_mono’ installation on Ubuntu 13.10 and later, and Debian 8.0 and later (and their derivatives), you will need to add a second repository to your system, in addition to the generic Debian/Ubuntu repository above using below command.
[cc]# echo “deb http://download.mono-project.com/repo/debian wheezy-apache24-compat main” | sudo tee -a /etc/apt/sources.list.d/mono-xamarin.list [/cc]
Now run below command to install MonoDevelop on your Ubuntu server which will install of its required packages including dependencies.
[cc]# apt-get install -y monodevelop [/cc]
For CentOS and Derivatives:
Use below command to install MonoDevelop.
[cc] # yum install -y monodevelop [/cc]
Testing MonoDevelop On Linux:
After you get Mono installed, it’s probably a good idea to run a quick Hello World program to make sure everything is set up properly. That way you’ll know that your Mono is working before you try writing or running a more complex application.
To test the most basic functionality available, copy the following code into a file called hello.cs.
[cc]# vim hello.cs[/cc]
[cc]
using System;
public class HelloWorld
{
static public void Main ()
{
Console.WriteLine (“Hello Mono World”);
}
}
[/cc]
Save the code and below ‘mcs’ command to compile.
[cc]# mcs hello.cs[/cc]
The compiler will create a new file ‘hello.exe’, which you can run using below command and get the same output that you put in the coded file.
[cc] # mono hello.exe [/cc]
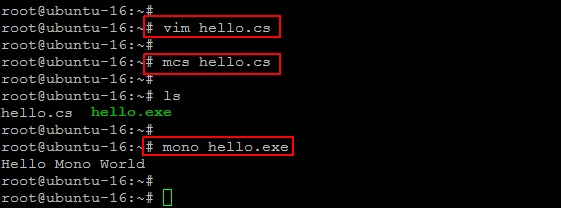
This shows that we have successfully installed a functional MonoDevelop IDE on our Linux server.
2) SlickEdit:
SlickEdit is an award-winning source code and text editor that supports more than 40 languages and file types across nine different platforms. You can choose from 15 different editor emulations for working in your comfort zone, with customizable menus, toolbars, and more for total personalization. With a variety of options available, SlickEdit can be used as a stand-alone tool or as a plug-in for Eclipse (SlickEdit Core) to add SlickEdit’s rich text editing capabilities to the Eclipse framework.
Key Features:
Following are the key features of SlickEdit IDE:
- Syntax expansion, completions and code templates
- DIFFzilla for dynamic differencing
- 15 editor emulations
- Tons of customization options
- Slick-C macro language extension
- Autocompletions, comment wrapping, and backup history
- Regex evaluator for comparisons against test cases
- Backup history
- SmartPaste and Smart Line Selections
Installing SlickEdit on Linux:
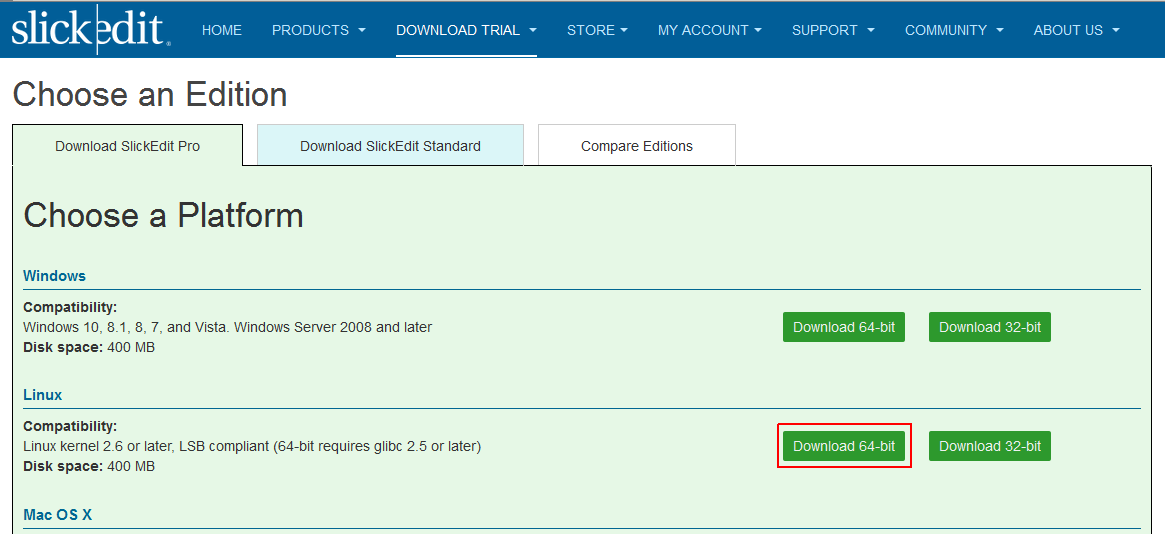
Follow the link to get the SlickEdit trial download from their official SlickEdit Page.
After downloading the package, extract it on your Linux server suing ‘tar’ command as shown.
[cc]# tar -zxf se_20000300_linux64.tar.gz [/cc]
Change directory and execute ‘vsinst’ script and hit ‘Enter’ key to start installation process.
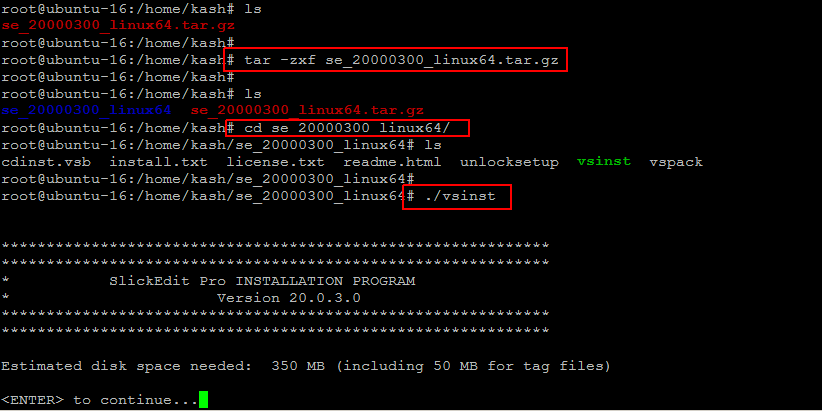
Then accept the license agreement and choose the installation directory. By default, the program is installed into the /opt/slickedit directory but you can change if you like to do so. Your installation will be complete after a while and you will get the below message about your successful installation.

As per instructions after the installation process, the executable to start SlickEdit by default is ‘/opt/slickedit-pro2015/bin/vs’, and typing that in a command shell starts the program and its initial wizard will be right up.
Once configured, you even have the option to export your settings so they can be imported on another machine. It’s a great feature if you use SlickEdit at home and at work, in order to ensure your developing environments match.
3) Netbeans:
NetBeans is a popular IDE for C and C++ projects. Its an intuitive, drag-and-drop interface with project templates, binary and static libraries, and many useful functions to make your life simpler.It also supports Fortan and Assembler files, with GNU Debugger Integration and code assistance. NetBeans is a functional IDE for editing existing projects, building on templates, or building from scratch on most leading platforms. There are also multiple NetBeans Enterprise IDE Download Bundles with options that support several additional technologies, including Java, PHP, HTML5, and more. The supported languages of Netbeans asr C, C++, C++11, Fortan, Assembler while its major features are given below.
Key Features of Netbeans:
- IDE allows you to quickly and easily build desktop, web, and mobile applications
- Remote development
- Works on Windows, Linux, OS X, and Solaris platforms
- Dynamic and static libraries
- Drag-and-drop binary files to create new projects
- Flexible Run and Debug commands
- Multi-session GNU gdb debugger integration
- Set a variety of breakpoints and view in Breakpoints window
- Refactoring in Editor, Class View, and Navigator
- Unit testing capability
- Qt Toolkit support
- Supports Oracle Solaris Studio, GNU, CLang/LLVM, Cygwin, and MinGW compilers
Installing Netbeans on Linux:
Ton install Netbeans on Linux we need to make sure that the following software requirements are complete.
- The Java SE Development Kit (JDK) 7 Update 10 (or later) or JDK 8 is required to install NetBeans IDE.
- The PHP and C/C++ NetBeans bundles only require the Java Runtime Environment (JRE) 7 or 8 should be installed and running. JDK 7 or 8 is required if you are planning to use any of the Java features.
- JDK 7 Update 6 (or newer) is required to use JavaFX 2.2 (or newer) features in NetBeans IDE 8.1.
- JDK 8 is required to use JavaFX 8 features in NetBeans IDE 8.1.
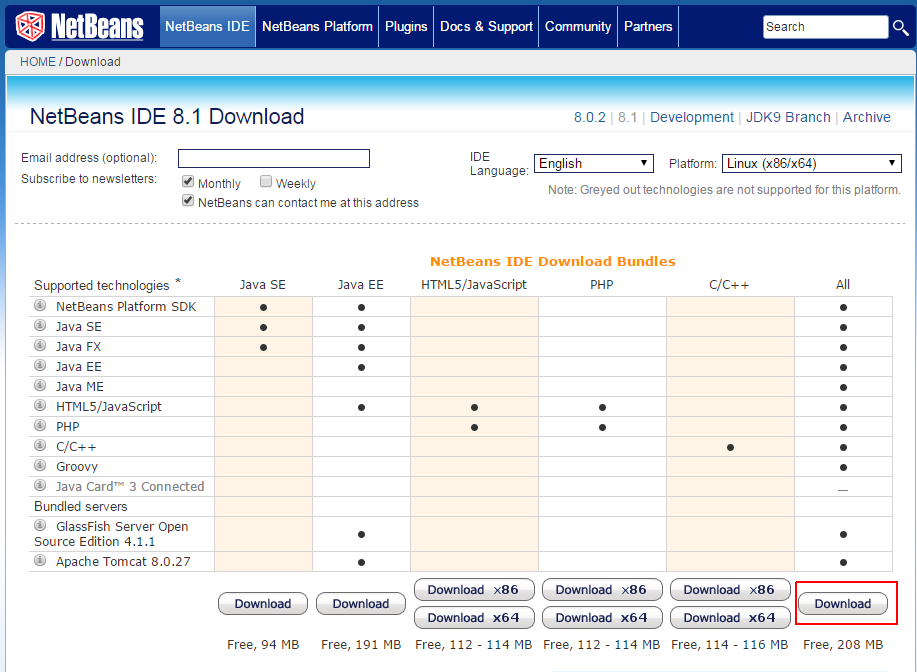
On the NetBeans IDE Download page, you can obtain one of several installers, each of which contains the base IDE and additional tools. Choose the Linux Platform from the top right side and click on the download button.
After the download completes, run the installer. For Linux platforms, the installer file has the .sh extension. For these platforms, you need to make the installer files executable by using the following command.
[cc]# chmod +x netbeans-8.1-linux.sh [/cc]
If you downloaded the All or Java EE bundle, you can customize your installation. Perform the following steps at the Welcome page of the installation wizard, Click Customize and in the Customize Installation dialog box, make your selections and click OK.
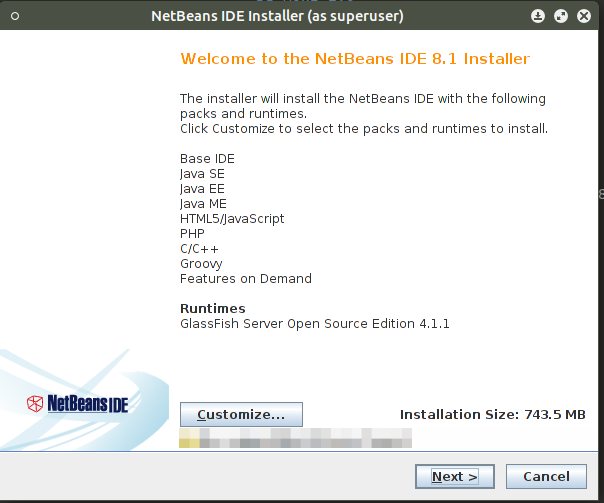
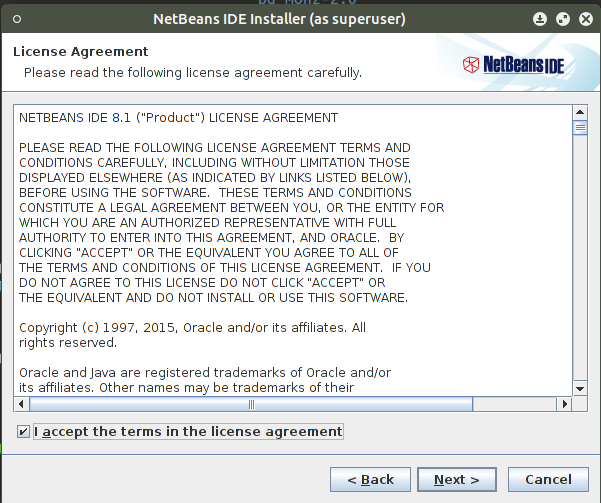
At the Welcome page of the installation wizard, click Next.At the License agreement page, review the license agreement, click the acceptance check box, and click Next.
After that accept the default installation directory for the NetBeans IDE or specify another directory, then click on Install to begin the installation.Once the installation complete at the Setup Complete page, provide anonymous usage data if desired, and click Finish to get started you apps deployment.
Conclusion:
That’s all for today. In this article we learned about three major IDE’s along with their main features and installation steps on Linux. As developers are frequently looking for integrated developer environments (IDEs) that meet specific needs or those that offer a broad range of features and supported languages to use on the regular. That’s why we covered the most useful IDE’s in this post and I hope you have find all of these much useful. If you have any suggestions and comments, you are welcome to post it here.
If you enjoy our article(s), Please use “Get Linuxpitstop articles by Email” option to get latest articles by email. Please like, follow and share our social network pages, we need help from esteemed visitors like yourself to keep this venture going.


