
Introduction to Load Balancing
Before we begin the tutorial, which will cover installing HAProxy for load balancing, let’s first talk about the concept of load balancing.
Many high-traffic websites are required to serve hundreds upon thousands of concurrent requests from users, all in the fastest manner possible. In some cases, these requests could be in the millions, and it is simply not conceivable to fulfill all of them using only one server, no matter how powerful it is.
In these situations, in order to meet these high volumes modern computing practice generally requires adding more servers (in this case, we talk about a server pool). This process must be “invisible” to the users, who will thus always see the same access point. The load balancer is the part that makes this invisibility possible.
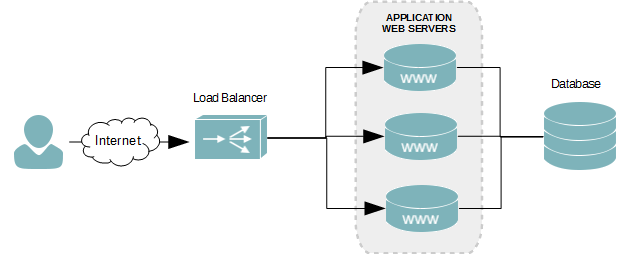
A load balancer distributes network load across multiple servers in the most efficient manner, ensuring reliability by sending requests only to servers that are online and capable of fulfilling those requests.
HAProxy is one of the most popular options for load balancing software, and this tutorial will demonstrate how to install and configure it on a server running CentOS 7.
Install HAProxy
HAProxy is available on the CentOS repository, but it might not be carrying the latest release. In order to check which version is currently available to you, simply run the following yumcommand:
# yum info haproxy
At this time, the latest stable release is 1.7. So, today we will build HAProxy 1.7 from source.
Prerequisites
In order to build HAProxy from source, you will need the tools for downloading and compiling it. The required packages are: wget, gcc and PCRE. You can easily install all of them using yum:
# yum install wget gcc pcre-static pcre-devel
Getting the source code
The next step is to download the source code. Use wget to complete this task.
$ wget http://www.haproxy.org/download/1.7/src/haproxy-1.7.5.tar.gz -O ~/Packages/haproxy.tar.gz
Once the download is complete, you can extract the files inside the archive:
$ tar xzvf ~/Packages/haproxy.tar.gz -C ~/Packages
Then, change into the extracted directory:
$ cd haproxy-1.7.5/
Build and install HAProxy
It’s time to compile the code. We can (of course) do some fine tuning in the process, as you can see in the first lines of the Makefile
# This GNU Makefile supports different OS and CPU combinations.
#
# You should use it this way :
# [g]make TARGET=os ARCH=arch CPU=cpu USE_xxx=1 ...
We will compile with the following command:
$ make TARGET=generic ARCH=native CPU=x86_64 -j8
Finally, install HAProxy:
# make install
In haproxy-1.7.5/examples you will find different files. Copy haproxy.init (the init settings) in /etc/init.d:
# cp haproxy-1.7.5/examples/haproxy.init /etc/init.d/haproxy
Now change its permissions:
# chmod 755 /etc/init.d/haproxy
Create the following directories, and a stats file:
# mkdir -p /etc/haproxy
# mkdir -p /run/haproxy
# mkdir -p /var/lib/haproxy
# touch /var/lib/haproxy/stats
Create a new user, named haproxy:
# useradd -r haproxy
Configure the load balancer
A HAProxy basic configuration tells this load balancing system what kind of connections it should be listening for and which servers it should relay the connections to. This is done by creating a new file, /etc/haproxy/haproxy.cfg, which will contain the necessary settings. In this file, paste the following configuration:
global
   log /dev/log local0
   log /dev/log local1 notice
   chroot /var/lib/haproxy
   stats socket /run/haproxy/admin.sock mode 660 level admin
   stats timeout 30s
   user haproxy
   group haproxy
   daemon

defaults
   log global
   mode http
   option httplog
   option dontlognull
   timeout connect 5000
   timeout client 50000
   timeout server 50000

frontend http_front
   bind *:80
   stats uri /haproxy?stats
   default_backend http_back

backend http_back
   balance roundrobin
   server my_server private_IP:80 check
   server my_server private_IP:80 check
Finally, save the configuration and restart HAProxy:
# systemctl restart haproxy
Conclusions
The HAProxy documentation contains a lot of resources for configuring the load balancer in whatever way works best for you.
Remember, a load balancing system like HAProxy is required once your website starts running a heavy load and a server pool. This software uses different algorithms for routing connections in the best possible manner, which is work that could not be done manually. At the end of the day, it’s a necessary investment! HAProxy is open source and a standard de facto in load balancing. Enjoy!


