Squid is a well known web proxy application which is used to filter and cache the web traffic. It has become an essential part of a good Linux based network where system administrator use this utility to keep track of network usage and restrict/allow access to the certain areas of the internet. “squidGuard” is a plugin that works with squid to enhance its capabilities. In this article we will be learning how to install and configure Squid and squidGuard, along-with step by step process to block a single or list of websites on Squid proxy.
Introduction to Squid
Squid is a caching proxy server which supports almost all popular protocols like HTTP, HTTPS, FTP, etc and lets you cache and filter the traffic on these protocols. It is very first choice for Internet Service Providers to cater the modern day needs; it lets you make best use of your network resources and you can achieve optimum network performance and reliability with this. It caches the most frequently accessed content and servers it quickly for future requests and also gives you full control on applying restrictions on the network traffic. You can easily block, allow websites, restrict users, specify user’s network quota etc on the network using Squid.
Introduction to squidGuard
It is a powerful plugin for Squid; once installed it enhances squid capabilities to new horizons, here is short list of tasks that can be performed easily with the help of this plugin.
- It can restrict the web access for some users to a list of specified web servers.
- It has ability to block access to blacklisted web servers.
- It can block websites matching some particular words or combination of words.
- It can restrict users to only use domain names instead of IP address in URLs.
- It can redirect blocked websites to the webpage of your own choice.
Let’s see how to install squid and squidGuard and configure them to block our specified website’s list.
Installing Squid
We will be performing squid and squidGuard installation process on CentOS 7 operating system. In order to install squid on your CentOS, make sure that your system’s packages are on the latest releases.
Run following command to install squid on your Linux system.
Once the installation is over, start squid service by issuing the following command.
Configure squid to automatically start on system boot by using the following command.
Verify that squid service has been started fine by using the following netstat command.
In case of successful start, it should show output as below.
tcp6 0 0 :::3128 :::* LISTEN 11435/(squid-1)
That’s it, squid has been installed successfully now. Let’s go ahead with squidGuard installation.
Installing squidGuard
SquidGuard needs CentOS Yum’s epel repositories to be enabled. Run following command to enable these repositories on your system.
As soon as above command execution completes successfuly, run following command to install squidGuard.
Congratulations! squidGuard has been installed now. On next step, we will be configuring our web browsers to use Squid and enable squidGuard settings to block our specified website(s).
Configuring Firefox to use Squid
We now need to configure our web browser to use use squid proxy. Its pretty simple, launch Firefox on your system and click on menu >> Preferences.
From here go to Advanced > Network > Connection option and specify 127.0.0.1:3128 here (If squid is running on same system, otherwise provide your squid system IP here along with 3128 port) .
That’s it, all the web browsing on this system will be routed via squid proxy now. So any rules applied on squid server end will be applicable on this system now.
Configuring squidGuard to Block Websites
Hope you enjoyed article so far and encountered no chronic errors. Let’s go ahead and configure squidGuard to disallow browsing of certain sites on the network. For this purpose, we will need to create “blacklists” directory in the squidGuard installation folder. Following commands should take care of this:
Now create a file, named “testdomains” here in this directory by using your favorite text editor.
In this file, specify the list of websites you want to block, one website per line. For demostration purposes, we added yahoo.com and gmail.com to the list. Save the file once done.
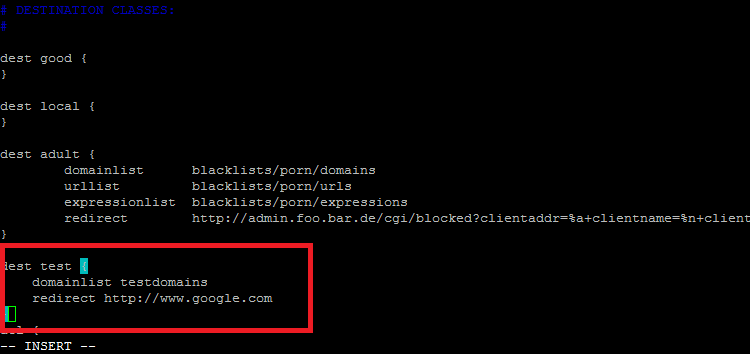
Now we need to edit “/etc/squid/squidGuard.conf ” and include the details for this testdomains file under “DESTINATION CLASSES” section.
dest test {
domainlist testdomains
redirect http://www.google.com
}
This section will let squid go throw “testdomains” and as soon as user tries to load any of those sites, it will redirect the request to google.com.
Now compile the squidGuard again by using the following command.
In order to avoid any weird permission errors, grant proper ownerships to “blacklists” directory.
Smile, we are almost there 🙂 , on the last step, edit “/etc/squid/squid.conf” file in vi/vim or nano editor and add following line there; please note down the exact location to enter this value with the help of following screenshot.
That’s it, restart squid service for the changes to take effect.
Now test your configuration, launch your sytem’s web browser and try loading the sites specified in the “testdomains” file, they should immediately redirect to “google.com”.
Conclusion
Squid is a powerful tool, it has made network management and caching a piece of cake. You can do a whole lot of things with squid and squidGuard. Both these tools are free, extremely fast, flexible and secure. If you are a system administrator and looking to manage the network of small to medium scale, you got no better option than Squid.
Hope you enjoyed this article! Please don’t forget to like and share it on social network. We need more esteemed visitors like you to keep this venture running!


