
ownCloud is a software system for File hosting. it is released under AGPLv3 license, so you can setup own cloud storage server without any additional cost. It has a good web suite that provides a cloud storage over the network, data can be uploaded via web browser or using software client. The project is based on PHP and a SQLite, MySQL, Oracle or PostgreSQL database, so it can run on all platforms that meet these requirements. In this tutorial, we will install ownCloud 7 on CentOS 7.
Initial setup
Install CentOS 7 with default Minimal configuration then install all current updates:
yum -y update
Next, we need to install PHP, Apache web server and MySQL server and some php extensions:
yum install httpd php php-mysql mariadb-server mariadb sqlite php-dom php-mbstring php-gd php-pdo wget vim
Set SELinux to allow OwnCloud to write the data:
setsebool -P httpd_unified 1
Allow web traffic through the firewall:
firewall-cmd --permanent --zone=public --add-service=http
firewall-cmd --permanent --zone=public --add-service=https
firewall-cmd --reload
Start Apache using the following command:
systemctl start httpd.service
Start MariaDB by issuing this command:
systemctl start mariadb.service
Auto start the service at system start-up:
systemctl enable httpd.service
systemctl enable mariadb.service
Installation
First, we need to download ownCloud from official website. Run the following command.
wget https://download.owncloud.org/community/owncloud-7.0.0.tar.bz2
Extract the archive we just downloaded.
tar -jxvf owncloud-7.0.0.tar.bz2 -C /var/www/html/
Next we need to assign the permission for web server to read and write the files on cloud directory.
chown -R apache.apache /var/www/html/owncloud/
DataBase configuration
Configure the mariadb instance.
mysql_secure_installation;
Hit enter on any of these that have the capital Y.
Set root password?[Y/n]New password: databaserootpassword
Re-enter new password: databaserootpassword
Remove anonymous users?[Y/n]Y
Disallow root login remotely?[Y/n]Y
Remove test database and access to it?[Y/n]Y
Reload privilege tables now?[Y/n]
Create the ownCloud database and user.
Login to mysql server, Using the following command
mysql -u root -p
Next, we need to Create DataBase for ownCloud and grand permission for ownCloud user.
mysql> create database owncloud;
mysql> create user 'owncloud'@'localhost' identified by'somedatabasepassword';
mysql> grant all on owncloud.* to 'owncloud'@'localhost';
mysql> flush privileges;
mysql> quit;
Apache server configuration
Open an external configuration file for ownCloud in your favorite editor, I’m using vim.
vim /etc/httpd/conf.d/owncloud.conf
Add the following lines in the config file.
<IfModule mod_alias.c>
Alias /owncloud /var/www/html/owncloud
</IfModule>
<Directory “/var/www/html/owncloud”>
Options Indexes FollowSymLinks
AllowOverride All
Order allow,deny
allow from all
</Directory>
Restart all apache and mariaDB services:
systemctl start httpd.service
systemctl start mariadb.service
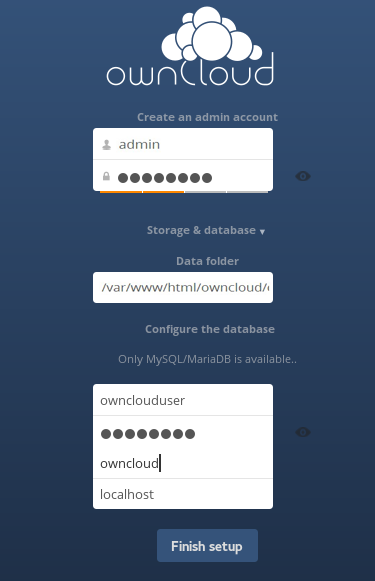
OwnCloud configuration
Open up your favorite browser and paste http://your_ip_address/owncloud or http://your_Domain.com/owncloud. It will shows the initial owncloud setup page. it must be configured before going to live.
Now you have your own cloud storage. Congratulations!!!
See you with next tutorial.


