
Hello and welcome to our todays article in installation setup of OpenEMM on Ubuntu 16.04. OpenEMM is a web-based enterprise application for email marketing, marketing automation, email newsletter and service emails (like transaction emails, event and time triggered emails) and lead management. OpenEMM is the first open source email marketing system that can be used to deploy professional e-mail newsletters and conduct e-mail marketing and it allows users to send both event and time triggered e-mails. OpemEMM includes a basic CRM, CMS and BI functionality, but also allows integration with other systems to provide a best of breed solution. Furthermore you can of course control and organize your lead management using OpenEMM.
In this article we will guide you through some necessary steps, which are needed to install and configure OpenEMM on Ubuntu 16.04.
Prerequisites:
For the successful installation setup of OpenEMM on Ubuntu 16.04, we need to setup the following software stack.
- Sendmail 8.9 or later, or Postfix 2.6 or later
- Sun Java SE JDK 8
- Apache Tomcat 7 or 8
- MySQL 5.1 to 5.6
- Python 2.4 or later (but not 3.x!)
System Update:
Update the you operating system to its latest release. This will keep your system in the most stable state and harden it against various intrusion attempts.
You do so by using following commands in your Ubuntu 16.04 server after login with root user credentials.
[cc]#apt-get update; apt-get upgrade[/cc]
System Packages:
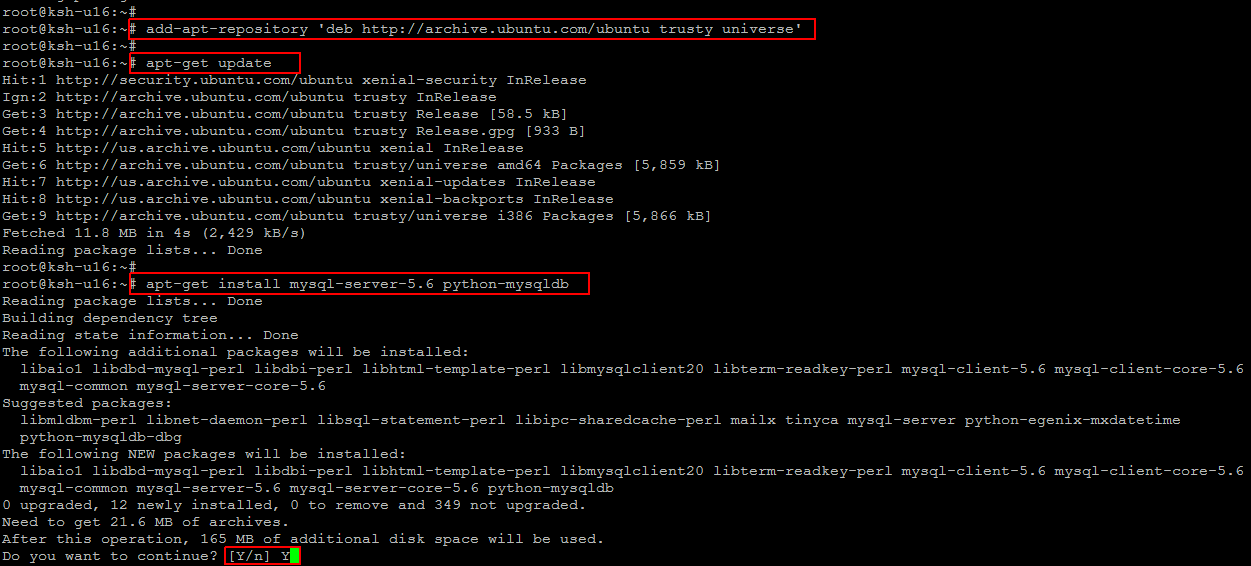
As we have mentioned earlier that OpenEMM support MySQL 5.6 , so we need to install the required version by using its specific repository using below commands.
[cc]# add-apt-repository ‘deb http://archive.ubuntu.com/ubuntu trusty universe'[/cc]
[cc]# apt-get update [/cc]
[cc]# apt install mysql-server-5.6[/cc]
Create New User:
Run the commands below to create a special group and user for OpenEMM .
[cc]# groupadd openemm[/cc]
[cc]# useradd -m -g openemm -G adm -d /home/openemm -s /bin/bash -c “OpenEMM-2015” openemm[/cc]
Installing SMTP Server/MTA:
OpenEMM relies on a SMTP server to send out mails and to accept bounces and replies. OpenEMM uses Sendmail for that task by default, because Sendmail is a proven, secure, and fast MTA (Mail Transfer Agent) and OpenEMM is deeply integrated with Sendmail. For sending emails, OpenEMM creates spool files which can be processed directly by Sendmail, and EMM is able to read Sendmail’s log files directly to collect information on the delivery status of each individual email.
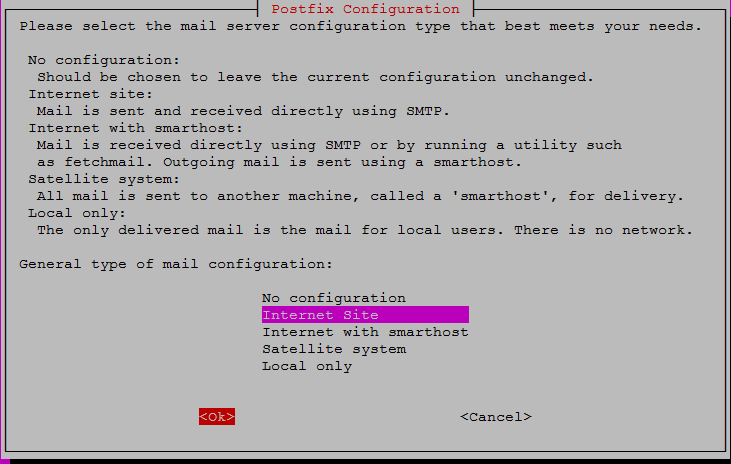
Installation of Postfix
In case a different SMTP server is already running on your server, you should stop it first like using command ‘service sendmail stop’.
To be able to use Postfix as SMTP server, you need the appropriate package installed using below command for Ubuntu.
[cc]# apt-get install postfix[/cc]
Further dependencies will be resolved and installed automatically by the repository management software once you press ‘Y’ key to proceed. Then configure the postfix when you are asked to choose from the available options and pres ‘OK’ key to proceed.
Installation of Sun Java JDK:
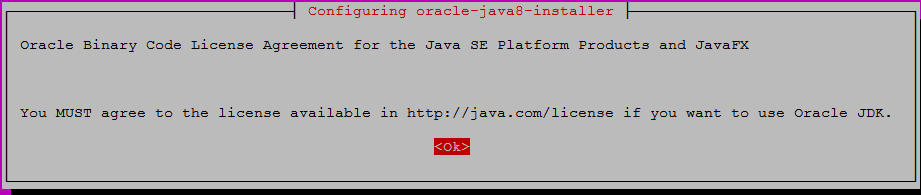
OpenEMM’s web container Tomcat requires the installation of Oracle’s Standard Edition Java Development Kit (SE JDK) – not the GNU version of Java! If Sun’s Java SE SDK is not included in your distribution and has not been installed yet, you have to install it by yourself. For OpenEMM 2015 you have to use Java 8 because Java 7 is no longer be supported by Oracle for free since April 2015.
Installing Java 8
Run below commands to add its repository first and then install Oracle Java 8 after system update.
[cc]# add-apt-repository ppa:webupd8team/java[/cc]
[cc]# apt-get update[/cc]
[cc]# apt-get install oracle-java8-installer[/cc]
Accept the License agreement.
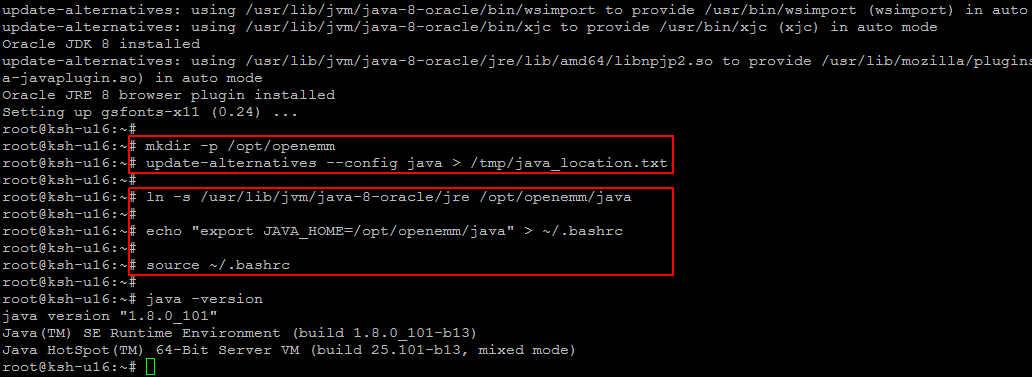
Create a new directory and setup the home variable environment for the newly installed Java.
[cc]# mkdir -p /opt/openemm [/cc]
[cc]# update-alternatives –config java > /tmp/java_location.txt [/cc]
Use command below for symlyincing java to openemm root as shown.
[cc]# ln -s /usr/lib/jvm/java-8-oracle/jre /opt/openemm/java [cc]
[cc]# echo “export JAVA_HOME=/opt/openemm/java” > ~/.bashrc [/cc]
[cc]# source ~/.bashrc [/cc]
Installing Tomcat:
Since OpenEMM is a web application using Java, it requires a web container like Tomcat. OpenEMM 2015 runs with Tomcat 6, 7 and 8, but we recommend Tomcat 8. If you still use Tomcat 6, we strongly recommend to update to Tomcat 7 or 8 rather sooner than later.
To install Tomcat, download the latest binary distribution of release 7 or 8 from http://tomcat.apache.org . The core package is sufficient. The examples here use Tomcat 8.0.36 – you should adapt them to the latest version of Tomcat 7 or 8 as needed.
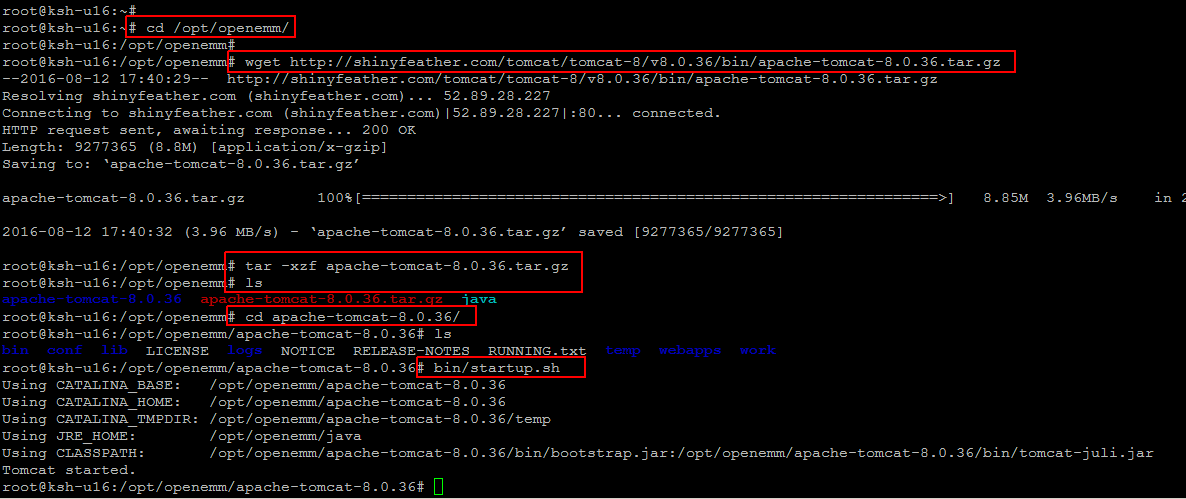
Let’s move to new new directory for software required by OpenEMM and download the Tomcat archive in it using ‘wget’ command.
[cc]# cd /opt/openemm/[/cc]
[cc]# wget http://shinyfeather.com/tomcat/tomcat-8/v8.0.36/bin/apache-tomcat-8.0.36.tar.gz[/cc]
Once the package is downloaded, extract it within the same directory and the start tomcat service after switching into tomcat directory.
[cc]# tar -xzf apache-tomcat-8.0.36.tar.gz[/cc]
[cc]# cd apache-tomcat-8.0.36/[/cc]
You can also create the soft link using below command.
[cc]ln -s apache-tomcat-8.0.24 tomcat[/cc]
If you want to make sure that Tomcat works, then run the command below to start tomcat process and check for Tomcat installation screen using below URL.
[cc]# bin/startup.sh[/cc]
[cc]http://localhost:8080[/cc]
To stop tomcat you can use below command with tomcat directory.
[cc]#bin/shutdown.sh[/cc]
Enable OpenEMM Access in Firewall:
The Ubuntu Firewall is not enabled by default, because no externally reachable services are running. You can check the status of the firewall and Enable the firewall to open port 25 (SMTP), 8080 (OpenEMM console & redirection) and 8044 (OpenEMM update service)with below commands.
[cc]# ufw status [/cc]
[cc]# ufw enable [/cc]
[cc]# ufw allow 25/tcp [/cc]
[cc]# ufw allow 8080/tcp [/cc]
[cc]# ufw allow 8044/tcp [/cc]
You can verifiy your settings with below command.
[cc]#ufw status [/cc]
If you plan to use the internal SMTP server of OpenEMM instead of Sendmail or Postfix, you have to open port 8025 (OpenEMM SMTP server) as well:
[cc] # ufw allow 8025/tcp [/cc]
Additionally, you have to enable a prerouting forwarding rule from port 25 to 8025. This is done by adding the following code after the comments at the top in file user.rules in directory ‘/lib/ufw’ :
*nat
:PREROUTING ACCEPT [0:0]
:POSTROUTING ACCEPT [0:0]
:OUTPUT ACCEPT [0:0]
-A PREROUTING -i eth+ -p tcp –dport 25 -j REDIRECT –to-port 8025
COMMIT
Committing all these changes requires a restart of the Ubuntu firewall, which is done with
[cc]# service ufw restart [/cc]
Installation of OpenEMM 2015:
Download the latest version of the OpenEMM binary code from
OpenEMM Download Link . Then copy the tarball to a temporary location – /tmp is a good choice. Change to the home directory and run the following commands to create a version specific directory for the new OpenEMM version and then create a symbolic link from openemm to that directory.
[cc]# wget https://sourceforge.net/projects/openemm/files/OpenEMM%20development/OpenEMM-2015_R3_EA-bin_x64.tar.gz[/cc]
[cc]# cd /home/openemm [/cc]
[cc]# tar xzvpf /tmp/OpenEMM-2015_R3_EA-bin_x64.tar.gz [/cc]
Finally, in order to follow best practise, move the documentation folder to ‘/usr/share/doc’ where doc files are usually located on a Linux system.
[cc]# mkdir -p /usr/share/doc/OpenEMM-2015[/cc]
[cc]# mv USR_SHARE/* /usr/share/doc/OpenEMM-2015[/cc]
Read Access to Maillog:
OpenEMM requires read access to the log file ‘/var/log/maillog’ . For Ubuntu nothing has to be done because openemm was added to group adm and, therefore, can already access the mailog. But since Ubuntu’s maillog is named ‘mail.log’ you have to create a symlink for
maillog with below command.
[cc]# ln -s /var/log/mail.log /var/log/maillog[/cc]
Initialize/Update the OpenEMM and its CMS Database:
Since OpenEMM 2015 works with a CMS database which did not exist before version 6.0, you have to setup this database and load its layout if you update OpenEMM from a version before 6.0 or if you are installing OpenEMM from scratch.
[cc]# cd /usr/share/doc/OpenEMM-2015 [/cc]
[cc]# service mysql restart[/cc]
[cc]# mysqladmin -u root -p create openemm_cms[/cc]
[cc]# mysql -u root -p openemm_cms < openemm_cms-2015.sql[/cc]
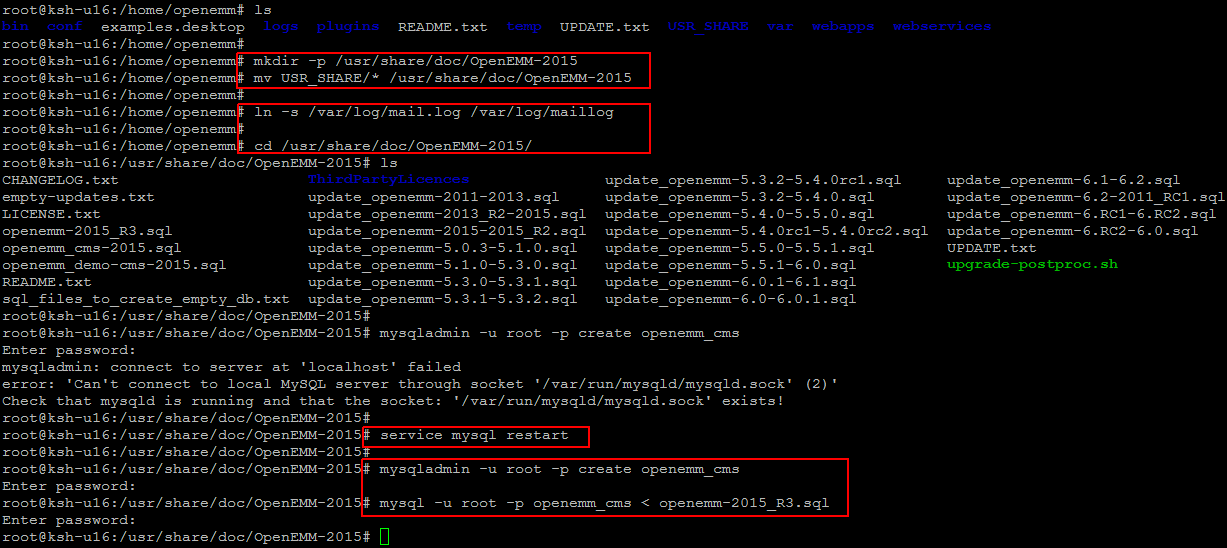
Create a new data base for openemm.
[cc]root@ksh-u16:/usr/share/doc/OpenEMM-2015# mysqladmin -u root -p create openemm [/cc]
[cc]root@ksh-u16:/usr/share/doc/OpenEMM-2015# mysql -u root -p openemm < openemm-2015_R3.sql[/cc]
If you would rather install a demo CMS database with sample values, use below commands to import data with sample values.
[cc]#mysql -u root -p openemm_cms < openemm_demo-cms.sql [/cc]
Then give full permission to user for access the database
[cc]#mysql -u root -p [/cc]
[cc]#GRANT DELETE, INSERT, UPDATE, LOCK TABLES, SELECT, ALTER, INDEX, CREATE TEMPORARY TABLES, DROP, CREATE ON openemm.* TO ‘openemm’@’localhost’ IDENTIFIED BY ‘password’; [/cc]
[cc]#FLUSH PRIVILEGES; [/cc]
[cc]#quit[/cc]
Basic configuration:
The property system.url in file emm.properties in directory /home/openemm/webapps/openemm/WEB-INF/classes must be set to the URL of your OpenEMM installation, which is usually identical to your redirection URL, in the form
http://www.openemm.org:8080
The property ‘cms.ccr.url’ in file cms.properties in the same directory should be set to the identical URL unless the content manager module (central content repository) runs on a different server – which is possible due to its webservices interface.
The property system.url in file emm.properties in directory ‘/home/openemm/webapps/openemm/WEB-INF/classes’ must be set to the URL of your OpenEMM installation, which is usually identical to your redirection URL, in the form as below.
[cc]# cd /home/openemm/webapps/openemm/WEB-INF/classes [/cc]
[cc]#vim emm.properties [/cc]
# Edit host for system.url
http://www.:8080
The property cms.ccr.url in file cms.properties in directory ‘/home/openemm/webapps/openemm/WEB-INF/classes’ must be set to the identical URL.
[cc]#vim ms.properties [/cc]
# Edit host for cms.ccr.url
[cc]http://your_server_ip:8080[/cc]
Start and Stop OpenEMM:
Change to user openemm with below command.
[cc]# su – openemm [/cc]
Then start the OpenEMM environment, change to the home directory of OpenEMM and launch the start script as below.
[cc]# openemm.sh start [/cc]
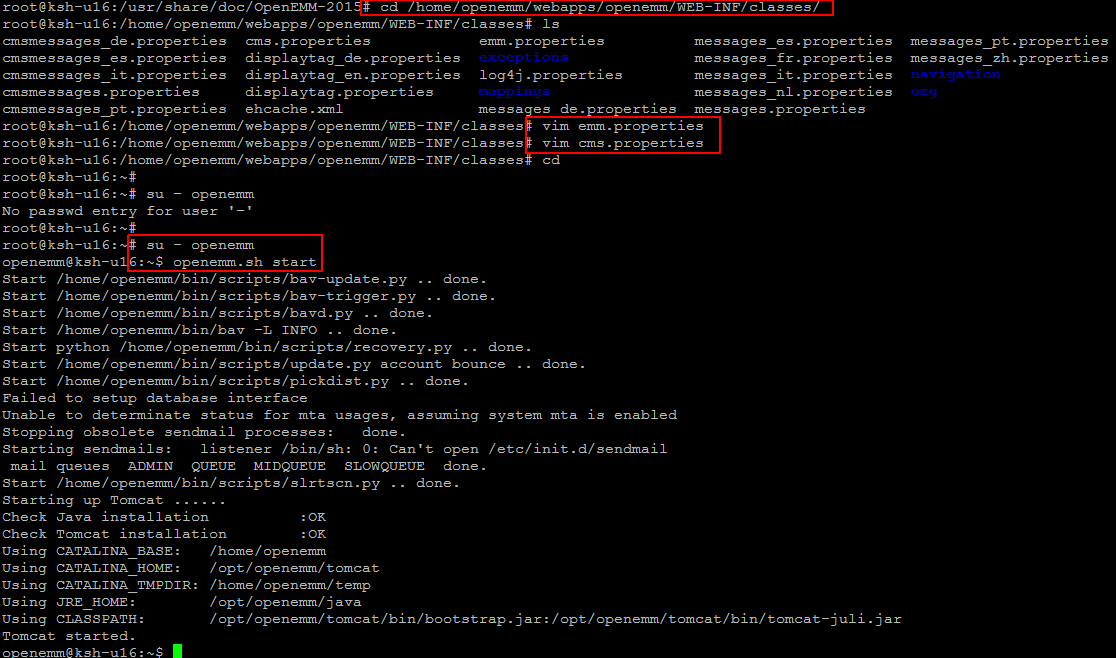
If the script openemm.sh is not found make sure that file .bash_profile in directory ‘/home/openemm’ contains line ‘PATH=$PATH:$HOME/bin’. To stop OpenEMM you can use below command.
[cc]#openemm.sh stop [/cc]
Accessing OpenEMM Web:
To invoke the GUI of OpenEMM, point your webbrowser to the following URL
[cc]http://{your FQDN}:8080[/cc]

Then log into OpenEMM using below credentials.
Username: admin
Password: openemm
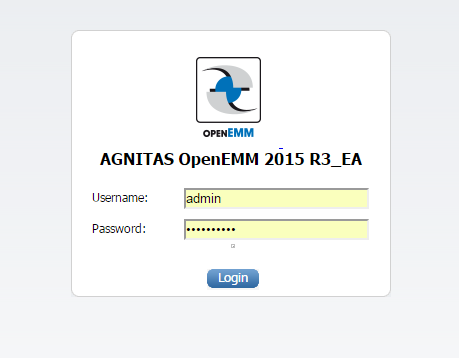
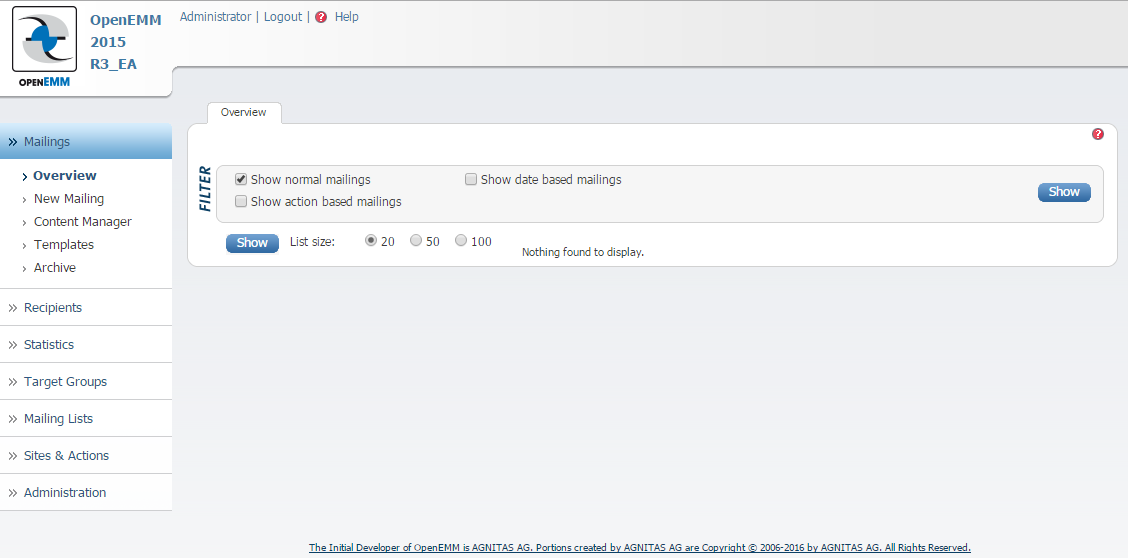
After successful login credentials, you will be surprised to see OpenEMM dashboard, where can start using it.
Conclusion:
Congratulations! we have successfully installed and setup the world’s most popular open-source software in the email marketing, newsletter and mailing field. OpenEMM offers anything you need for sending newsletter and large quantities of emails. With the aid of this customer-oriented program, any number of recipients or recipient groups receive emails and newsletters with a personal greeting and individual content. With OpenEMM, an unlimited number of recipient profiles can be created, which are saved in a MySQL database. Even already existing datasets can be imported or exported. Besides the automatic detection and filtering of erroneous or undeliverable email addresses, it can also be checked how many emails were opened and how many recipients clicked on a URL contained in the newsletter. I hope you have got this article much helpful, so do not forget to share your valuable comments and suggestions.


