
LibreNMS is an autodiscovering PHP/MySQL/SNMP based network monitoring tool which includes support for a wide range of network hardware and operating systems including Cisco, Linux, FreeBSD, Juniper, Brocade, Foundry, HP and many more. LibreNMS is a community-based fork of Observium.
LibreNMS has many features:
- Automatic discovery: Automatically discover your entire network using CDP, FDP, LLDP, OSPF, BGP, SNMP and ARP.
- Customizable alerting: Highly flexible alerting system, notify via email, irc, slack and more.
- Distributed Polling: Horizontal scaling to grow with your network.
- Plugin system: LibreNMS has plugin system that enables you to extend your install for your needs.
This tutorial will cover the installation process of LibreNMS on RHEL/CentOS/ based systems with the minimal configurations needed to be done.
Requirements
In this article we assume that you have made a fresh install for Centos server and you are the root user. If you are not, prepend
to all shell commands or temporarily become a user with root privileges with
.
Database configuration
LibreNMS is based on LAMP Server (Mysql, apache and php). The first step that we will do it is to install mysql server and configure the database for LbreNMS.
yum install net-snmp mysql-server
service snmpd start
service mysqld start
chkconfig --levels 235 mysqld on
chkconfig --levels 235 snmpd on
Now after installing the mysql server you need to secure using the mysql secure script.
mysql_secure_installation
Now you can set up the mysql user and database for LibreNMS.
You need to have the password of the MySQL root user.
Log into MySQL:
mysql -u root -p
After successful authenticated, you need to create the database for the WordPress Website.
CREATE DATABASE librenms;
The database Name is librenms. You will need this information later.
Now, you should create the database administrator.
CREATE USER librenmsadmin@localhost IDENTIFIED BY 'librenmspassword';
Next, you need to give this user permissions to administer the database you created.
GRANT ALL PRIVILEGES ON librenms.* TO librenms@localhost;
You need to flush the privilege information to disk to activate the new MySQL user:
FLUSH PRIVILEGES;
exit
If your database is on the same server as LibreNMS, you can just use
as the IP address. If you are deploying a separate database server you must change localhost above with the IP of the server running LibreNMS. And also you need to change you need to change the
.
vim /etc/my.cnf
Add the following line:
bind-address = <ip>
Change
to the IP address that your MySQL server should listen on. Restart MySQL:
service mysqld restart
LibreNMS Installation
Before we download the LibreNMS package you need to install some prerequisite software.
The packages listed below are an all-inclusive list of packages that were necessary on a clean install of CentOS 6.5. It also requires the EPEL repository.
if not using HTTPd (Apache): RHEL requires
to be installed regardless of of
‘s (or any other web-server’s) presence.
rpm -Uvh http://download.fedoraproject.org/pub/epel/6/i386/epel-release-6-8.noarch.rpm
yum install php php-cli php-gd php-mysql php-snmp php-pear php-curl httpd net-snmp graphviz graphviz-php mysql ImageMagick jwhois nmap mtr rrdtool MySQL-python net-snmp-utils vixie-cron php-mcrypt fping git
pear install Net_IPv4-1.3.4
pear install Net_IPv6-1.2.2b2
Next step is to add the librenms-user.
useradd librenms -d /opt/librenms -M -r
usermod -a -G librenms apache
Then make sure that you set httpd to start on system boot.
chkconfig --levels 235 httpd on
Next, add the following to /etc/httpd/conf.d/librenms.conf
<VirtualHost *:80>
  DocumentRoot /opt/librenms/html/
  ServerName  librenms.example.com
  CustomLog /opt/librenms/logs/access_log combined
  ErrorLog /opt/librenms/logs/error_log
  AllowEncodedSlashes On
  <Directory "/opt/librenms/html/">
    AllowOverride All
    Options FollowSymLinks MultiViews
  </Directory>
</VirtualHost>
If you are running Apache 2.2.18 or higher then change
to
and append
underneath
.
In this stage, you can clone the repository via HTTPS or SSH. In either case, you need to ensure the appropriate port (443 for HTTPS, 22 for SSH) is open in the outbound direction for your server.
cd /opt
git clone https://github.com/librenms/librenms.git librenms
cd /opt/librenms
The recommended method of cloning a git repository is HTTPS. If you would like to clone via SSH instead, use the command
cd /opt
git clone git@github.com:librenms/librenms.git librenms instead
cd /opt/librenms
At this stage you can either launch the web installer by going to http://IP/install.php, follow the on-screen instructions then skip to the ‘Web Interface’ section further down.
Alternatively if you want to continue the setup manually then just keep following these instructions.
cp config.php.default config.php
vim config.php
Change the values to the right of the equal sign for lines beginning with
to match your database information as setup above.
Change the value of
from
to whatever your read-only SNMP community is. If you have multiple communities, set it to the most common.
Add the following line to the end of
:
$config['fping'] = "/usr/sbin/fping";
Be sure you have no characters (including whitespace like: newlines, spaces, tabs, etc) outside of the<?php?> blocks. Your graphs will break otherwise.
Now you need to initialize the database.
php build-base.php
Now it’s time to create th admin user with privilege should be 10. Substitute your desired username and password–and leave the angled brackets off.
php adduser.php <name> <pass> 10
To prepare the web interface (and adding devices shortly), you’ll need to create and chown a directory as well as create an Apache vhost.
First, create and chown the rrd directory and create the logs directory
mkdir rrd logs
chown apache:apache logs
chmod 775 rrd
chown librenms:librenms rrd
Start the web-server:
service httpd restart
Add localhost
php addhost.php localhost public v2c
This assumes you haven’t made community changes–if you have, replace public with your community. It also assumes SNMP v2c.
Discover localhost and poll it for the first time:
php discovery.php -h all && php poller.php -h all
Create cronjob
The polling method used by LibreNMS is
, which was placed in the public domain by its author. By default, the LibreNMS cronjob runs
with 16 threads. The current LibreNMS recommendation is to use 4 th reads per core. The default if no thread count is
.
If the thread count needs to be changed, you can do so by editing the cron file (
). Just add a number after
, as in the below example:
/opt/librenms/poller-wrapper.py 12 >> /dev/null 2>&1
Create the cronjob
cp librenms.nonroot.cron /etc/cron.d/librenms
LibreNMS performs daily updates by default. At 00:15 system time every day, a git pull –no-edit –quiet is performed. You can override this default by edit ing your config.php file. Remove the comment (the # mark) on the line:
#$config['update'] = 0;
so that it looks like this:
$config['update'] = 0;
That’s it! You now should be able to log in to http://librenms.example.com/.
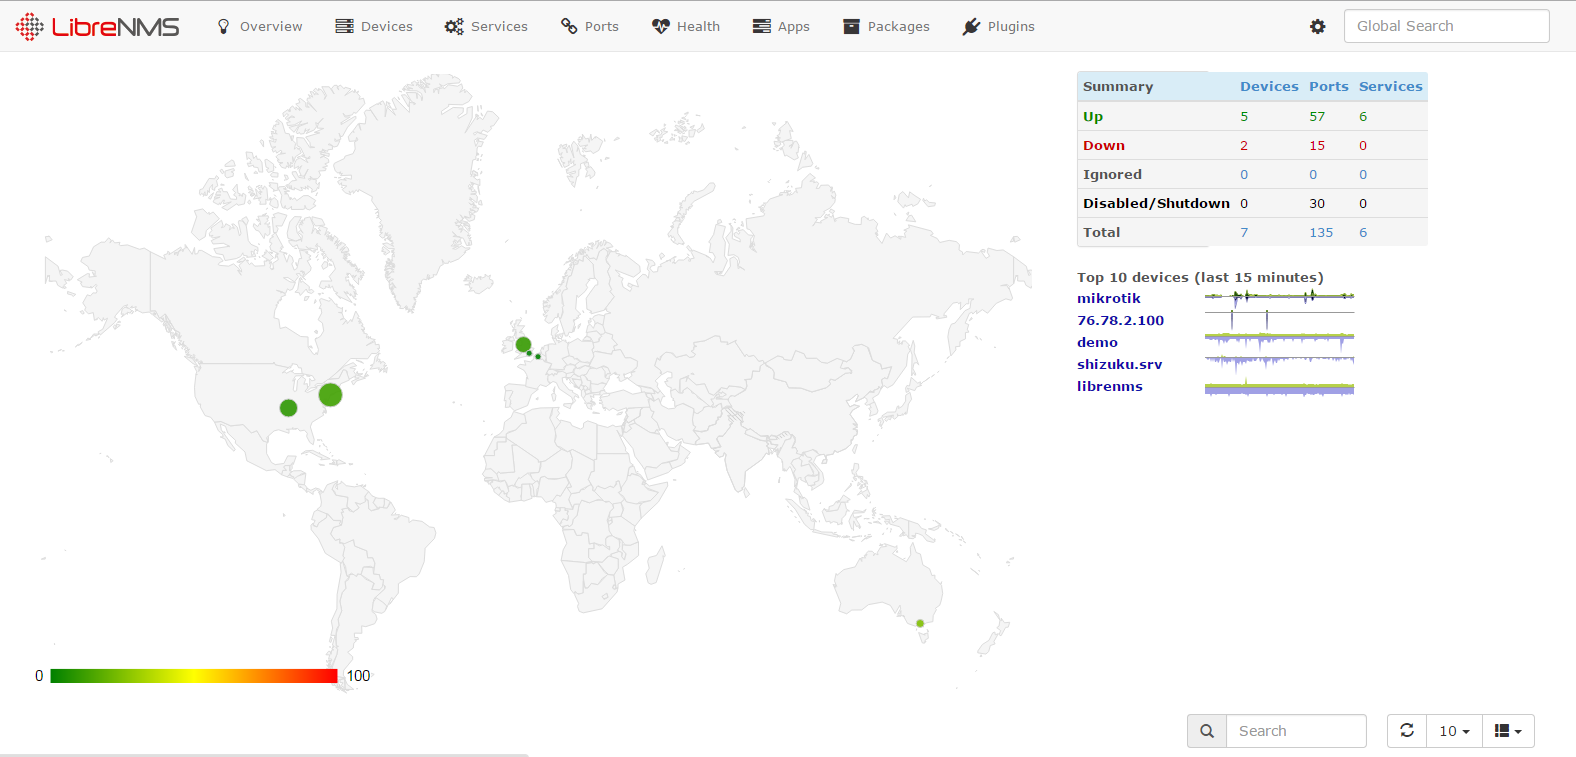
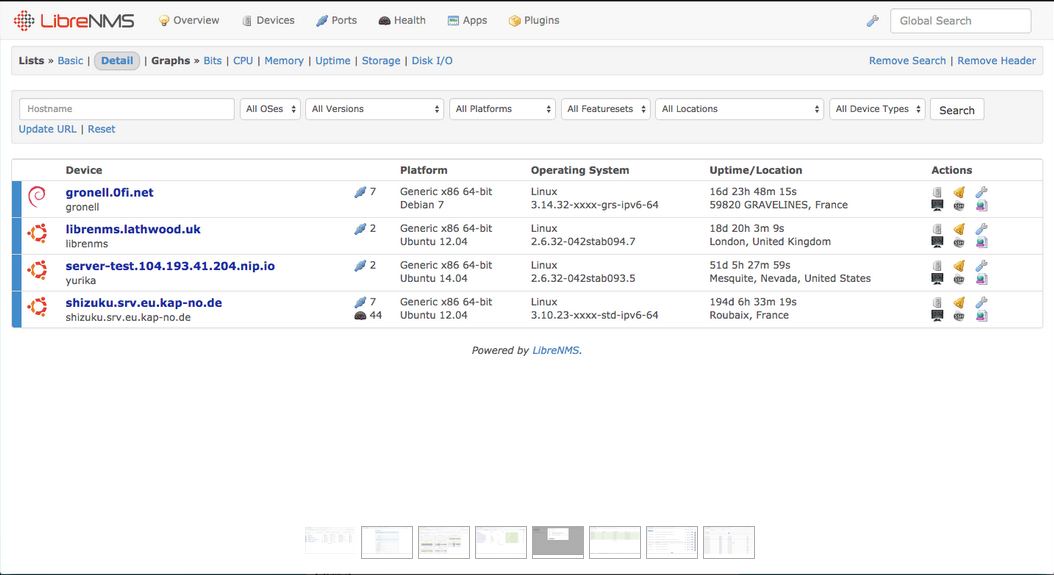
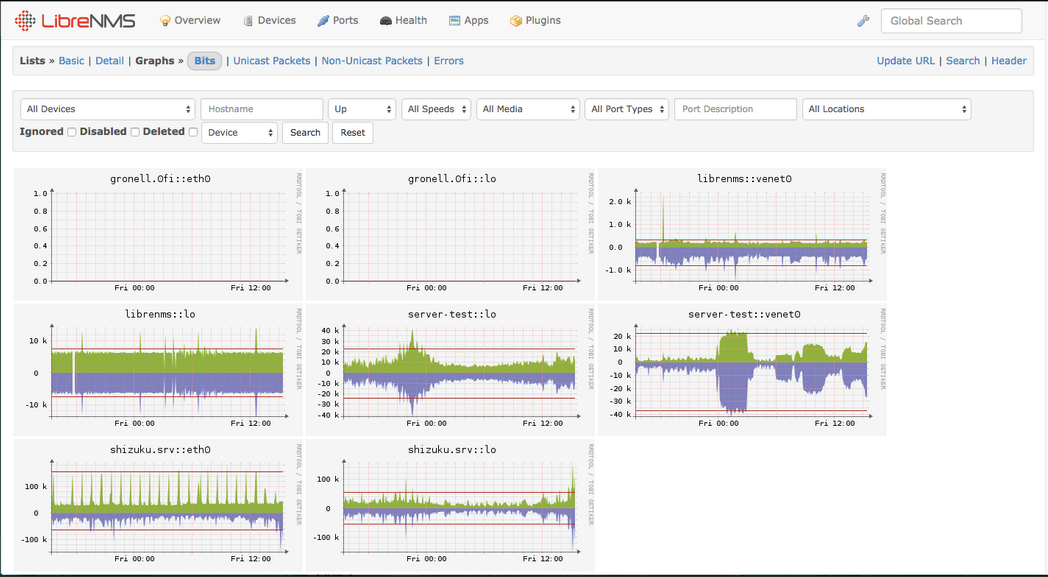
Screenshots
That’s all for now. Thanks for visiting Unixmen. Stay tuned with us.


