
The title says it all. Right? Today, we will know how we can install and configure Qmail (a mailing agent) on our OpenSUSE 42.1 Linux distribution so that our server act like a mail server. Mail server based on Linux platform is the best choice due to many reasons like security, maintenance, less troubleshooting etc etc.
Let’s start then.
What is Qmail?
Qmail is one of the best mail transfer agent (MTA) in Linux driven platforms. In December 1995, Qmail was written by Daniel J. Bernstein. It gets it’s popularity due to security. It is the first security-aware mail transport agent. After Qmail, few other MTAs have been published with the same feature. Qmail is based on modular architecture where each major function is separated from the other major functions.
Performance wise, Qmail is significantly faster than Sendmail (Another famous MTA ) specially when used for bulk mail tasks such as large mailing list servers. Qmail is much simpler to configure and deploy rather than other MTAs.
You can download and install Qmail for almost all popular Linux distribution like Redhat, Debian, Cent OS, Ubuntu etc etc.
Why OpenSUSE?
OpenSUSE is a very famous Linux distribution. It is widely used by System Admins now a days and too good for software development purposes. Many enterprise grade application production environment runs on OpemSUSE. You can install this on your Laptop and enjoy the beauty of OpenSUSE. Beyond the distribution, the openSUSE Project provides a web portal for community involvement. It is built for software developers and system administrators, also has a user-friendly desktop, and feature-rich server environment. Also, It has both KDE & GNOME Desktop environment.
Installing Qmail
Before installing Qmail on to your server, we have to check our checklists so that we can make sure our that our server works perfectly. Checklists are as follows
- Purchasing your domain from a domain register like Godaddy, Namecheap or from others.
- Setting up host name / server name properly. Something like mail.yourdomain.com. This is good practice to do.
- You must have a public / real IP address set yo your NIC / LAN card set statically / manually.
- Name server entry in your DNS Server for resolving your mail server host name (mail.yourdomain.com). This is for resolving your host name against your Public / Real IP address. I will not cover this over here.
- Implementing DomainKeys Identified Mail (DKIM) system so that mail send from your mail server is not treated as spam or junk mail by others. Though, I will not cover this over here. You need to Google for that in order to implement it. Its not that hard though.
- Make sure you don’t have any other MTA installed on your system except Qmail. If you found other MTA, then you must remove / uninstall those.
- Make sure your firewall / iptables is not blocking 25 & 110 port.
Setting Host name
To set your server host name like mail.yourdomain.com, open a terminal and issue the following command.
sudo vim /etc/hostname
Here, I am using vim as a editor. You can use your own favorite editor. Type the host name like mail.yourdomain.com and save & exit from the file.
Then, issue the following command.
sudo vim /etc/hosts
And then just type it like the below image.
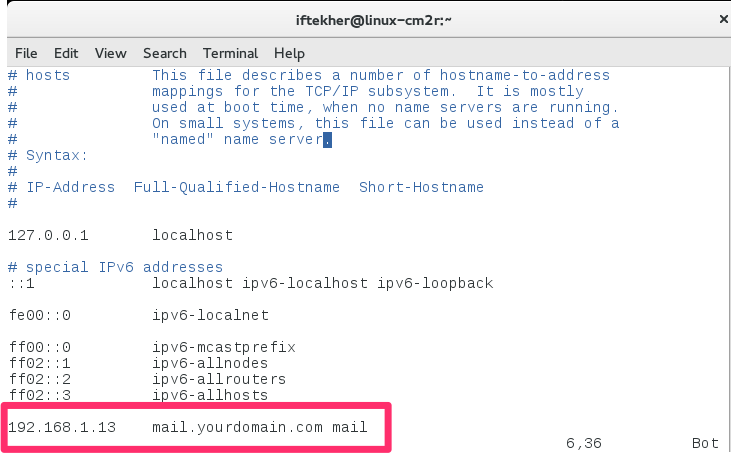
Note: You can see that I am using 192.168.1.13 for my IP address. But here, you need to use your own public / real IP address instead of using mine. Please make sure of it. After doing this, you may need to reboot your system so that the changes made by you can take place.
Stay up to date
Before starting, make sure all the packages / software that you have on your system is up to date. This is a good practice to stay up to date. To do so, issue the below command on your terminal.
sudo zypper update
It may take a while depending on the internet speed of yours. After successful update, you must reboot your system as well.
Remove / Uninstall other MTA
To remove or uninstall other MTA on your system, let’s search is first and then uninstall it from the system. To do so, issue the following on a terminal
sudo zypper search sendmail
sudo zypper search postfix
Now, if you found something from the above command, then you need to remove it from your system. Let’s revome it by doiing the followings
sudo zypper remove sendmail
sudo zypper remove postfix
Now, download the latest source of Qmail from here. As this is the source file of Qmail in tar archive file format, we need to extract the contents of it and need to compile it to install.
Or
You can open a terminal and issue the following command to install it directly. But we need to add the repository first for his. Let’s add the Qmail repository.
sudo zypper addrepo http://download.opensuse.org/repositories/home:/aledr/openSUSE_Leap_42.1/home:aledr.repo
This will add the repo of qmail or netqmail.
Let’s install it now.
sudo zypper install make automake gcc netqmail netqmail-pop3d netqmail-skel ucspi-tcp daemontools libsrs2-devel spamdyke
The above command will download and will install netqmail on your system.
Starting Qmail service
To start Qmail service onto your server, do the following one by one and one after another.
sudo svscanboot
qmailctl start
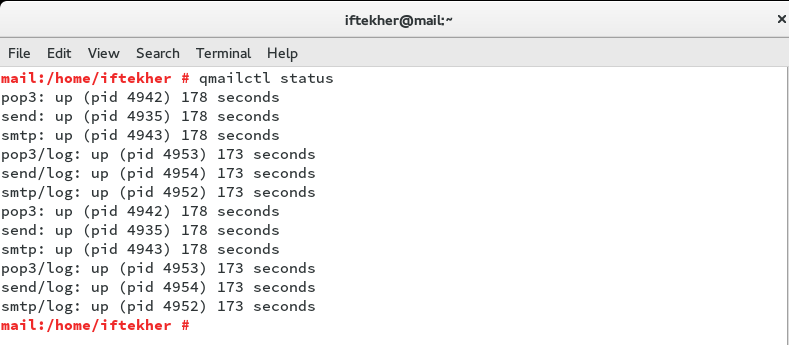
This will start Qmail on your system. Now, to verify whether it is really running on your system or not, issue the following command on your terminal.
sudo qmailctl status
Now, you will see something like this below page which will indicate that Qmail is up and running on your system.
Doing the rest
Type the following one by one and one after another on your terminal
sudo echo '127.0.0.1:allow,RELAYCLIENT="",RBLSMTPD=""' >> /etc/tcp.smtp
sudo echo '192.168.:allow,MFDNSCHECK="",RELAYCLIENT="",DATABYTES="7340032",RBLSMTPD="",LOCALMFCHECK=""' >> /etc/tcp.smtp
sudo echo ':allow,SMTPAUTH="",DATABYTES="6815744"' >> /etc/tcp.smtp
Now, we need to create the database by doing the following.
sudo /etc/init.d/qmail cdb

or

sudo qmailctl cdb
sudo ln -s /var/qmail/alias/.qmail-root /var/qmail/alias/.qmail-anonymous
sudo ln -s /var/log/qmail/qmail-send/current /var/log/qmail
Now, type the following
sudo rm /usr/sbin/sendmail
ln -s /var/qmail/bin/sendmail /usr/lib/sendmail
ln -s /var/qmail/bin/sendmail /usr/sbin/sendmail
We are almost done.
Now, open the file located /etc/spamdyke/spamdyke.conf with any file editor and put # or commented out line 4 & 44.
Now, restart Qmail. If everything goes well and if you don’t encounter any error, then we are done with it.
Testing Qmail
Let’s testing Qmail whether it is really working or not. Open a terminal and issue the below command.
sudo telnet localhost 25
If it is succesfull then you will see something like below image.
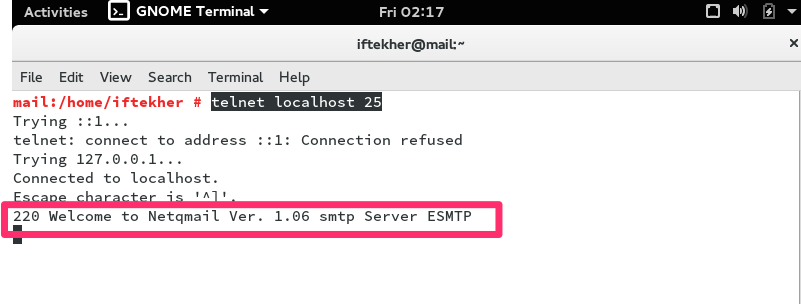
As you can see that, it is 220 and with a welcome message indicating that its listening to port 25 and your server is ready to send mail.
I didn’t cover many other things which are related to mail server like spam-filtering, web mail etc etc as I want to stay with the basics without diving deep onto it . But I hope that you will enjoy this and it will help you a lot.
Thanks for viewing.


