
Today, we will walk thorough how to install, configure and test an ftp server. Let’s began then.
First, what is FTP?
The File Transfer Protocol (FTP) is a standard network protocol used to transfer computer files from one host to another host over a TCP-based network, such as the Internet or over LAN (Local Area Network). So, you can upload your files on a FTP server that you have and you can provide a url/link of that file to your friend to download. Your friend then can use a FTP client to download the file. Usually FTP runs on port 21.
We will use vsftpd so that it act like a FTP service on a server and hence we will call it FTP server.
I am assuming that you are running a Linux operating system distribution like Ubuntu, Debian, CentOS, RedHat or Fedora. I am using Ubuntu 14.04.3 LTS as my Linux distribution.
Note: To begin, make sure you have a static IP address manually assigned on your interface on the machine where your Linux is running and where we are going to install vsftpd. If you get an IP address from a DHCP server, then you may have IP address dynamically assigned to your interface and it will change time to time.
# STEP 1
Update your package lists from the repositories. To do this, open a terminal.
Now type the following command in the terminal.
If you are a Ubuntu, Debian user:
sudo apt-get update
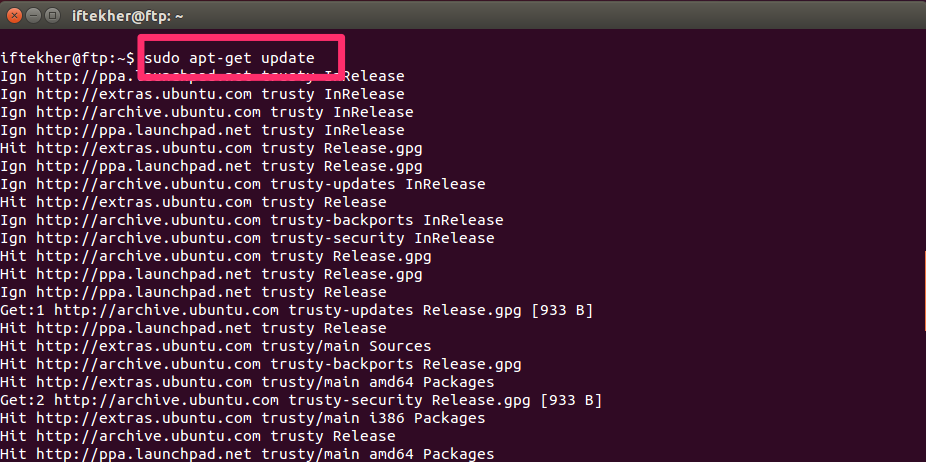
This will also ask for your root password. Wait till it gets updated.
# STEP 2
We will need a file editor to edit our configuration files. Here, I will use vim as an editor to edit our configuration file. Usually every Linux distribution comes up with vi installed and if you are familiar with vi, you can skip step 2. But vim has many advantages over vi and hence vim is more popular as a editor.
If you don’t have vim installed on your Linux, please issue the following command on your terminal.
If you are a Ubuntu, Debian user:
sudo apt-get install vim
If you are a CentOS/RedHat/Fedora user:
sudo yum install vim
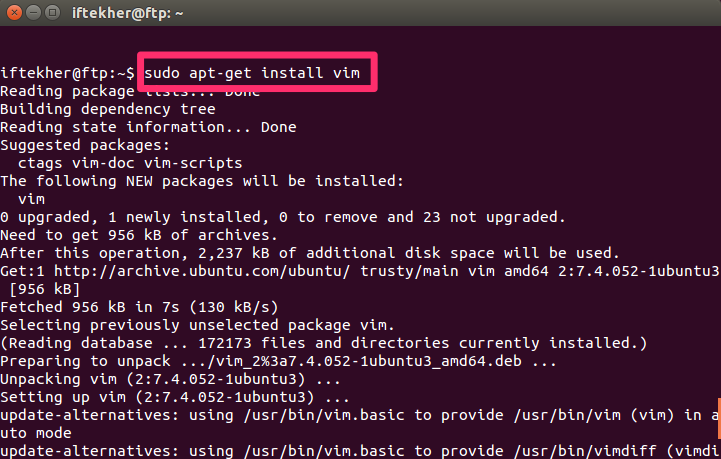
It will install vim on your Linux distribution. Wait till the installation of vim gets finished.
# STEP 3
Now it’s time to install vsftpd which will act like a FTP server. Issue the following command in the terminal which will download and install vsftpd on your Linux.
If you are a Ubuntu, Debian user:
sudo apt-get install vsftpd
If you are a CentOS/RedHat/Fedora user:
sudo yum install vsftpd
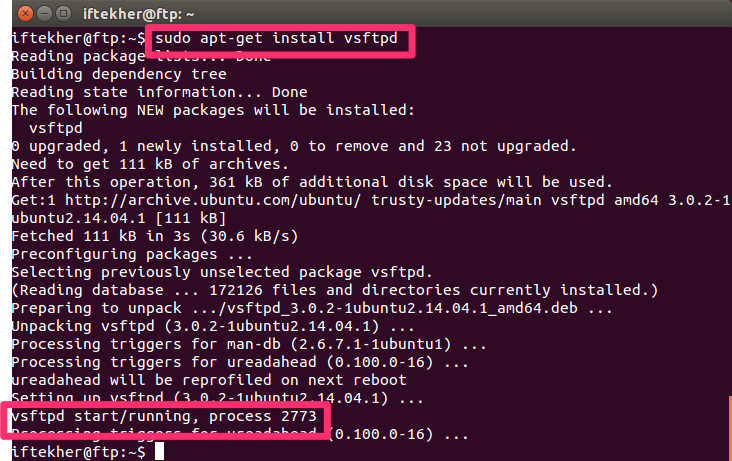
Guess what, in this state your FTP server is already up & running. But we need to modify it a little bit to work properly.
# STEP 4
To configure your FTP server more, please open the following file on vim by typing the following command in your terminal.
If you are a Ubuntu, Debian user:
sudo vim /etc/vsftpd.conf
If you are a CentOS/RedHat/Fedora user:
sudo vim /etc/vsftpd/vsftpd.conf
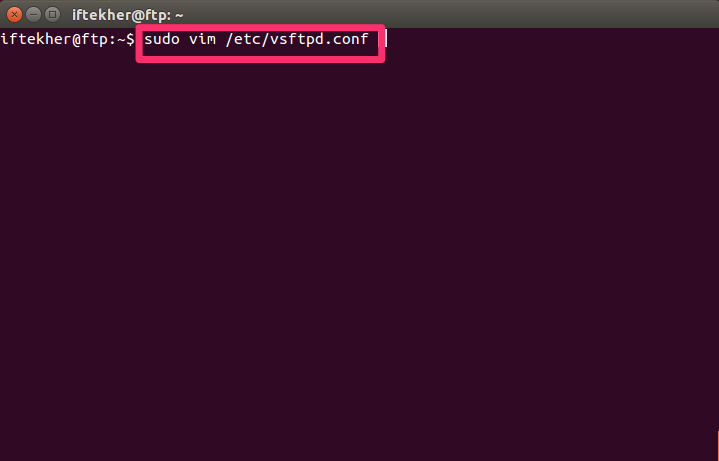
Let’s change some parameter to configure it more to act like a real FTP server.
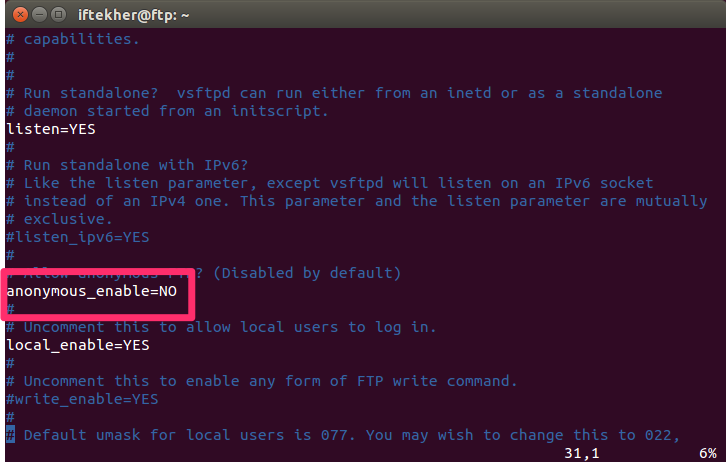
# STEP 5
By changing the value to anonymous_enable=YES, you can enable anonymous user. Then anyone can use the user name “anonymous” to login into your FTP server, which is a potential security threat. Don’t enable this unless it is required.
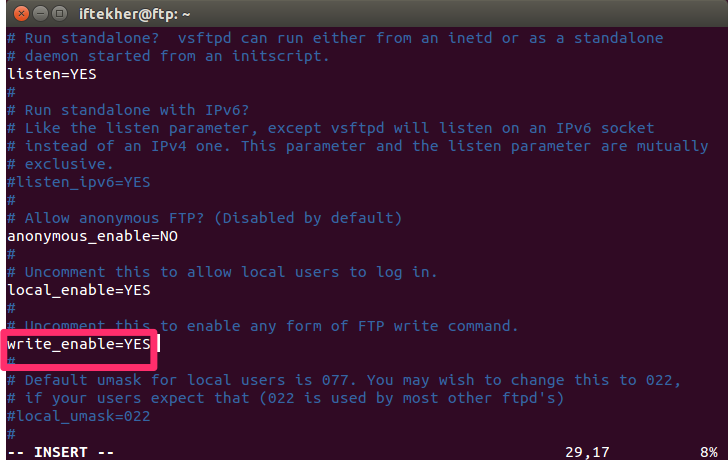
# STEP 6
Uncomment write_enable=YES
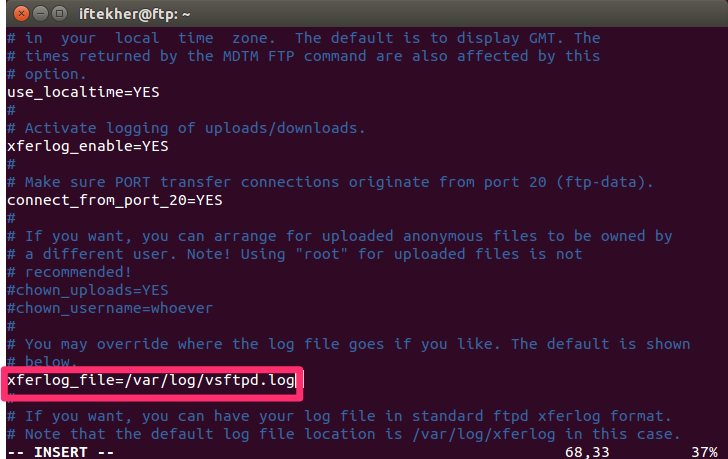
# STEP 7
Uncomment line xferlog_file=/var/log/vsftpd.log for enabling log for your FTP server.
For viewing log files of vsftpd, please type the following command in the terminal
sudo cat /var/log/vsftpd.log
To view the log file in real time, type the following command in the terminal
sudo tail -f /var/log/vsftpd.log
The above command will show last 20 lines dynamically for the FTP server log.
# STEP 8
Uncomment ftpd_banner and place your own welcome text.
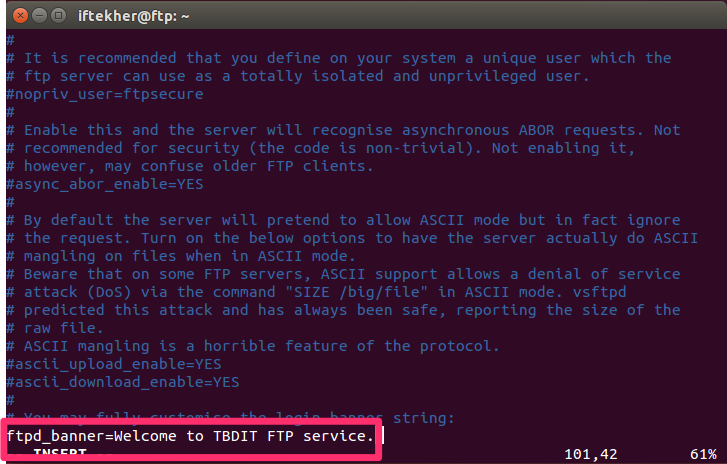
Here, I typed, “Welcome to TBDIT FTP service” for my own banner. Please type yours one.
# STEP 9
Now, save & exit from the vsftpd.conf file. To do so, if you are using vim then
Press esc then press & hold shift button and then press : and then finally press x and then press enter. This will save and exit from the file.
# STEP 10
Our initial configuring is done. Now, make sure you are restarting your vsftpd service to accept the changes that we had made so far. To do so, please type the following in your terminal
sudo service vsftpd restart
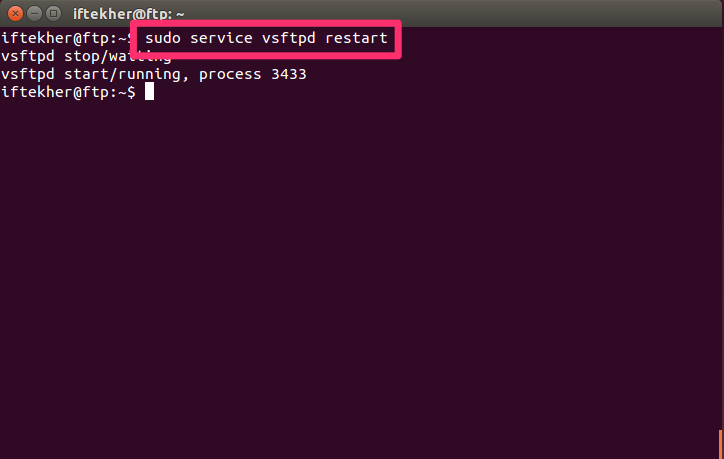
This will restart the vsftpd service with the new configuration that we had made so far.
# STEP 11
Though you will came to know form the previous step that your vsftpd is up and running, still we need to make sure that it is properly listening to port 21.
To do so, please type the following in your terminal and wait for something like this
sudo telnel localhost 21
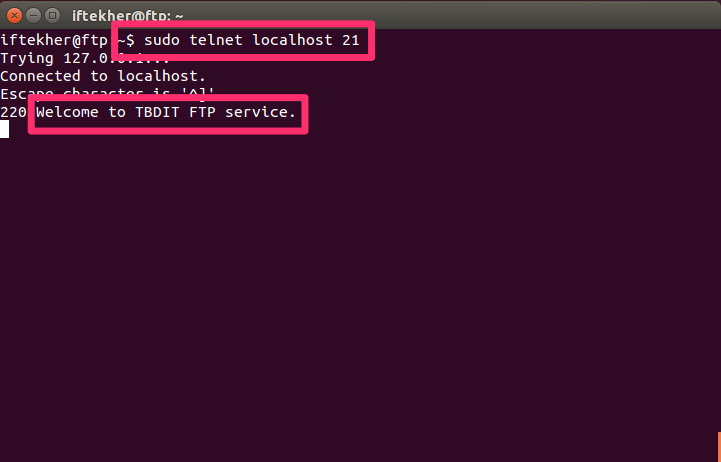
You will see the welcome text banner that you had wrote before. It means everything is fine and working ☺
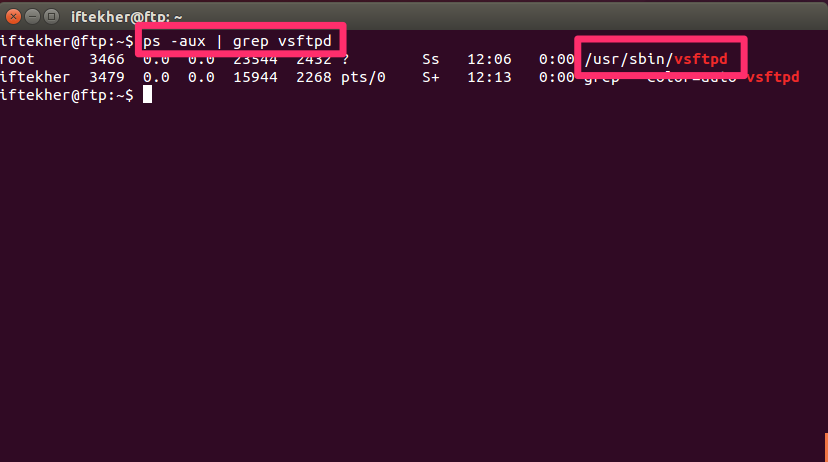
Also, you can type the following in your terminal to see whether vsftpd is up and running for you
ps -aux | grep vsftpd
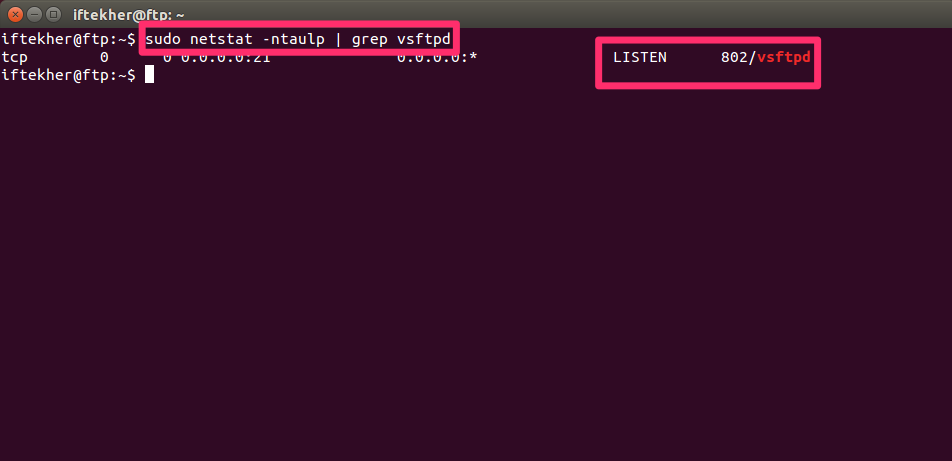
And lastly, type the following in the terminal and see that vsftpd is listening on the port 21 for any incoming FTP connection.
sudo netstat -ntaulp | grep vsftpd
# STEP 12
Now, add a user in your Linux.
To add a user in your Linux distribution, type the following in your terminal
sudo adduser ftp1user
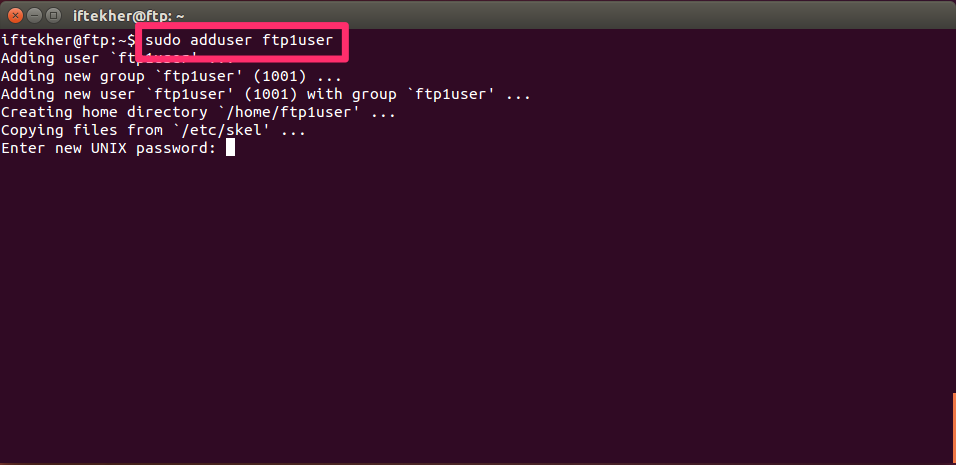
This will add a user named ftp1user on your Linux OS.
Type a password that you can remember easily or write in a safe place in case if you forget it.
# STEP 13
Now, use another computer or workstation (laptop/desktop) whatever you have to download Filezilla. Please visit this link https://filezilla-project.org/ and download filezilla according to your operating system. We will use Filezilla application, which is an open source ftp client and widely used for uploading and download files to & from any FTP server.
Actually, there are few ways of uploading or downloading files to our FTP server. One is, we can use command line terminal and the other one is using a free or paid ftp client like Filezilla. We can use a web browser to download file from our FTP server as well.
After downloading Filezilla, just follow on screen instructions to install it. It’s very easy to install it.
Important thing is, make sure you are using the same network subnet or class for this computer or workstation where you are installing Filezilla. Say, your FTP server has an IP address of 192.168.0.1/32 where you install the vsftpd. So, the computer or workstation that you are using to install Filezilla must have an IP address of that same class as well such as 192.168.0.2/32. You can use whatever IP address you want to use except the broadcast IP address of that class. If the IP address are not from the same class, your workstation and the FTP server will not be able to communicate between them.
# STEP 14
It’s time to connect our FTP server by using Filezilla application. Here, my FTP server IP address is 192.168.1.11
Open FileZilla application.
Type your FTP server IP address in the Host imput field. My FTP server IP address is 192.168.1.11. Type ftp1user as your User Name in the Username field. And your password that you have set earlier for the user ftp1user in the Password field. Type 21 in the Port field.
Now, click quickconnect and it will connect to your server and it will move you to the user home directory on the right hand side panel.
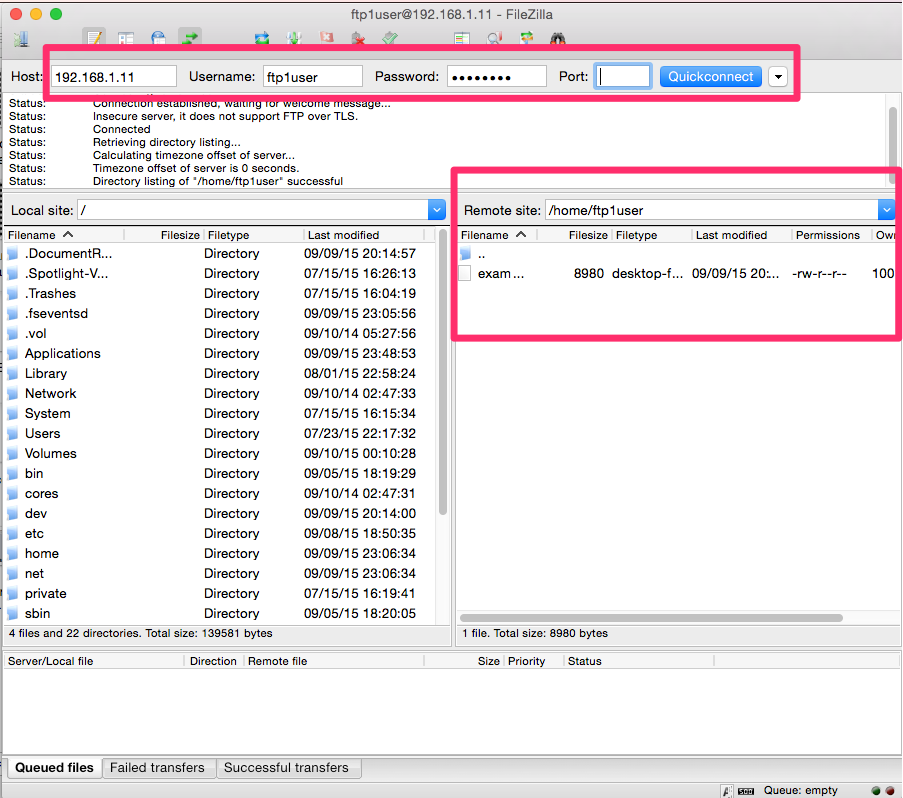
Now, browse to any directory and upload a file. Here, I am uploading a file name Hello FTP.txt to my FTP server.
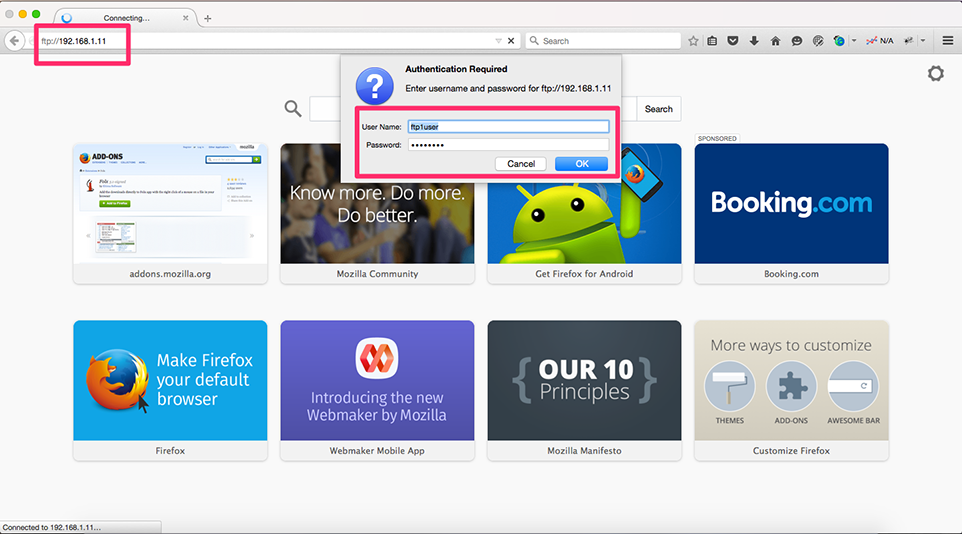
To download the file you can use filezilla or you can use any web browser to download the file.
Type ftp://192.168.1.11/ on your favorite web browser from your workstation (laptop/desktop).
Here 192.168.1.11 is my FTP server IP address. Please use your FTP server IP address.
It will ask for your username & password and enter ftp1user and it’s password respectively.
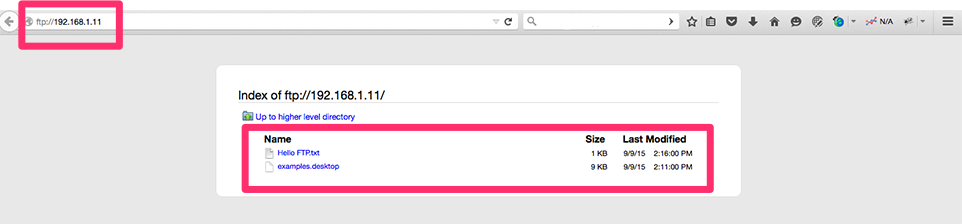
If everything goes well, you will see the file that you have uploaded earlier. I can see my Hello FTP.txt file there. Now click the file to download it.
That’s all for today. Hope you enjoyed it.
Feature image: Craig Chapman-Hall via Flickr.


