
Bareos (Backup Archiving Recovery Open Sourced) is a reliable, cross-network Open Source Software for backup, archiving and recovery of data across all common operating systems (Linux, UN*X, MacOS, Windows). With Bareos file or rather directory trees can be configured centrally and then automatically and periodically be saved as a full, differential or incremental backup onto hard drives, tape drives or into the cloud. It also offers its own web frontend, by using web frontend administrators or users can select files for recovery. Due to open interfaces Bareos can easily be extended with scripts or plugins, e.g. to run application-specific commands before, during or after a backup. Plugins for backing up MySQL/MariaDB, LDAP, MSSQL or VMWare Snapshots incrementally are already possible using bareos.
Bareos Components
The basic structure of Bareos consists of a control unit, the Backup Director, one or more Storage daemons, and the File daemons on the clients to be backed up.
The File daemons are responsible for backing up the data from the client or restoring the data on the client again. This daemon runs permanently on the clients and carries out the Director’s instructions.
The Director is the controller: It contains all the logic and accounts for most of the settings.
Installing Bareos Backup:
On RHEL 7 and CentOS 7 bareos is available through the RHEL Server Optional channel. On CentOS 7 and Fedora is it included on the main repository which you can get using below command.
[cc]# wget -O /etc/yum.repos.d/bareos.repo http://download.bareos.org/bareos/release/latest/CentOS_7/bareos.repo [/cc]
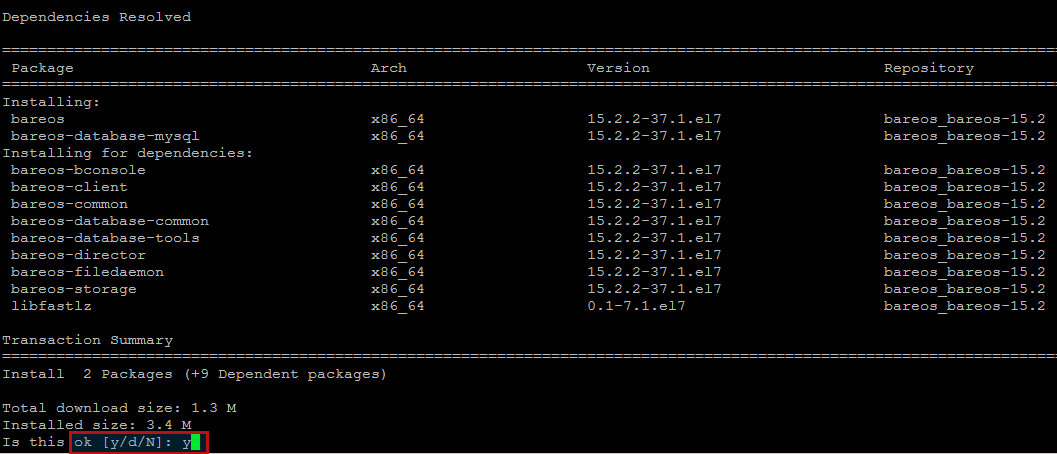
After downloading the repository, use below command to install Bareos along with its dependent packages using the command below.
[cc]# yum install bareos bareos-database-mysql[/cc]
Press ‘y’ key to continue installation of following shown packages.

You have the option whether to choose mysql database or postgresql along with bareos, but in this article we are using the MySQL database.
Prepare Bareos database:
First of all make sure that your preferred database should be installed and running. The easiest way to set up a database is using a system account that have passwordless local access to the database. Often this is the user root for MySQL or the user postgres for PostgreSQL.
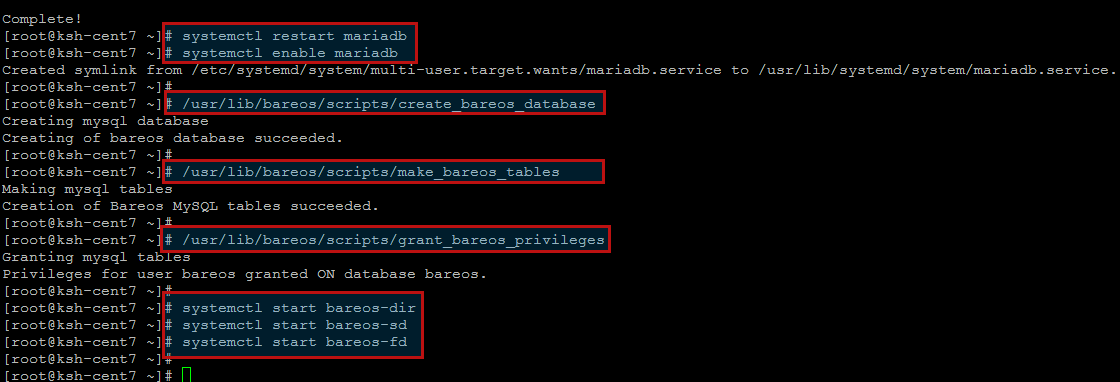
Let’s run the below command to install MySQL/MariaDB on your CentOS 7 server if its not already installed on your system and then start its services.
[cc]# yum install mariadb-server[/cc]
[cc]# systemctl start mariadb.service[/cc]
[cc]# systemctl enable mariadb.service[/cc]
Make sure, that ‘root’ has direct access to the local MySQL server. Check if the command mysql connects to the database without defining the password. This is the default on RedHat and SUSE distributions. On other systems (Debian, Ubuntu), create the file ‘~/.my.cnf’ with your authentication informations like given below.
[client]
host=localhost
user=root
password=YourPasswordForAccessingMysqlAsRoot
Let’s setup the Bareos database tables by following commands.
[cc]#/usr/lib/bareos/scripts/create_bareos_database [/cc]
[cc]#/usr/lib/bareos/scripts/make_bareos_tables [/cc]
[cc]#/usr/lib/bareos/scripts/grant_bareos_privileges [/cc]
Start the bareos daemons
[cc]# systemctl start bareos-dir[/cc]
[cc]# systemctl start bareos-sd[/cc]
[cc]# systemctl start bareos-fd[/cc]
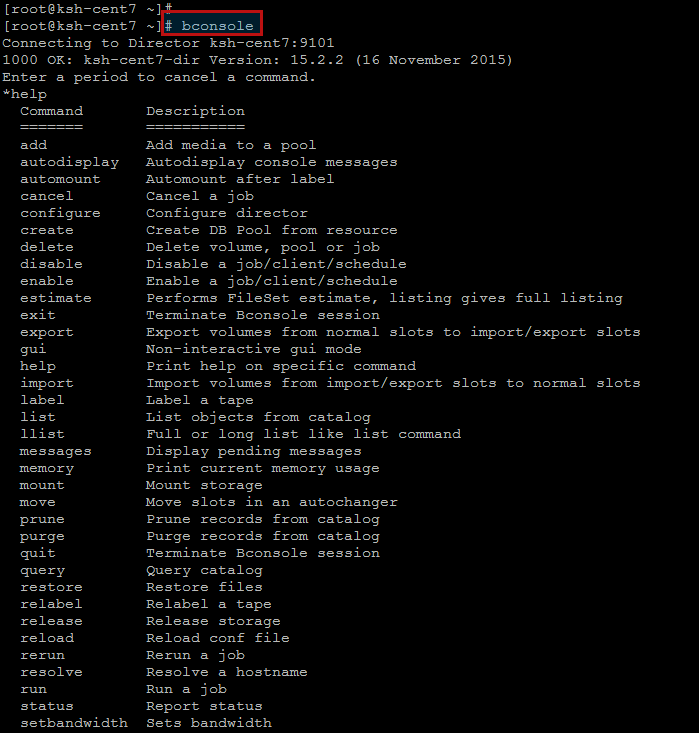
After starting services, you will eventually have to allow access to the ports 9101-9103, used by Bareos. Afterwards you should be able to access the director using the ‘bconsole’ command.
[cc]#bconsole[/cc]
Connecting to Director ksh-cent7:9101
1000 OK: ksh-cent7-dir Version: 15.2.2 (16 November 2015)
Enter a period to cancel a command.
*
Installing Bareos Webui:
Bareos-webui is part of the Bareos project and available for a number of platforms.
Following are the basic system requirements for Bareos-webui.
- A working Bareos environment, Bareos >= 15.2.2, including JSON API mode, see jansson.
- A Bareos platform, where bareos-webui packages are provided.
- An Apache 2.x Webserver with mod-rewrite, mod-php5 and mod-setenv
PHP >= 5.3.3 - Zend Framework 2.2.x or later. Note: Unfortunately, not all distributions offer a Zend Framework 2 package. The following list shows where to get the Zend Framework 2 package.
Run the command below to install Apache and PHP on your CentOS 7 server.
[cc]# yum install httpd php php-cli php-common [/cc]
Add the Bareos repository that is matching your Linux distribution, here we will be using the ‘yum’ command to installa the latest epel release.
[cc]# yum install epel-release[/cc]
Now you can install the Barios-webui with the help of below command, which will be install barios-webui along with its required packages.
[cc]# yum install bareos-webui [/cc]
Barios-webui Configurations:
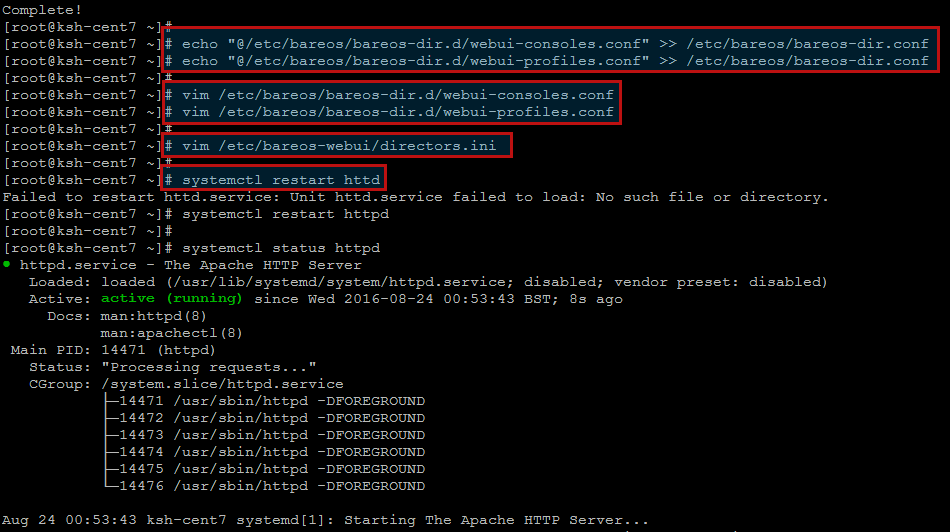
The bareos-webui package provides a default console and profile configuration under ‘/etc/bareos/bareos-dir.d/’, which have to be included at the bottom of your ‘/etc/bareos/bareos-dir.conf’ and edited as per your needs.
[cc]echo “@/etc/bareos/bareos-dir.d/webui-consoles.conf” >> /etc/bareos/bareos-dir.conf[/cc]
[cc]echo “@/etc/bareos/bareos-dir.d/webui-profiles.conf” >> /etc/bareos/bareos-dir.conf[/cc]
You can view the default ‘webui-consoles.conf’ and ‘webui-profiles.conf’ files using ‘cat’ or ‘vim’ command.
[cc]# vim /etc/bareos/bareos-dir.d/webui-consoles.conf[/cc]
[cc]# vim /etc/bareos/bareos-dir.d/webui-profiles.conf[/cc]
Apache Web server configurations:
A default configuration is provided at ‘/etc/httpd/conf.d/bareos-webui.conf’ file to configure apache web server configurations for Bareos-webui. The required Apache modules, setenv, rewrite and php are enabled via package postinstall script. You simply need to restart your apache webserver manually.
Then configure your directors in ‘/etc/bareos-webui/directors.ini’ to match your settings, which you have chosen in the previous steps.
The configuration file ‘/etc/bareos-webui/directors.ini’ should look similar to the following.
[cc]#vim /etc/bareos-webui/directors.ini [/cc]
; Section localhost-dir
;
[localhost-dir]
; Enable or disable section. Possible values are “yes” or “no”, the default is “yes”.
enabled = “yes”
; Fill in the IP-Address or FQDN of you director.
diraddress = “localhost”
; Default value is 9101
dirport = 9101
; Section another-host-dir
;
[another-host-dir]
enabled = “no”
diraddress = “”
dirport = 9101
Save and close the configuration file and then restart Apache web services.
[cc]#systemctl restart httpd[/cc]
[cc]# systemctl restart bareos-dir[/cc]
To install bareos-webui on a system with SELinux enabled, the following additional steps have to be performed to Allow HTTPD scripts and modules to connect to the network.
[cc]#setsebool -P httpd_can_network_connect on [/cc]
Accessing Bareos-webui:
Now open your browser of choice following the FQDN or your servers IP provided by your login credentials defined in your Bareos Director Console configuration.
[cc]http://your_servers_ip/bareos-webui/ [/cc]
login: user1
passwd: CHANGEME
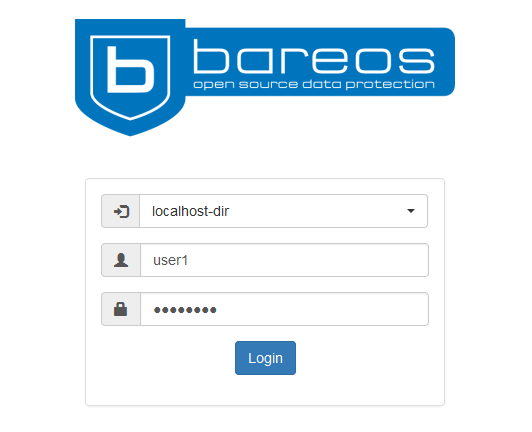
You can change these credentials in file ‘/etc/bareos/bareos-dir.d/webui-consoles.conf’.
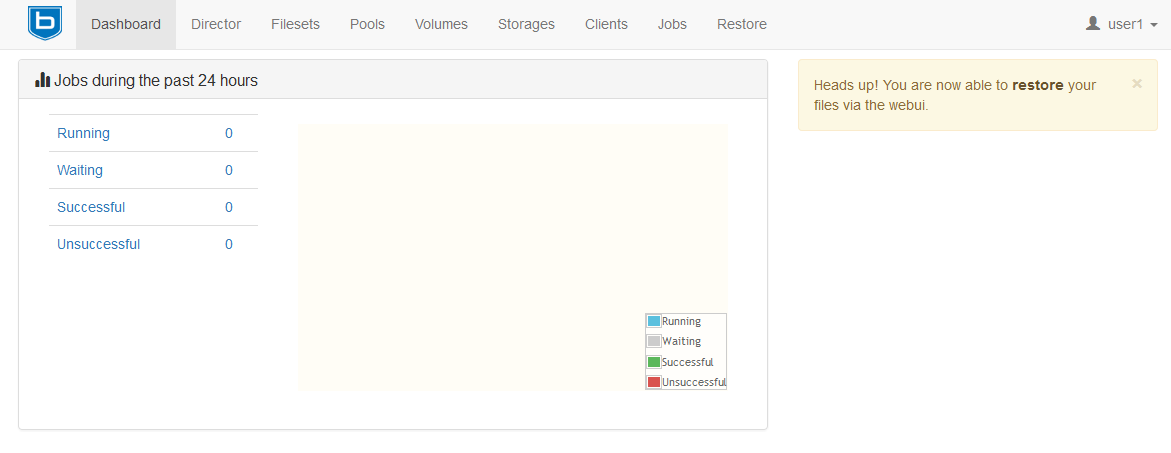
After providing the successful login credentials, you will be directed towards its dashboard where you can see staus of your current and previous backups.
Using bconsole:
The bconsole runs the Bareos Console program, once you connected to the bconsole, type ‘help’ to see a list of available commands.
[cc]#bconsole[/cc]
The most useful commands among the above list are given below.
[cc]* show filesets[/cc]
[cc]* status dir[/cc]
[cc]* status client[/cc]
[cc]* status storage[/cc]
Now Lets run the backup Job using the ‘run’ command as shown.
[cc]*run [/cc]
Conclusion:
That’s it we have successfully installed and setup Bareos Backup solution on CentOS 7. Bareos is an Open source backup solution with its awesome features. Bareos is a fork of Bacula with offers prebuild binaries for all major Linux distributions and Windows. It also includes numerous new features like Passive Clients, Copy Jobs between different storage daemons, NDMP backup, and so on. Everything is developed as Open Source. Let’s play with Bareos and do not forget to share your experience while backing up and restoring your backup.


