
VirtualBox comes with a suite of command line utilities, and you can use the VirtualBox command line interfaces (CLIs) to manage VMs on a remote headless server. In this tutorial, we will show you how to create and start a VM without VirtualBox GUI using VBoxManage. VBoxManage is the command-line interface to VirtualBox taht you can use to completely control VirtualBox from the command line of your host operating system. VBoxManage supports all the features that the graphical user interface gives you access to, but it supports a lot more than that. It exposes really all the features of the virtualization engine, even those that cannot (yet) be accessed from the GUI. You will need to use the command line if you want to use a different user interface than the main GUI and control some of the more advanced and experimental configuration settings for a VM.
You will find VBoxManage helpful when you want to create and run virtual machines (VMs) on VirtualBox, but you only have access to a terminal on a remote host machine. This can be a common situation for servers where VMs are managed from remotely.
Prerequisites
Before we start using VBoxManage command line utility, make sure that you have root or sudo user access to your Ubuntu 16.04 server and the Oracle Virtual Box is already installed on it. Then you need to install VirtualBox Extension Pack which is needed to run a VRDE remote desktop server used to access headless VMs.
Installing VBoxManage
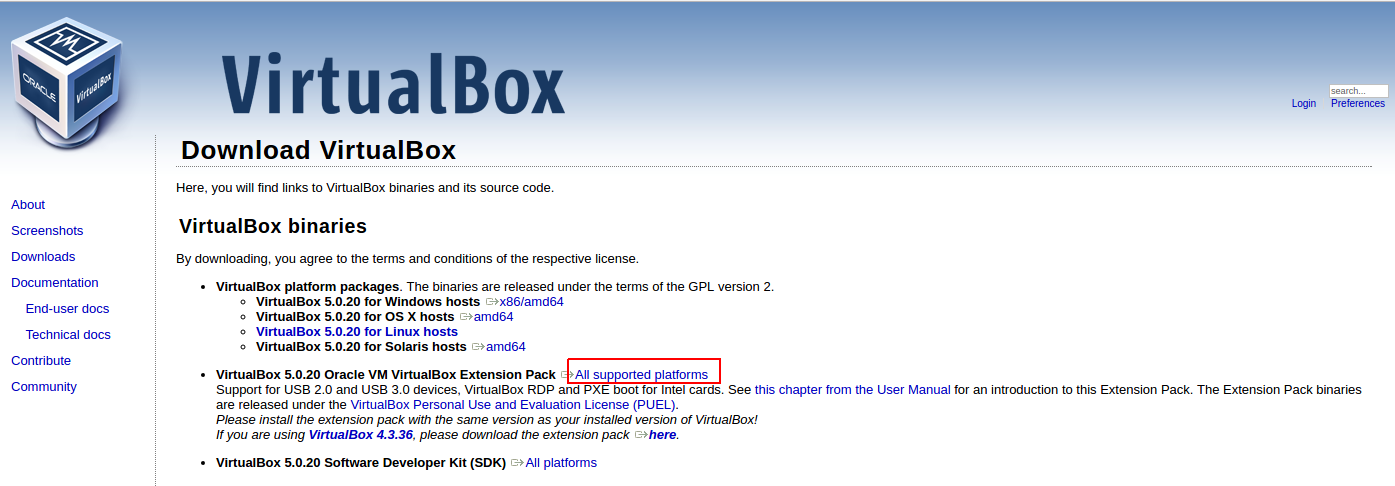
You can get your required package by following the link to Virtual Box Download Page to get the latest extension pack, same version as your installed version of VirtualBox!.
You can also make use of below command to get the VBoxManage extension on your system
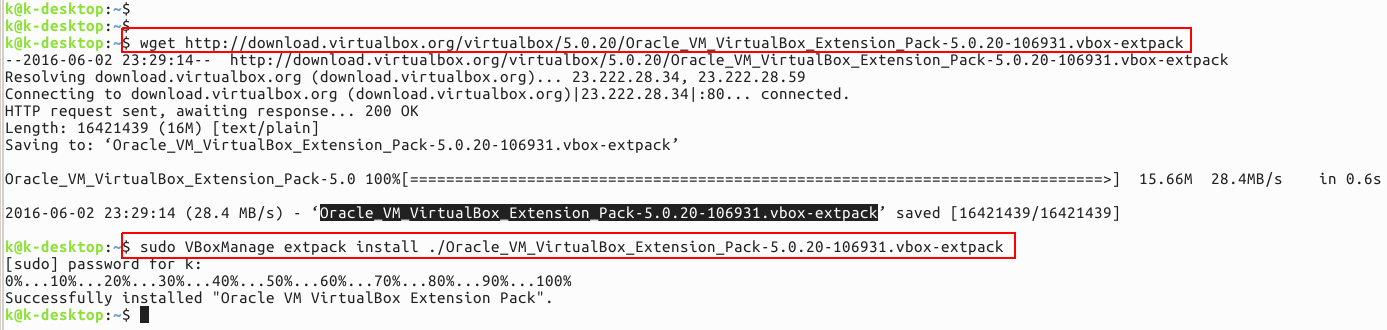
[cc]$ wget http://download.virtualbox.org/virtualbox/5.0.20/Oracle_VM_VirtualBox_Extension_Pack-5.0.20-106931.vbox-extpack [/cc]
After downloading the package, you can install it on your system by flowing the command below.
[cc]$ sudo VBoxManage extpack install ./Oracle_VM_VirtualBox_Extension_Pack-5.0.20-106931.vbox-extpack [/cc]
Run the below command to confirm that VBoxManage has been successfully installed.
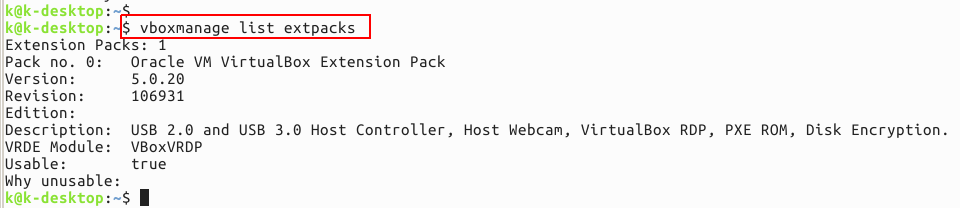
[cc]$ VBoxManage list extpacks [/cc]
Using VBoxManage on Ubuntu 16.04
Now we are going to use VBoxManage to show you that how easily you can create and manage your virtual machines by using this utility from command line terminal.
Let’s run the below command to create a virtual machine for Ubuntu OS.
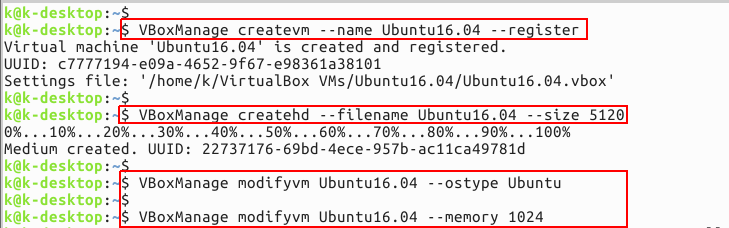
[cc]# VBoxManage createvm –name Ubuntu16.04 –register[/cc]
After executing this command it will create virtual machine called “Ubuntu16.vbox” in home folder under “VirtualBox VMs/Ubuntu16/Ubuntu16.04.vbox” . In the above command, “createvm” is used to create a virtual machine and “–name“ defines the name of the virtual machine while “registervm” command is used to register the virtual machine.
Now, create the hard disk image for the virtual machine using the below command.
[cc]$ VBoxManage createhd –filename Ubuntu16.04 –size 5124 [/cc]
Here “createhd” is used to create hard disk image and “–filename” is used to specify the virtual machine’s name, for which the hard disk image is created. Here, “–size” denotes the size of the hard disk image. The size is always given in MB. Here we have specified 5Gb that is 5124MB.
Next we will set the OS type, if the Linux OS has to be installed, then specify the OS type as Linux or Ubuntu Or Fedora etc using below command.
[cc]$ VBoxManage modifyvm Ubuntu16.04 –ostype Ubuntu [/cc]
Use below command to set the memory size for the virtual OS, i.e. the ram size for the virtual OS from the host Machine.
[cc]$ VBoxManage modifyvm Ubuntu10.10 –memory 512[/cc]
Now we are going to create a storage controller for the virtual machine by using below command.
[cc]$ VBoxManage storagectl Ubuntu16.04 –name IDE –add ide –controller PIIX4 –bootable on [/cc]
Here in above command ‘storagectl’ is used to create a storage controller for virtual machine,’–name’ specifies the name of the storage controller that needs to be created, modified or removed from the virtual machine. Then ‘–add’ defines the type of system bus to which the storage controller must be connected. Its available options are ide/sata/scsi/floppy. The ‘–controller’ option allows to choose the type of chipset that is to be emulated for the given storage controller while its available options are LsiLogic / LSILogicSAS / BusLogic / IntelAhci / PIIX3 / PIIX4 / ICH6 / I82078. At the end ‘–bootable’ defines whether this controller is bootable or not.
The above command creates the storage controller called IDE. Later the virtual media can be attached to the controller using ‘storageattach’ command.
Now run below command to create a storage controller called SATA, that will be used to attach the hard disk image to this later.
[cc]$ VBoxManage storagectl Ubuntu16.04 –name SATA –add sata –controller IntelAhci –bootable on[/cc]
Attach the previously created disk image as well as CD/DVD drive to the IDE controller. Ubuntu installation ISO image which is then inserted to the CD/DVD drive. Now, attach the storage controller to the virtual machine using ‘storageattach’ command.
[cc]$ VBoxManage storageattach Ubuntu16.04 –storagectl SATA –port 0 –device 0 –type hdd –medium “your_iso_filepath”[/cc]
This will attach the storage controller SATA to virtual machine Ubuntu16.04 with the medium i.e., to the virtual disk image which is created.
Run below commands to add some features like networking setup, audio, etc.
[cc]$ VBoxManage modifyvm Ubuntu10.10 –nic1 nat –nictype1 82540EM –cableconnected1 on [/cc]
[cc]$ VBoxManage modifyvm Ubuntu10.10 –vram 128 –accelerate3d on –audio alsa –audiocontroller ac97[/cc]
Now, start the VM by using the below command by specifying the name of the VM that you wish to start.
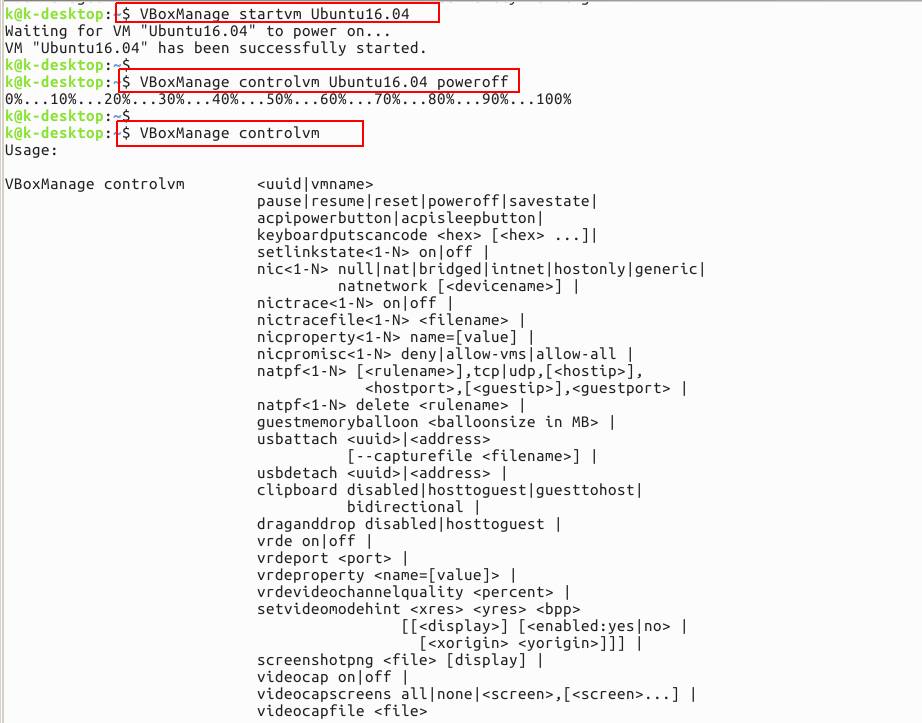
[cc] $ VBoxManage startvm Ubuntu16.04 [/cc]
A new window will be opened where you new VM be booted from your attached file.

To stop the virtual machine , you can make use of the following command.
[cc]$ VBoxManage controlvm Ubuntu16.04 poweroff [/cc]
The ‘controlvm’ command is used to control the state of the virtual machine. Some of the available options are pause / resume / reset / poweroff / savestate / acpipowerbutton / acpisleepbutton. There are many options in controlvm to see all the options available in it, run below command.
[cc]$VBoxManage controlvm[/cc]
Conclusion
In this article we have learned about an awesome tool of Oracle Virtual Box that is VBoxManage, that includes its installation and usage on Ubuntu 16.04 Operating system. The article includes a detailed instructions about its useful commands to create and manage your virtual machines using VBoxManage. Hope you find this much helpful, do not forget to share your comments or suggestions.
If you enjoy our article(s), Please use “Get Linuxpitstop articles by Email” option to get latest articles by email. Please like, follow and share our social network pages, we need help from esteemed visitors like yourself to keep this venture going.


