
About Spacewalk
Spacewalk is a free, open source Linux management system. It is upstream community project for Red Hat Satellite server. Using Spacewalk, we can deploy, manage and update packages to Red Hat derived distributions like CentOS, Fedora, and Scientific Linux etc. It has a cool web interface that will help us to view the status of software updates in the clients and initiate update actions. Spacewalk provides provisioning capabilities that enables you to kickstart provision systems and manage and deploy configuration files. It also has virtualization capabilities to enable you to provision, control, manage, and monitor virtual KVM and Xen guests.
Spacewalk Proxy, the upstream version of Red Hat Satellite Proxy product, connects to your central Sapcewalk server and caches the contents from the Central server. Then, it distributes the contents to various geographical locations and reduces the load of the Central Spacewalk server. So, eventually, it reduces the downtime and increases the download speed for the client systems.
In this tutorial let us see how to install spacewalk and how to configure it in CentOS 7 64bit server. The same steps will work on Fedora and Scientific Linux distributions.
Features
Using Spacewalk, you can:
- Inventory your systems (hardware and software information) ;
- Install and update software on your systems ;
- Collect and distribute your custom software packages into manageable groups ;
- Provision (kickstart) your systems ;
- Manage and deploy configuration files to your systems ;
- Provision and start/stop/configure virtual guests ;
- Distribute content across multiple geographical sites in an efficient manner ;
- And many.
Install Spacewalk in CentOS 7
My testing machine details are given below:
- Operating System : CentOS 7 minimal installation ;
- Hostname : server1.unixmen.local ;
- IP Address : 192.168.1.150/24.
Before installing Spacewalk, we need to add some additional repositories that will help us to get some important dependencies which are not available in the Spacewalk official repository.
First, add EPEL repository:
Run the following command from your terminal to add and enable EPEL repository:
yum install epel-release
Add JPackage repository:
Run the following command from your Terminal to add JPackage repository:
cat > /etc/yum.repos.d/jpackage-generic.repo << EOF
[jpackage-generic]
name=JPackage generic
#baseurl=http://mirrors.dotsrc.org/pub/jpackage/5.0/generic/free/
mirrorlist=http://www.jpackage.org/mirrorlist.php?dist=generic&type=free&release=5.0
enabled=1
gpgcheck=1
gpgkey=http://www.jpackage.org/jpackage.asc
EOF
Add Spacewalk repository:
Add Spacewalk official repository as shown below depending upon the distribution you use. As of writing this tutorial, the latest Spacewalk version was 2.3.
On RHEL/CentOS/Scientific Linux 6:
rpm -Uvh http://yum.spacewalkproject.org/2.3/RHEL/6/x86_64/spacewalk-repo-2.3-4.el6.noarch.rpm
On RHEL/CentOS/Scientific Linux 7:
rpm -Uvh http://yum.spacewalkproject.org/2.3/RHEL/7/x86_64/spacewalk-repo-2.3-4.el7.noarch.rpm
Fedora 20:
rpm -Uvh http://yum.spacewalkproject.org/2.3/Fedora/20/x86_64/spacewalk-repo-2.3-4.fc20.noarch.rpm
Fedora 21:
rpm -Uvh http://yum.spacewalkproject.org/2.3/Fedora/21/x86_64/spacewalk-repo-2.3-4.fc21.noarch.rpm
Since, I am using CentOS 7, I added the Spacewalk repository for CentOS 7.
Now, update the repository lists using command:
yum repolist && yum update
Install database server:
Spacewalk needs a database server to store it’s primary data. By default, Spacewalk uses an embedded PostgreSQL database. Also, you can use Oracle RDBMS (version 10g or higher) if you want.
We will go with defaults. Install postgreSQL database for Spacewalk using command:
yum install spacewalk-setup-postgresql
Install Spacewalk:
Now, install Spacewalk server using command:
yum install spacewalk-postgresql
Configure Firewall:
After installing Spacewalk, you need to allow few ports via your Firewall and router.
firewall-cmd --add-service=https --permanent
firewall-cmd --add-service=http --permanent
Also, add port 5222 if you want to push actions to client machines and 5269 for push actions to a Spacewalk Proxy, 69 udp if you want to use tftp.
Finally, restart firewall service using command:
firewall-cmd --reload
The installation part is over. Let us go and configure Spacewalk server.
Configure Spacewalk server
Your Spacewalk server must have a valid FQDN like server.example.com. In case your server fails to resolve it’s hostname, edit /etc/hosts file and add Spacewalk server’s hostname and IP address manually.
Here is my /etc/hosts file output:
127.0.0.1 localhost localhost.localdomain localhost4 localhost4.localdomain4
::1 localhost localhost.localdomain localhost6 localhost6.localdomain6
192.168.1.150 server1.unixmen.local server1
Also, during Spacewalk configuration, you’ll be asked to enter a password for the Spacewalk database user. Please don’t use ‘#’ (number sign/pound/hash) and ‘@’ in your database password otherwise installation will fail.
Well, run the following command to configure the Spacewalk server:
spacewalk-setup --disconnected
Sample output:
* Setting up SELinux..
** Database: Setting up database connection for PostgreSQL backend.
** Database: Installing the database:
** Database: This is a long process that is logged in:
** Database: /var/log/rhn/install_db.log
*** Progress: ###
** Database: Installation complete.
** Database: Populating database.
*** Progress: ############################
* Configuring tomcat.
* Setting up users and groups.
** GPG: Initializing GPG and importing key.
** GPG: Creating /root/.gnupg directory
You must enter an email address.
Admin Email Address? sk@unixmen.com ## Enter your Email ##
* Performing initial configuration.
* Activating Spacewalk.
** Loading Spacewalk Certificate.
** Verifying certificate locally.
** Activating Spacewalk.
* Configuring apache SSL virtual host.
Should setup configure apache's default ssl server for you (saves original ssl.conf) [Y]? ## Press Enter ##
** /etc/httpd/conf.d/ssl.conf has been backed up to ssl.conf-swsave
* Configuring jabberd.
* Creating SSL certificates.
CA certificate password?  ## Enter certificate password ##
Re-enter CA certificate password? ## Re-enter theassword ##
Organization? Unixmen  ## Enter your Organization ##
Organization Unit [server1.unixmen.local]?   ## Verify your hostname and press Enter ##
Email Address [sk@unixmen.com]?  ## Enter your Email Id ##
City? Erode  ## Enter city ##
State? Tamilnadu  ## Enter your state ##
Country code (Examples: "US", "JP", "IN", or type "?" to see a list)? IN ## Enter Country code ##
** SSL: Generating CA certificate.
** SSL: Deploying CA certificate.
** SSL: Generating server certificate.
** SSL: Storing SSL certificates.
* Deploying configuration files.
* Update configuration in database.
* Setting up Cobbler..
Cobbler requires tftp and xinetd services be turned on for PXE provisioning functionality. Enable these services [Y]?  ## Press Enter ##
* Restarting services.
Installation complete.
Visit https://server1.unixmen.local to create the Spacewalk administrator account.
Spacewalk server has been configured now. Now, let us go ahead and set up the password for the Spacewalk administrator account.
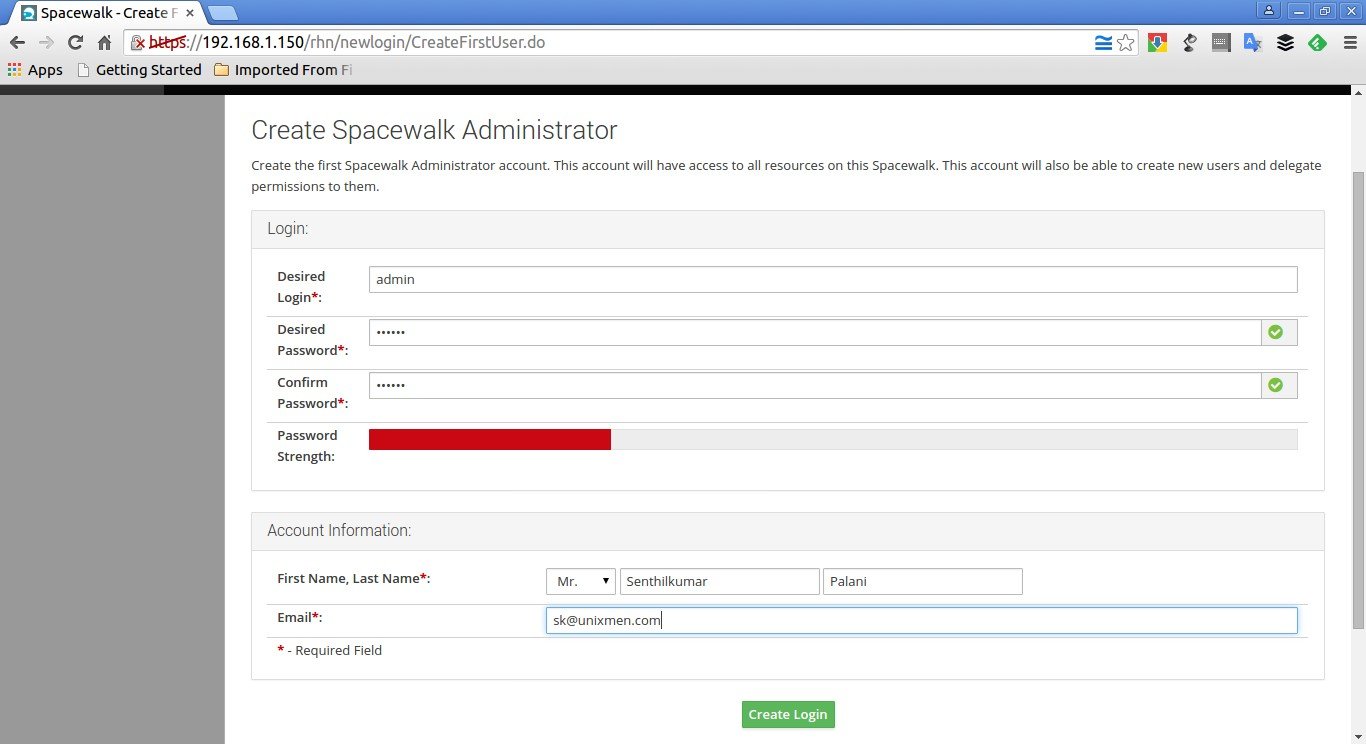
Open up your web browser and navigate to https://hostname/ or https://ip-address/.
Enter the administrator account name, password, first name, last name and Email address etc. Then, click Create Login button.
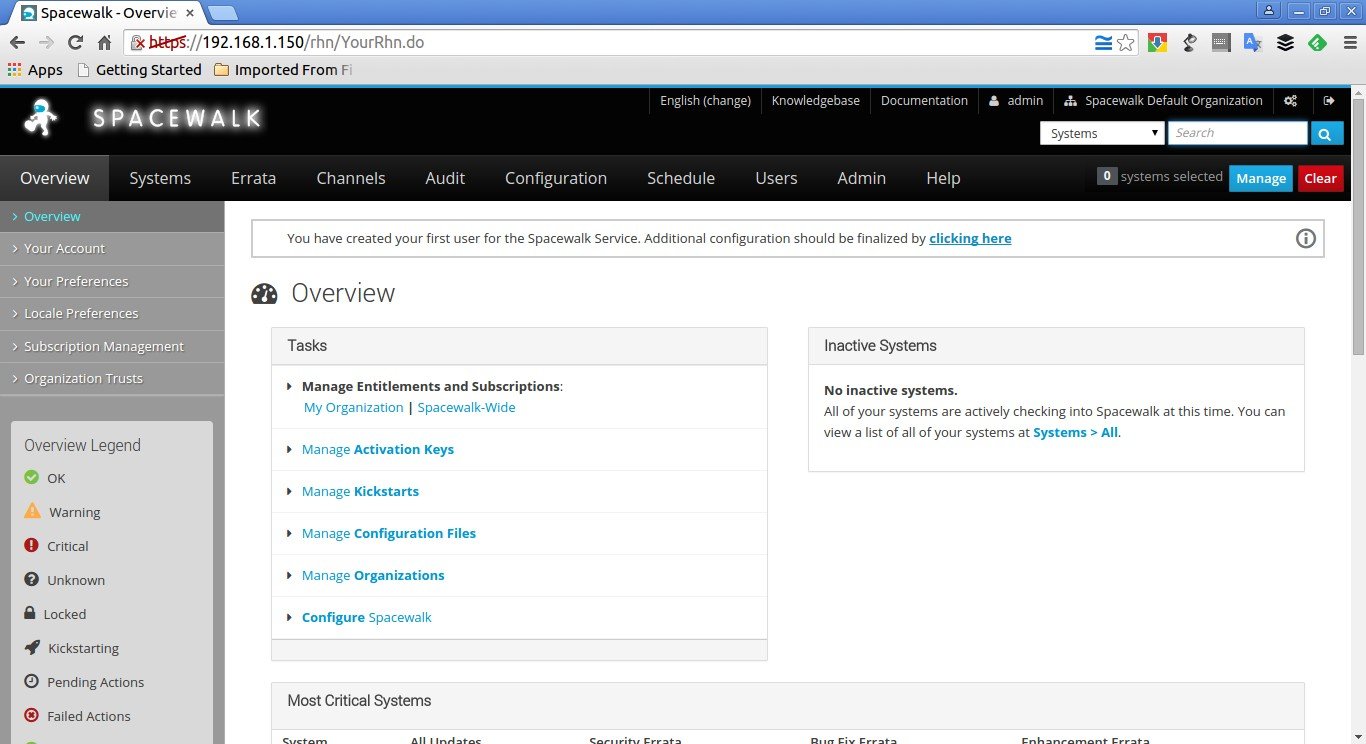
Now, you’ll be pleased with Spacewalk administrator dashboard.
At this stage, you have successfully installed and configured Spacewalk server in CentOS 7. It is time to use Spacewalk server.
In our upcoming article, we’ll cover the basic usage, Spacewalk client configuration, and how to deploy packages from Spacewalk server.
Refer the following article to know how to manage Spacewalk Channels and Repositories.
Source and Reference:


