Introduction
Nextcloud is a cloud storage service invented by ownCloud founder. Unlike other popular services, in this case you can set up your own storage system, on your server. Nextcloud gives you fine-grained control over data access, facilitates file synchronization and allows for sharing across devices. It is a great solution for not only private users but also for organizations.
It supports many databases, like Oracle, SQLite, PostreSQL and MySQL. The project provides a desktop client for Windows, GNU/Linux and macOS, and a mobile app for Android and iOS. It also provides several additional features beyond storage.
Please read on to learn how to configure Nextcloud 11 on Ubuntu 16.04.
Prerequisites
In order to install and use Nextcloud, you’ll need Apache, MariaDB and PHP7. Follow our guide if you need to install the LAMP stack on Ubuntu 16.04.
Installation
Download Nextcloud 11 onto your server. You can do this through a browser, or, easily, with the following command:
$ wget https://download.nextcloud.com/server/releases/nextcloud-11.0.0.zip
Next, extract the archive:
$ unzip nextcloud-11.0.0.zip
Now, you should see a new folder named nextcloud; copy this directory to /var/www/, executing the command:
# cp -r nextcloud /var/www/
The Apache user must have write permission:
# chown www-data:www-data /var/www/nextcloud/ -R
Create user and a database in MariaDB
Log into MariaDB with the following command:
# mysql -u root -p
If everything went well, create the database for Nextcloud. In this tutorial we’ll name this database nextclouddb.
mysql> CREATE DATABASE nextclouddb;
Create a user for this database. Of course, you can enter the username if you choose.
mysql> CREATE USER mynextclouduser@localhost IDENTIFIED BY 'my_strong_password';
Grant this user all privileges:
mysql> GRANT ALL PRIVILEGES ON nextclouddb.* TO mynextclouduser@localhost IDENTIFIED BY 'my_strong_password';
Next, just exit:
mysql> FLUSH PRIVILEGES;
mysql> EXIT;
If you want to enable the binary logging in MariaDB, edit the mysqld configuration file, which is /etc/mysql/mariadb.conf.d/50-server.conf, adding, in the [mysqld] section, the following lines:
log-bin        = /var/log/mysql/mariadb-bin
log-bin-index  = /var/log/mysql/mariadb-bin.index
binlog_format  = mixed
Save and close the file, and then reload MariaDB:
# systemctl reload mysql
If you see an error message like this:Failed to reload mysql.service: Job type reload is not applicable for unit mysql.service.
See system logs and ‘systemctl status mysql.service’ for details.
you have to restart mysql.
# systemctl restart mysql
Apache Virtual Host File for Nextcloud
In /etc/apache2/sites-available, create a nextcloud.conf file.
In that file, paste the following content:
<VirtualHost *:80>
 DocumentRoot "/var/www/nextcloud"
 ServerName nextcloud.example.com

 ErrorLog ${APACHE_LOG_DIR}/error.log
 CustomLog ${APACHE_LOG_DIR}/access.log combined

<Directory /var/www/nextcloud/>
 Options +FollowSymlinks
 AllowOverride All

 <IfModule mod_dav.c>
 Dav off
 </IfModule>

 SetEnv HOME /var/www/nextcloud
 SetEnv HTTP_HOME /var/www/nextcloud
 Satisfy Any

</Directory>

</VirtualHost>
Note: of course, in the “ServerName” line you must change “example.com” with your domain.
After saving and closing, create a link to /etc/apache2/sites-enabled/, executing the following command:
# ln -s /etc/apache2/sites-available/nextcloud.conf /etc/apache2/sites-enabled/nextcloud.conf
Enable required Apache modules and install PHP modules:
# a2enmod rewrite  env headers mime dir ssl setenvif
# apt install php7.0-common php7.0-gd php7.0-json php7.0-curl  php7.0-zip php7.0-xml php7.0-mbstring
These modules will be loaded after restarting Apache:
# systemctl restart apache2
Configure through your web browser
The last part of the configuration process must be done on your browser. Go to the URL you specified in nextcloud.conf. You will see the following page
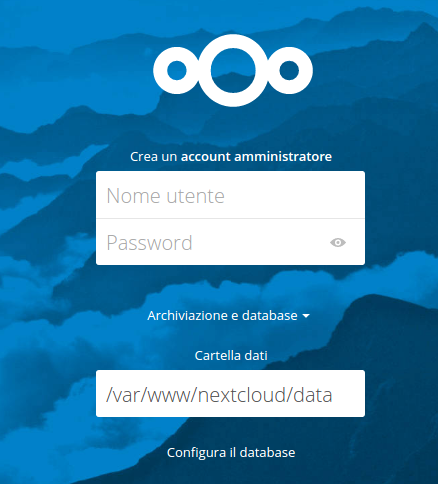
Note: in my case there is Italian localization.
There you will be asked to create an admin account, and specify a Nextcloud data folder. For security reasons, it’s better to put the last one outside the Nextcloud root. So, for example:
# mkdir /var/www/nextclouddata
Make sure the Apache user has write permission:
# chown www-data:www-data /var/www/nextclouddata -R
Create user, specify data folder, and then scrolling the page you will see:
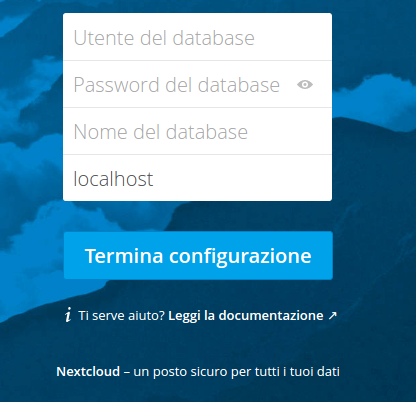
In that form you must enter the same database information you provided in the previous steps. Then you can connect Nextcloud to MariaDB.
Finally, just click on Finish setup and wait until Nextcloud finishes configuring. When it is complete you will see the Nextcloud web interface.
As you can see, the set up is very easy and once you have completed it you won’t be disappointed by the result! Congrats! You have configured your own cloud storage and you’re ready to use it!


