
Introduction
Mantis Bug Tracker, or MantisBT, is a web based bug tracking system, available since November 2000. MantisBT is written in PHP and supports multiple database backends, including MySQL, MS SQL and PostgreSQL. The software is released under the terms of GNU General Public License (GPL).
In this tutorial, we’ll learn how to install MantisBT on CentOS 7, using Apache as our web server and MariaDB as our database.
Getting started
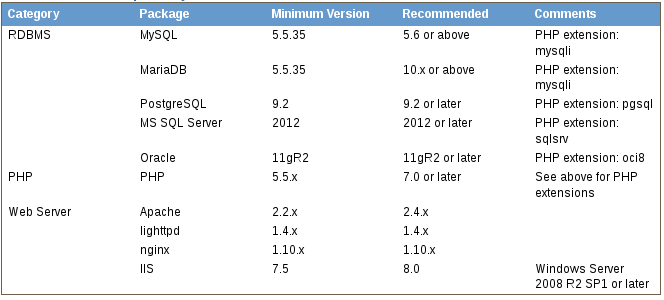
The following table shows the software requirements for installing MantisBT:
Install Apache Web Server
The first step is the installation of the Apache Web Server. The package is available in the CentOS repositories. Install it using yum:
# yum install -y httpd
Once it is installed, start the Apache service like this:
# systemctl start httpd
Now, check its status:
# systemctl status httpd
---------------------------------------------------
httpd.service - The Apache HTTP Server
   Loaded: loaded (/usr/lib/systemd/system/httpd.service; disabled; vendor preset: disabled)
   Active: active (running)
Install MariaDB
MariaDB is also available in the CentOS repositories:
# yum install -y mariadb mariadb-server
Now, start MariaDB:
# systemctl start mysqld
Check if the service is running correctly:
# systemctl status mysqld
------------------------------------
mysqld.service - MySQL Server
   Loaded: loaded (/usr/lib/systemd/system/mysqld.service; enabled; vendor preset: disabled)
   Active: active (running)
Install PHP
MantisBT supports PHP 5.5+, recommending PHP 7. The last one is the version we will install. PHP 7 is not available in CentOS repositories, but this is not a big problem, since you can find it in external repos like webtatic or ius.io. In this tutorial, we will find it in webtatic.
First, install EPEL:
# yum install -y epel-release
Once the installation is finished, install the Webtatic repository by executing the following command:
# rpm -Uvh https://mirror.webtatic.com/yum/el7/webtatic-release.rpm
It is now possible to install PHP 7.1 with the required modules:
# yum install -y php71w php71w-mysqli php71w-cli
Configure MariaDB
Secure MariaDB by running the mysql_secure_installation script:
# mysql_secure_installation
Remove anonymous users? Y
Success.

Disallow root login remotely? Y
Success.

Remove test database and access to it? Y
 - Dropping test database...
Success.

 - Removing privileges on test database...
Success.

Reload privilege tables now? Y

Success.

All done!
Login to the MariaDB shell and create a database and user for Mantis:
# mysql -u root -p
MariaDB [(none)]> CREATE USER 'mantisusr'@'localhost' IDENTIFIED BY 'Usr_strong_password1!';
MariaDB [(none)]> CREATE DATABASE mantis_db;
MariaDB [(none)]> GRANT ALL PRIVILEGES ON mantis_db.* TO 'mantisusr'@'localhost' IDENTIFIED BY 'Usr_strong_password1!';
MariaDB [(none)]> FLUSH PRIVILEGES;
MariaDB [(none)]> EXIT;
Install Mantis
Download the MantisBT latest release with wget:
$ wget https://excellmedia.dl.sourceforge.net/project/mantisbt/mantis-stable/2.4.1/mantisbt-2.4.1.tar.gz
Extract the archive and move extracted files to the Apache web root directory, which is /var/www/html:
$ tar -xpf mantisbt-2.4.1.tar.gz
# mv mantisbt-2.4.1 /var/www/html/mantis
Change ownership of mantis with the following command:
# chown -R apache:apache /var/www/html/mantis/
Create a Virtual Host file for Mantis
Next step is to create a new virtual host file for MantisBT.
# $EDITOR /etc/httpd/conf.d/mantis.conf
In this file, paste the following lines:
<VirtualHost *:80>
        ServerAdmin admin@example.com
        DocumentRoot "/var/www/html/mantis"
        ServerName example.com
        <Directory "/var/www/html/mantis/">
                Options FollowSymLinks
                AllowOverride All
                Options MultiViews FollowSymlinks
                AllowOverride All
                Order allow,deny
                Allow from all
        </Directory>
        TransferLog /var/log/httpd/mantis_access.log
        ErrorLog /var/log/httpd/mantis_error.log
</VirtualHost>
Save, exit and restart Apache:
# systemctl restart httpd
Installation
With a web browser, go to URL http://example.com/mantis/admin/install.php. This will start the installation procedure, which will check basic parameters for the web server, will ask for database information, user and password, and additional privileges.
Conclusion
In this tutorial we have seen how easy it can be to install a powerful bug tracker like MantisBT on a server running CentOS 7. With a tool like Mantis, bug tracking of a large project becomes much easier.
Install, configure and keep track!


