
Occasionally, you find yourself scouring through your system in search of a particular file(s). It can be a truly daunting task sifting through hundreds of directories and even files. Sometimes, it may feel like finding a needle in a haystack. In this guide, we will show valuable ways that you can leverage to find a file in Linux in a simple and seamless manner. These cut across all Linux distributions.
Let’s begin.
1) Find a file in Linux using the locate command
The locate command is a fast command-line tool that you can leverage to find a file in Linux. As its name suggests, the command finds a file using its file name by searching through a database. Inside the database are bits of the file and its corresponding path on the Local Linux system. Let’s delve into some of the command examples.
The locate command takes the following syntax:
$ locate OPTION pattern
Searching a file with a specific file name
In its basic syntax, the locate command is used to search for a particular file in a given directory path. The syntax is shown below:
$ locate filename
For example, to search for a file called latest.tar.gz, which is a WordPress installation file that I downloaded from the Offical WordPress download site, run the command:
$ locate latest.tar.gz
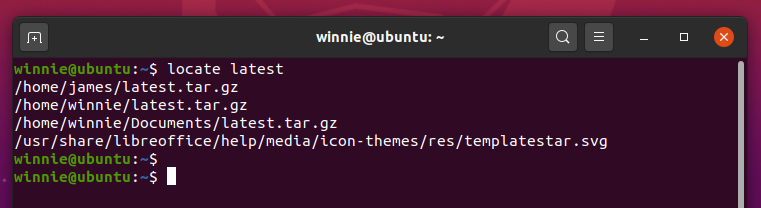
The command searches for all the possible locations of the file starting from the root partition.
Ignore case sensitivity when searching a file
By default, locate command is case sensitive. For example, LINUX.txt is different from linux.txt If you are unsure about whether the filename is in uppercase or lowercase characters, you can ignore case sensitivity using the -i flag as shown below.
$ locate -i file1.txt
The above command will display all instances of the filename, whether in uppercase or lowercase characters.
Display the number of matching entries
To display the number of matching file entries use the -c option with locate command. In the example below, the locate command narrows down to all instances of files with a .pdf extension.
$ locate -c [.pdf]*
The above command will count for all instances of files with a .pdf file extension.

Limit the number of search queries
In most cases, you are likely to get massive output on your terminal. Thankfully, you can limit your search result and determine the number of queries to be printed on the terminal. To achieve this, simply use the -n flag followed by the number of search queries.
For example, the command below limits the search queries for up to 30 queries.
$ locate *.pdf* -n 30
Refresh the database
The locate command is reliant on the mlocate database. This needs to be regularly updated for the command-line utility to work as expected. To update the database use the updatedb utility as shown with sudo privileges as shown.
$ sudo updatedb
2) Find a file in Linux using find command
The Linux find command is yet another command-line utility that you can use to find files on your system. In fact, it’s one of the basic commands that beginners must learn on their journey to become Linux experts. Unlike the locate command, it’s quite slow and usually takes time to populate the results. The find command takes the following syntax:
$ find location comparison-criteria search term
List all files in your present current working directory
To begin with, you can have an overview of all the files in your current directory by invoking the command below. Be sure to note the period at the end of the command.
$ find .
Search for all files in a given directory
Alternatively, you may decide to search or display all the files contained in a given directory. For example, in this example, we are searching for all the files in the ‘Documents’ directory located in the home directory.
$ find /home/winnie/Documents

Search for a specific file name within a folder
To narrow down to a specific file within a specified directory use the syntax below:
$ find directory_name -name "file_name"
For example, to search for file unixmen.txt in the home directory, run the command below
$ find /home/winnie -name unixmen.txt

Search for files only or directories only
The find command gives you the flexibility to decide whether you want to search either a file or a directory only. To specify a file search use the -f flag and to search for a directory, use the -d option. Let’s take a few examples:
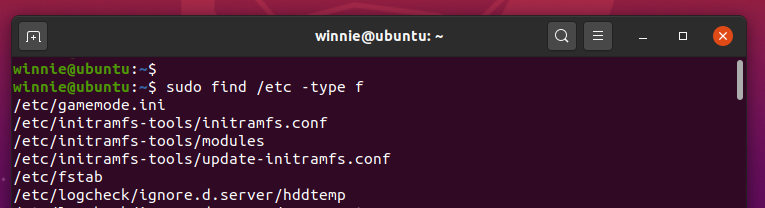
To search for files only in the /etc directory, run the command:
$ sudo find /etc -type f
This is going to print all files in the /etc directory. Here’s just a snippet of the output
To search for a file called ‘hosts’ in the /etc directory, add the -name flag as shown in the command:
$ sudo find /etc -type f -name hosts

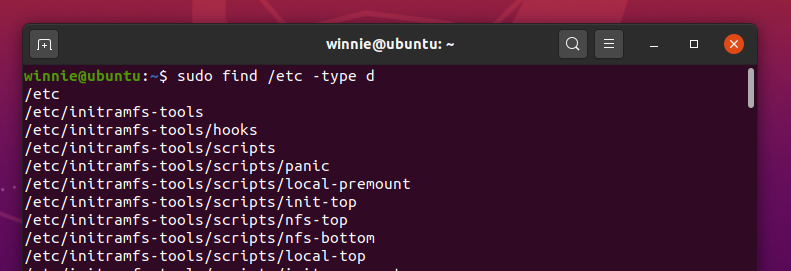
Also, you can search for directories only and omit files. For example, to search for directories only in the /etc directory, run the command shown
$ sudo find /etc -type d
To be more specific, you can search for a specific directory, for instance, to search for SSL directory in the /etc path, run
$ sudo find /etc -type d -name ssl

Find a file in Linux owned by a particular user
Using the -user flag, you can search for a file owned by a specific user. For example, in the following command, we are searching for files owned by user ‘James’ in the /home/winnie/ location.

3) Find a file in Linux using catfish tool
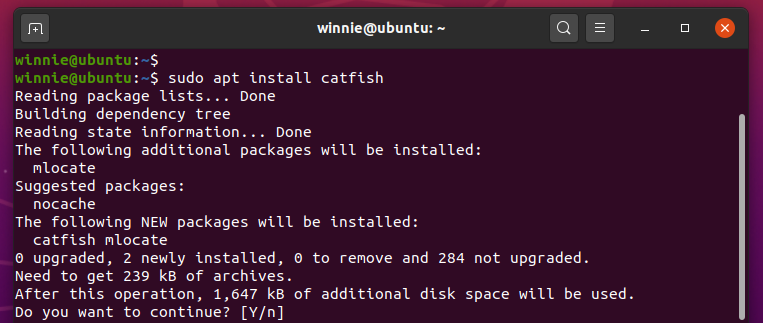
Catfish is a lightweight GUI tool based on GTK+ that helps you find various file types. The tool leverages the find and locate commands under the hood to perform a file search. It’s easy to install and in most cases, you can easily download it from the Software centre of your favourite distro. For Ubuntu/Debian and mint simply run:
$ sudo apt install catfish
Once installed, simply use the application manager to launch catfish as shown.

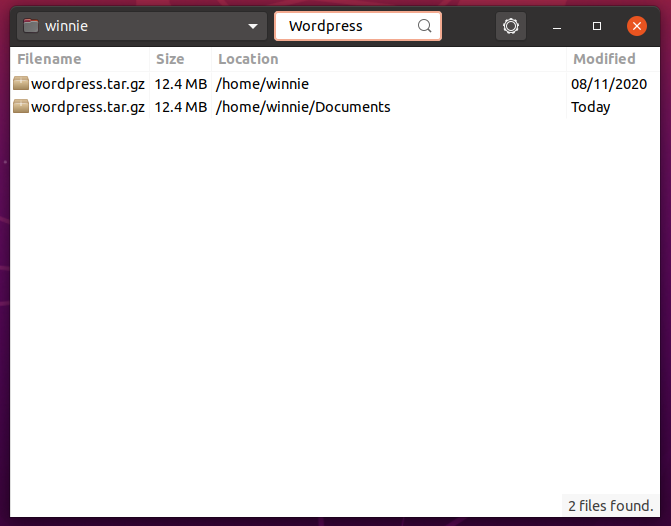
Once launched, you can then begin to search for your files based on your preferred location. In the example below, we are searching for the WordPress installation file in the home directory. As you can see it searches for all the possible locations of the file path. Additionally, you can sort the results based on the size, location and date modified.
Conclusion
We have come to the end of this guide. We have demonstrated how you can search for files on Linux using two command-line tools- locate and find command – as well as find files using a graphical front-end tool called Catfish. It’s our hope that going forward, you will have a much easier time searching for your files.


