
Introduction
It was September when, with a post on its blog, Google announced that starting from Chrome 56, its browser will mark non-secure pages containing password and credit card input fields as Not Secure in the URL bar.
It’s important to note that we are talking about all HTTP pages collecting users’ “critical” data.
This move is part of a long-term plan to mark all HTTP sites as non-secure. So, if you own (or manage) a web server, you need to make the right move:this article this will explain just what that means.
Why HTTPS?
The first question is: why is Google doing this? What are the concerns around HTTP, and why, today, is it a good choice to secure connections?
Of course, everybody knows that secure is better then insecure; but in this case, the big problem with HTTP is that it lacks a system for protecting communications between clients and servers. This exposes data to different kinds of attacks, for instance, the “Man in the middle” (MIM), in which the attacker intercepts your data. If you are using some transaction system with your bank, using credit card infos, or just entering a password to log in to a web site, this can become very dangerous.
This is why HTTPS exists (HTTP over TLS, or, HTTP over SSL, or, HTTP Secure).
If you are on Unixmen, you probably know what this means: SSL/TLS ensures encrypted connections.
So, if your job is to keep a web server up and running on, you should switch to HTTPS.
Getting started with HTTPS
First off, to enable HTTPS on your site, you need a certificate. These can be acquired from a Certificate Authority (CA). Next you’ll want to follow our tutorial, where we’ll talk about Let’s Encrypt. We will configure on an Apache web server running on CentOS 7.
In order to get it, it’s necessary to demonstrate control over the domain to secure. You can accomplish this task through software that uses ACME.
We will suppose that you have shell access to your server; in other words, that you can connect through SSH.
Using Certbot
Certbot is a powerful, yet easy to use, ACME client that the EFF provides.
In CentOS 7, you can find Certbot on the EPEL repository; if you enable it, just install what you need:
# yum install python-certbot-apache
It has a solid Apache plugin, and it automates almost all the required passages. Just give the command:
$ certbot --apache
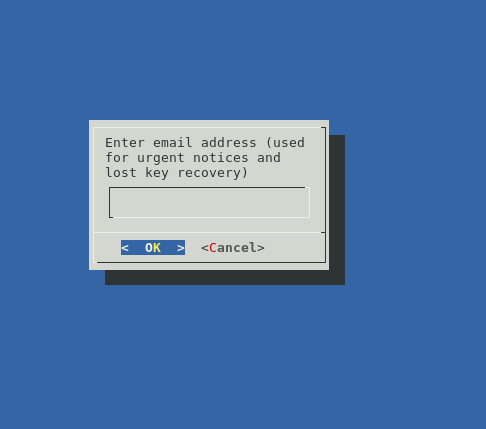
After that, you’ll see a guide to customize your options, just like this:
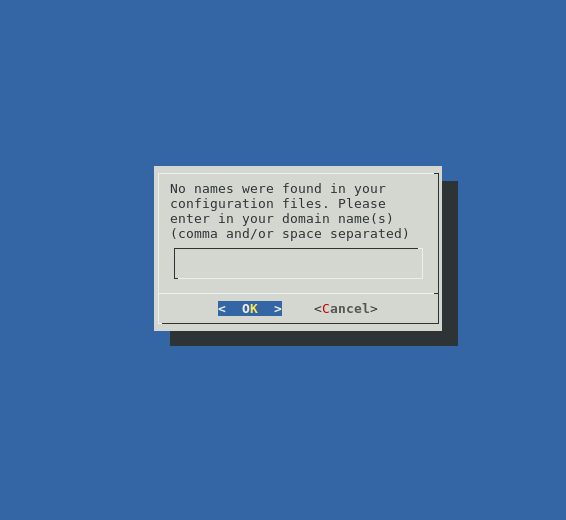
Enter the domain you want to secure; then, Certbot will prompt you to enter your email address.
Next, you will choose the Virtual Host file, being the default ssh.conf.
After that, you can decide whether to enable both http and https access or redirect to https. The secure option is the second one (https). At the end of the procedure, Certbot will display a message containing configuration information.
Edit CentOS SSL configuration
If you want to add more security, you have to make some changes.
First, edit the Virtual Host file you specified during configuration through Certbot. If you used the default one, the file should be /etc/httpd/conf.d/ssl.conf.
There, for securing Apache SSL, we can follow this recommandation, which, for our example, is:
SSLCipherSuite EECDH+AESGCM:EDH+AESGCM:AES256+EECDH:AES256+EDH
SSLProtocol All -SSLv2 -SSLv3
SSLHonorCipherOrder On
Header always set Strict-Transport-Security "max-age=63072000; includeSubDomains; preload"
Header always set X-Frame-Options DENY
Header always set X-Content-Type-Options nosniff
# Requires Apache >= 2.4
SSLCompression off
SSLUseStapling on
SSLStaplingCache "shmcb:logs/stapling-cache(150000)"
# Requires Apache >= 2.4.11
SSLSessionTickets Off
Of course, remember that you can have compatibility troubles with old clients, so it’s up to you whether to change the previous lines as suggested, or choose another route.
When you’re finished, save and close the file.
Testing and executing your new configuration
This is the easiest task. Check for syntax errors, running:
# apachectl configtest
If, as output, you have a Syntax OK it means that you have not made mistakes in editing conf file.
So, it’s time to restart Apache:
# systemctl restart httpd
Now, if everything went well, your web server will start to serve pages through SSL connections.
More about certificates
Let’s Encrypt certificates last for 90 days, so it’s up to you to renew. Using Certbot, you can test the automatic renewal system with this command:
certbot renew --dry-run
If it works, you can add a cron or systemd job to manage automatic renewal.
Conclusion
If you are at this point, your web server should be serving clients through secure connections.
And, of course, Chrome will no longer mark your site as Not Secure.


