
What Is Docker?
From the Docker website,
Docker is an open platform for developing, shipping, and running applications. Docker is designed to deliver your applications faster. With Docker you can separate your applications from your infrastructure and treat your infrastructure like a managed application. Docker helps you ship code faster, test faster, deploy faster, and shorten the cycle between writing code and running code.
Docker does this by combining a lightweight container virtualization platform with workflows and tooling that help you manage and deploy your applications.
At its core, Docker provides a way to run almost any application securely isolated in a container. The isolation and security allow you to run many containers simultaneously on your host. The lightweight nature of containers, which run without the extra load of a hypervisor, means you can get more out of your hardware.
Docker is lightweight and fast platform that provides a viable, cost-effective alternative to hypervisor-based virtual machines. This is perfectly suitable for development environments. The developers can write any code of their choice inside the containers, and then share them to the other developers later via Docker for testing. Once the testing is done, the codes or applications can be pushed to the production environment and you can start deploying and using the applications in real time.
You can run the Docker containers on any physical system, or Virtual machines, or in any Cloud platforms. Docker will run on almost all modern operating systems like GNU/Linux, Mac OS, and Windows etc. Moreover, Docker will run Cloud platforms like Amazon EC2, Rackspace Cloud, Google Cloud, and IBM softlayer etc.
You might want to check our previous articles about LXC and Vagrant.
This tutorial describes you how to install and use Docker on Ubuntu and CentOS like systems. This article was tested on Ubuntu 14.04 and CentOS 7 64bit Minimal servers.
Install Docker
On Ubuntu 14.04 systems:
curl -sSL https://get.docker.io/ubuntu/ | sudo sh
Note: The above script is deprecated now. Please head over to the Docker installation page for Ubuntu, and install it.
On CentOS 7 systems:
Docker is available on CentOS 7 default repositories. So, you can install it by just running the following command from your Terminal.
yum install docker
Enable and start Docker service:
systemctl enable docker
systemctl start docker
For other distributions, check out the official installation instructions page.
Usage
1. Creating New Containers
Docker usage is as simple as LXC. First, let us download the Ubuntu image and create a Ubuntu container.
To do that, switch to root user and run the following command from the Terminal:
docker pull ubuntu
Sample Output:
 Pulling repository ubuntu
 75204fdb260b: Pulling image (utopic) from ubuntu, endpoint: https://cdn-registry-1.docker.io/v1/
 195eb90b5349: Pulling image (saucy) from ubuntu, endpoint: https://cdn-registry-1.docker.io/v1/
 3db9c44f4520: Pulling image (lucid) from ubuntu, endpoint: https://cdn-registry-1.docker.io/v1/
 463ff6be4238: Pulling image (13.04) from ubuntu, endpoint: https://cdn-registry-75204fdb260b: Pulling dependent layers
 195eb90b5349: Pulling dependent layers
 3db9c44f4520: Downloading 39.62 MB/63.51 MB 11m53s
 463ff6be4238: Downloading 16.95 MB/18.11 MB 35s
 463ff6be4238: Downloading 17.32 MB/18.11 MB 24s
 463ff6be4238: Downloading 17.51 MB/18.11 MB 18s
 822a01ae9a15: Pulling dependent layers
 3db9c44f4520: Downloading 40.68 MB/63.51 MB 11m10s
 463ff6be4238: Download complete
 c5881f11ded9: Pulling fs layer
 3db9c44f4520: Downloading 42.26 MB/63.51 MB 10m6s
 c5881f11ded9: Download complete
 cc58e55aa5a5: Download complete
 f127542f0b61: Download complete
 6cfa4d1f33fb: Download complete
 bac448df371d: Download complete
 3af9d794ad07: Download complete
 af82eb377801: Download complete
 93c381d2c255: Download complete
 b7c6da90134e: Download complete
 47dd6d11a49f: Download complete
 a5208e800234: Download complete
 f33dbb8bc20e: Download complete
 9fccf650672f: Download complete
 1186c90e2e28: Download complete
 92ac38e49c3e: Download complete
 dfaad36d8984: Download complete
 fae16849ebe2: Download complete
 aa822e26d727: Download complete
 f6a1afb93adb: Download complete
 5796a7edb16b: Download complete
 0f4aac48388f: Download complete
 31db3b10873e: Download complete
 209ea56fda6d: Download complete
The above command will first look for the ubuntu images from the localhost itself. If images are not available locally, then it pull the latest images from the Docker hub.
If you want to build a CentOS container, then pull the centos image instead:
docker pull centos
To list all downloaded Docker images, run the following command:
docker images
Sample Output:
 REPOSITORY          TAG                 IMAGE ID            CREATED             VIRTUAL SIZE
 ubuntu              14.04               c4ff7513909d        2 days ago          225.4 MB
 ubuntu              trusty              c4ff7513909d        2 days ago          225.4 MB
 ubuntu              latest              c4ff7513909d        2 days ago          225.4 MB
 ubuntu              14.04.1             c4ff7513909d        2 days ago          225.4 MB
 ubuntu              utopic              75204fdb260b        2 days ago          230.1 MB
 ubuntu              14.10               75204fdb260b        2 days ago          230.1 MB
 ubuntu              precise             822a01ae9a15        2 days ago          108.1 MB
 ubuntu              12.04.5             822a01ae9a15        2 days ago          108.1 MB
 ubuntu              12.04               822a01ae9a15        2 days ago          108.1 MB
 ubuntu              12.10               c5881f11ded9        8 weeks ago         172.2 MB
 ubuntu              quantal             c5881f11ded9        8 weeks ago         172.2 MB
 ubuntu              13.04               463ff6be4238        8 weeks ago         169.4 MB
 ubuntu              raring              463ff6be4238        8 weeks ago         169.4 MB
 ubuntu              13.10               195eb90b5349        8 weeks ago         184.7 MB
 ubuntu              saucy               195eb90b5349        8 weeks ago         184.7 MB
 ubuntu              10.04               3db9c44f4520        3 months ago        183 MB
 ubuntu              lucid               3db9c44f4520        3 months ago        183 MB
The above images have been built by someone else on the Docker community. The downloaded images will be saved locally in the /var/lib/docker/ directory.
After downloading the Docker images, let us run the new Container by entering the following command:
docker run -t -i ubuntu:14.04.1 /bin/bash
Where,
-t : Assigns a pseudo-tty or terminal inside our new container.
-i : Allows us to make an interactive connection by grabbing the standard in (STDIN) of the container.
/bin/bash : This will launch a Bash shell inside our container.
ubuntu:14.04.1 : Launches the container running latest Ubuntu 14.04.1 image.
Or, you can run a Container by using the Image id also.
docker run -t -i c4ff7513909d /bin/bash
Here, c4ff7513909d is the Ubuntu 14.04.1 Image id.
To run Ubuntu 14.10 container:
docker run -t -i ubuntu:14.10 /bin/bash
Likewise, you can run Ubuntu 13.10 container:
docker run -t -i ubuntu:13.10 /bin/bash
The above commands will let you to login to the container.
root@61186887519b:/#
Now, you can use the container to build your applications.
To return back to your original host’s Terminal without quiting the Container, press ctrl+p, following by ctrl+q key.
To view the running Docker containers, run the following command:
docker ps
Sample Output:
 CONTAINER ID        IMAGE               COMMAND             CREATED             STATUS              PORTS               NAMES
 61186887519b        ubuntu:14.04        /bin/bash           20 minutes ago      Up 20 minutes                           jovial_archimedes
To view all containers, use the flag “-a”.
docker ps -a
If you want to attach back to the running container, run the following command:
docker attach 61186887519b
Here, 61186887519b is the ID of the running container.
To stop the container, type exit from that Container’s bash shell.
2. Building Our Own Images
What we’ve seen above is run an image created by someone else in the Docker Hub. Now, We will see how to create our own image with some preinstalled packages (Ex.apache web server) in the Container.
First, run the required container. Here, I will run Ubuntu 14.04.
docker run -t -i ubuntu:14.04 /bin/bash
Install Apache web server in the Container.
apt-get update && apt-get install apache2 -y
Start apache service:
service apache2 start
Check if server is working by navigating to the http://ip-address-of-the-container/ from your original host browser.
Note: You can find the IP address of any Container by running the “ifconfig” command inside the Container’s Terminal.
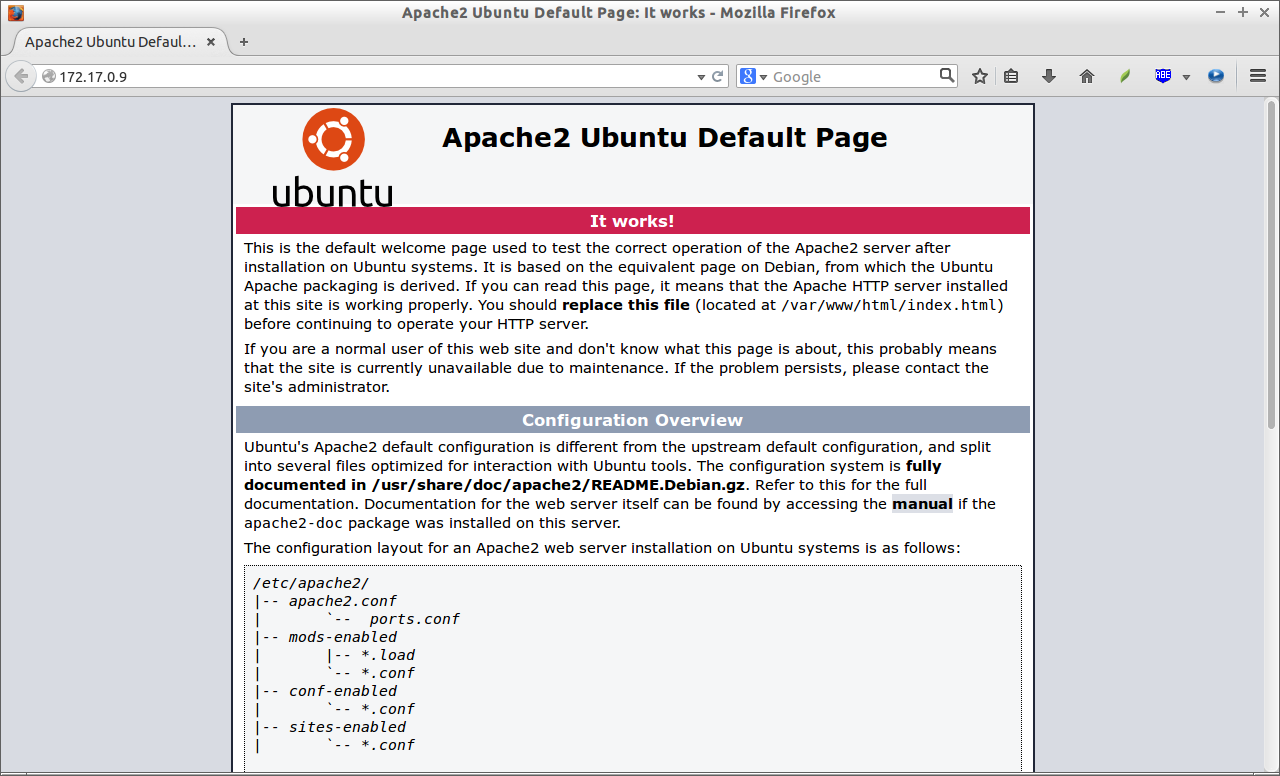
Voila! Apache server is working!!
Now, return back to your original system host Terminal by pressing ctrl+p and ctrl+q keys.
Run the following command to build our own Docker image which includes apache web server preinstalled.
Example:
docker commit 28107ffa5560 sk_unixmen/ubuntu_apach
Sample Output:
9f656205a4bd30959b437da8bf91d848702b0d512c4c0cdb56eeadf771bcab85
Here,
28107ffa5560 – Ubuntu 14.04 container ID. You can find it using command “docker ps”.
sk_unixmen – Name of the user who created the container.
ubuntu_apache – Name of the docker image created by user sk_container.
Now, let us run command “docker images” to see if our new image is created.
docker images
Sample Output:
REPOSITORY                 TAG                 IMAGE ID            CREATED             VIRTUAL SIZE
sk_unixmen/ubuntu_apache   latest              9f656205a4bd        29 seconds ago      260.2 MB
ubuntu                     trusty              c4ff7513909d        4 days ago          225.4 MB
ubuntu                     14.04               c4ff7513909d        4 days ago          225.4 MB
ubuntu                     latest              c4ff7513909d        4 days ago          225.4 MB
ubuntu                     14.04.1             c4ff7513909d        4 days ago          225.4 MB
ubuntu                     14.10               75204fdb260b        4 days ago          230.1 MB
ubuntu                     utopic              75204fdb260b        4 days ago          230.1 MB
ubuntu                     12.04               822a01ae9a15        4 days ago          108.1 MB
ubuntu                     12.04.5             822a01ae9a15        4 days ago          108.1 MB
ubuntu                     precise             822a01ae9a15        4 days ago          108.1 MB
ubuntu                     12.10               c5881f11ded9        8 weeks ago         172.2 MB
ubuntu                     quantal             c5881f11ded9        8 weeks ago         172.2 MB
ubuntu                     13.04               463ff6be4238        8 weeks ago         169.4 MB
ubuntu                     raring              463ff6be4238        8 weeks ago         169.4 MB
ubuntu                     13.10               195eb90b5349        8 weeks ago         184.7 MB
ubuntu                     saucy               195eb90b5349        8 weeks ago         184.7 MB
ubuntu                     10.04               3db9c44f4520        3 months ago        183 MB
ubuntu                     lucid               3db9c44f4520        3 months ago        183 MB
As you see above, Our new image has been created.
Now, you can create a another new container using the new image which we have created just before.
docker run -t -i sk_unixmen/ubuntu_apache /bin/bash
You’ll be now able to play with your Container as usual. Please note that the apache server is preinstalled in our newly created Image.
3. Removing Containers and Images
Once you done with Containers or Images, you can permanently delete them from your local system.
First, let us view the list of available Containers.
docker ps -a
Sample Output:
CONTAINER ID        IMAGE               COMMAND             CREATED             STATUS                          PORTS               NAMES
6f9a6e4b1e82        9f656205a4bd        /bin/bash           8 minutes ago       Up 8 minutes                                        sad_heisenberg
6ce258454f77        ubuntu:14.04        /bin/bash           30 minutes ago      Up 30 minutes                                       desperate_bohr
777b275823e9        ubuntu:14.04        /bin/bash           40 minutes ago      Exited (0) 30 minutes ago                           compassionate_mclean
eac3b804a2fb        ubuntu:14.10        /bin/bash           22 hours ago        Exited (0) 20 hours ago                             backstabbing_bartik
325d0bfcb828        ubuntu:14.10        /bin/bash           43 hours ago        Exited (0) 43 hours ago                             kickass_torvalds
226c86bc836e        ubuntu:14.04        /bin/bash           43 hours ago        Exited (1) 43 hours ago                             sharp_albattani
7cba44200ff9        ubuntu:14.10        /bin/bash           43 hours ago        Exited (100) 43 hours ago                           jovial_lumiere
28107ffa5560        ubuntu:14.10        /bin/bash           43 hours ago        Exited (-1) About an hour ago                       ecstatic_davinci
3170c250a59f        ubuntu:14.10        /bin/bash           43 hours ago        Exited (0) 43 hours ago                             angry_wright
f41190788d0b        ubuntu:14.04        /bin/bash           44 hours ago        Exited (0) 44 hours ago                             elegant_mcclintock
4610f91b4d65        ubuntu:14.10        /bin/bash           44 hours ago        Exited (0) 44 hours ago                             condescending_archimedes
61186887519b        ubuntu:14.04        /bin/bash           44 hours ago        Exited (0) 44 hours ago                             jovial_archimedes
As you see above result, there are two Containers running now. Let us stop them first.
docker stop 6f9a6e4b1e82
docker stop 6ce258454f77
Here, 6f9a6e4b1e82 and 6ce258454f77 are ID of the running Container’s.
After stopping the Containers, run the following commands to delete them.
docker rm 6f9a6e4b1e82
docker rm 6ce258454f77
Now, the above two Container’s have been deleted from the local system.
Similarly, you can delete the Docker Images too.
Let us view the list of available Docker Images in our local system.
docker images
Sample Output:
REPOSITORY          TAG                 IMAGE ID            CREATED             VIRTUAL SIZE
<none>              <none>              9f656205a4bd        15 minutes ago      260.2 MB
ubuntu              14.04               c4ff7513909d        4 days ago          225.4 MB
ubuntu              latest              c4ff7513909d        4 days ago          225.4 MB
ubuntu              14.04.1             c4ff7513909d        4 days ago          225.4 MB
ubuntu              trusty              c4ff7513909d        4 days ago          225.4 MB
ubuntu              14.10               75204fdb260b        4 days ago          230.1 MB
ubuntu              utopic              75204fdb260b        4 days ago          230.1 MB
ubuntu              12.04.5             822a01ae9a15        4 days ago          108.1 MB
ubuntu              precise             822a01ae9a15        4 days ago          108.1 MB
ubuntu              12.04               822a01ae9a15        4 days ago          108.1 MB
ubuntu              12.10               c5881f11ded9        8 weeks ago         172.2 MB
ubuntu              quantal             c5881f11ded9        8 weeks ago         172.2 MB
ubuntu              13.04               463ff6be4238        8 weeks ago         169.4 MB
ubuntu              raring              463ff6be4238        8 weeks ago         169.4 MB
ubuntu              13.10               195eb90b5349        8 weeks ago         184.7 MB
ubuntu              saucy               195eb90b5349        8 weeks ago         184.7 MB
ubuntu              10.04               3db9c44f4520        3 months ago        183 MB
ubuntu              lucid               3db9c44f4520        3 months ago        183 M
To delete an Image (Ex.9f656205a4bd), run the following command:
docker rmi 9f656205a4bd
The Docker image has been deleted now.
That’s all for now. What we’ve discussed so for is just the Docker installation part and it’s basic usage. I recommended you to go thorough the Official Docker documentation to find out more about Docker.
Cheers!


