
In our today’s Linux article we are going to demonstrate the installation and configuration of fully distributed hbase cluster on CentOS 7. Apache HBase is an open-source, distributed, versioned, non-relational database modeled after Google’s Bigtable. HBase is a column-oriented database management system that runs on top of HDFS and Hadoop. It is well suited for sparse data sets, which are common in many big data use cases. Unlike relational database systems, HBase does not support a structured query language like SQL; in fact, HBase isn’t a relational data store at all. HBase applications are written in Java much like a typical MapReduce application. HBase does support writing applications in Avro, REST, and Thrift.
Just as HDFS(Hadoop distributed File System) has a NameNode and slave nodes, HBase is built on similar concepts. In HBase a master node manages the cluster and region servers store portions of the tables and perform the work on the data. In the same way HDFS has some enterprise concerns due to the availability of the NameNode , HBase is also sensitive to the loss of its master node.
Prerequisites:
In order to setup fully distributed Hbase cluster in CentOS 7, we need to complete some of its basic requirement to setup the environment that includes the following steps.
Host file change:
Configure the host file with your hostnames of master and client servers. The example configuration in our environment will as shown below where the we will be using ‘linux’ as a NameNode and ‘node2’ as a DataNode.
[cc]# vi /etc/hosts [/cc]
[cc]172.25.10.178 linux
172.25.10.172 node2 [/cc]
JAVA Setup:
Java is the basic requirement to run HBase on your system, so make sure its installed on your system.
Run the following command to check if java is installed on your system or not.
[cc] $ java -version [/cc]
[cc]java version “1.7.0_91”
OpenJDK Runtime Environment (rhel-2.6.2.3.el7-x86_64 u91-b00)
OpenJDK 64-Bit Server VM (build 24.91-b01, mixed mode)[/cc]
If you don’t have Java installed on your system, then you must install it on your system before moving to the next steps.
Create User:
It is recommended that you create a dedicated hadoop user to keep file permissions in order.
Create a new user using below command and setup its password.
[cc]# useradd hadoop [/cc]
[cc]# passwd hadoop [/cc]
After creating account, it also required to set up key based ssh to its own account. To do this execute following commands.
[cc] $ su – hadoop [/cc]
[cc] $ ssh-keygen -t rsa [/cc]
copy the public into below shown file and change its permissions.
[cc] $ cat ~/.ssh/id_rsa.pub >> ~/.ssh/authorized_keys [/cc]
[cc] $ chmod 0600 ~/.ssh/authorized_keys [/cc]

Downloading Hadoop
Now we going to install and setup Hadoop on our master node. The installation of Hadoop on your pseudo distributed or fully distributed cluster is the second requirement to setup Hbase cluster in CentOS 7.
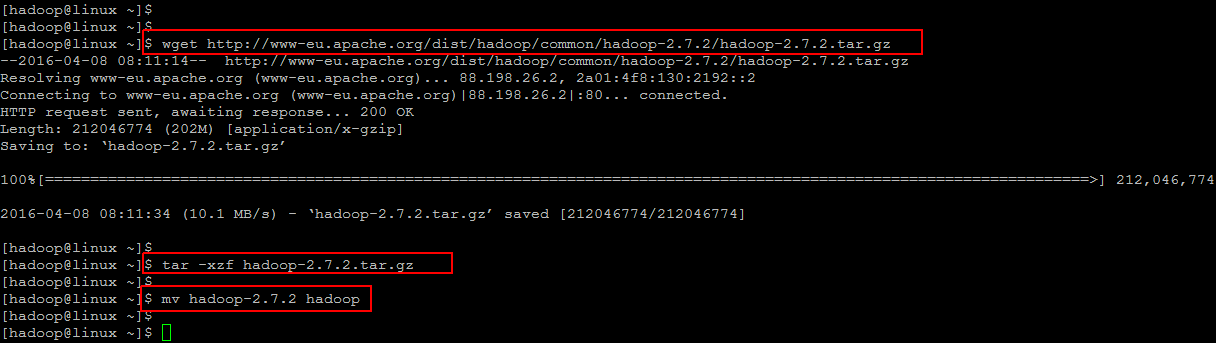
To download the latest package you make make use of ‘wget’ command as shown below and then extract the package with using ‘tar’ command and change the directory name.
[cc] $ wget http://www-eu.apache.org/dist/hadoop/common/hadoop-2.7.2/hadoop-2.7.2.tar.gz [/cc]
[cc] $ tar -xzf hadoop-2.7.2.tar.gz [/cc]
[cc] $ mv hadoop-2.7.2 hadoop[/cc]
Hadoop Configuration in Multi-Distributed Mode
First we need to set environment variable uses by hadoop by editing ~/.bashrc file with following values appended at end of file.
[cc]$ vim .bashrc[/cc]
[cc]export HADOOP_HOME=/home/hadoop/hadoop
export HADOOP_INSTALL=$HADOOP_HOME
export HADOOP_MAPRED_HOME=$HADOOP_HOME
export HADOOP_COMMON_HOME=$HADOOP_HOME
export HADOOP_HDFS_HOME=$HADOOP_HOME
export YARN_HOME=$HADOOP_HOME
export HADOOP_COMMON_LIB_NATIVE_DIR=$HADOOP_HOME/lib/native
export PATH=$PATH:$HADOOP_HOME/sbin:$HADOOP_HOME/bin[/cc]
Save and close the file using ‘:wq!’ editor’s parameter. and then run the below command to apply the changes in current running environment .
[cc] $ source ~/.bashrc [/cc]
Now edit ‘hadoop-env.sh’ file and set JAVA_HOME environment variable by changing the JAVA path as per install on your system. This path may vary as per your operating system version and installation source. So make sure you are using correct path.
[cc] $ vim $HADOOP_HOME/etc/hadoop/hadoop-env.sh [/cc]
[cc] export JAVA_HOME=/usr/lib/jvm/jre [/cc]

Setting up Hadoop Configuration Files
As have seen that Hadoop has many of configuration files, which need to configure as per requirements of your hadoop infrastructure. Lets start with the configuration with basic hadoop cluster setup by navigating to below location. Make sure that you change the configurations of conf/core-site.xml, conf/mapred-site.xml and conf/hdfs-site.xml on ALL machines as follows.
[cc] $ vim $HADOOP_HOME/etc/hadoop/hdfs-site.xml [/cc]
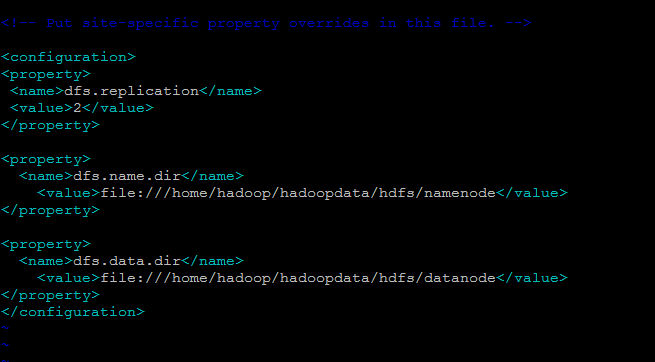
Here we have change the ‘dfs.replication’ parameter which specifies the default block replication. It defines how many machines a single file should be replicated to before it becomes available.
The default value of dfs.replication is 0. However, we have only two nodes available, so we set dfs.replication to 2.
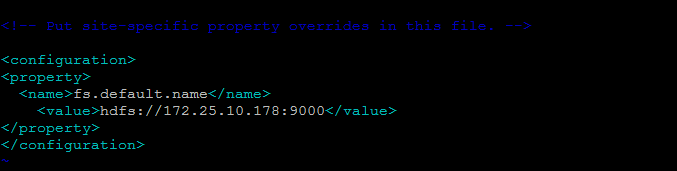
Now Open the below file to change the ‘fs.default.name’ parameter which specifies the NameNode (the HDFS master) host and port on the master node.
[cc] vim $HADOOP_HOME/etc/hadoop/core-site.xml [/cc]
Next we have to change the ‘mapred.job.tracker’ parameter , which specifies the JobTracker that is MapReduce master host and port in below file.
[cc] $ vim $HADOOP_HOME/etc/hadoop/mapred-site.xml [/cc]

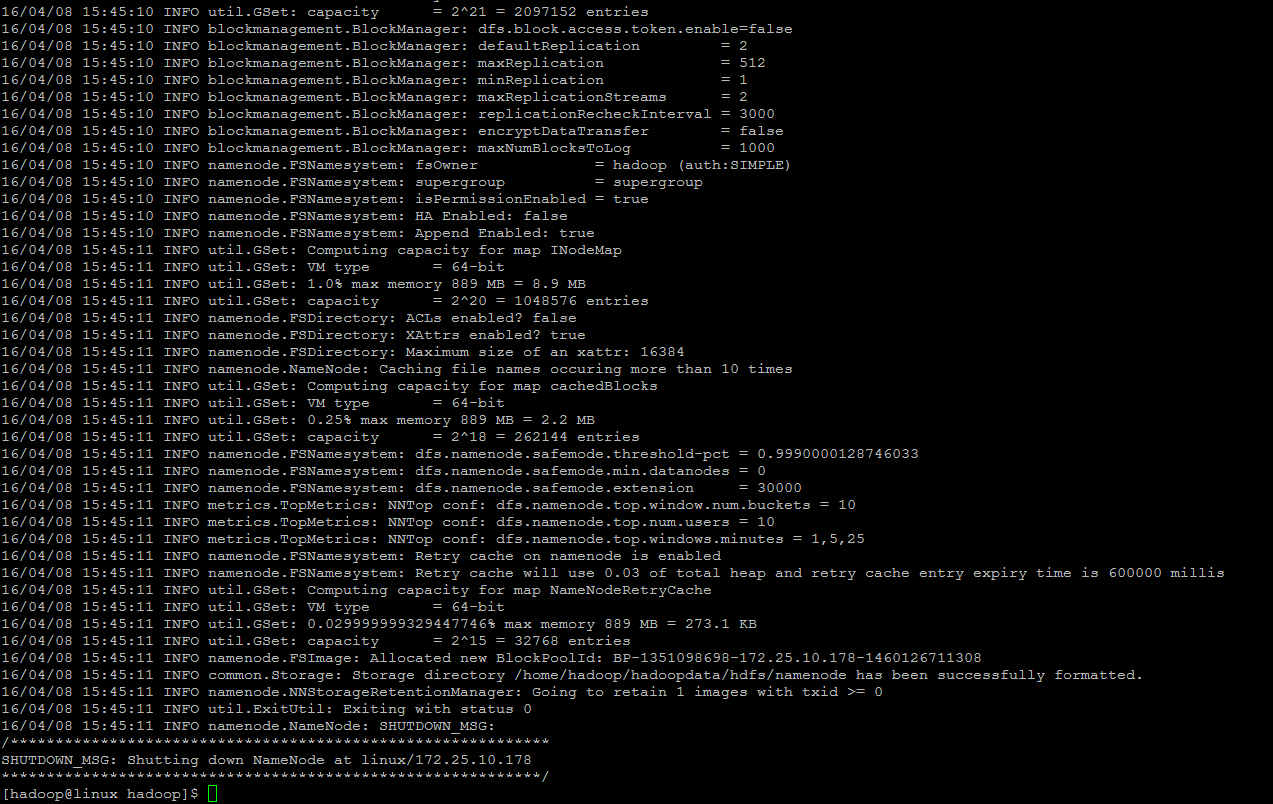
Formatting the HDFS via NameNode
We must format Hadoop’s distributed filesystem (HDFS) via the NameNode. You need to do this the first time you set up an Hadoop cluster before we start our new multi-node cluster.
[cc] $ hdfs namenode -format [/cc]
[cc] 16/04/08 15:45:08 INFO namenode.NameNode: STARTUP_MSG:
/************************************************************
STARTUP_MSG: Starting NameNode
STARTUP_MSG: host = linux/172.25.10.178
STARTUP_MSG: args = [-format]
STARTUP_MSG: version = 2.7.2
STARTUP_MSG: classpath = /home/hadoop/hadoop/etc/hadoop:/home/hadoop/hadoop/share/hadoop/common/lib/commons-compress-1.4.1.jar:/home/hadoop/hadoop/share/hadoop/common/lib/jersey-server-1.9.jar:/home/hadoop/hadoop/share/hadoop/common/lib/jets3t-0.9.0.jar:/home/hadoop/hadoop/share/hadoop/common/lib/jersey-core-1.9.jar: [/cc]
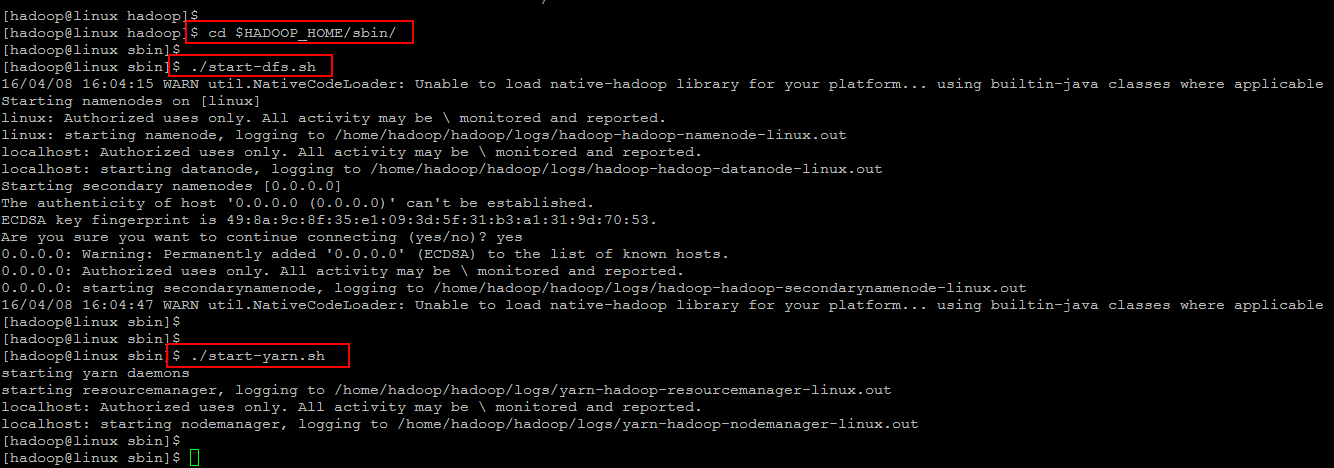
Startup Hadoop Cluster
Now start the hadoop cluster using the scripts provides by hadoop by navigating navigate to your hadoop ‘sbin’ directory and the execute scripts one by one as shown.
[cc] $ cd $HADOOP_HOME/sbin/ [/cc]
[cc] $ ./start-dfs.sh [/cc]
[cc] $ ./start-yarn.sh [/cc]
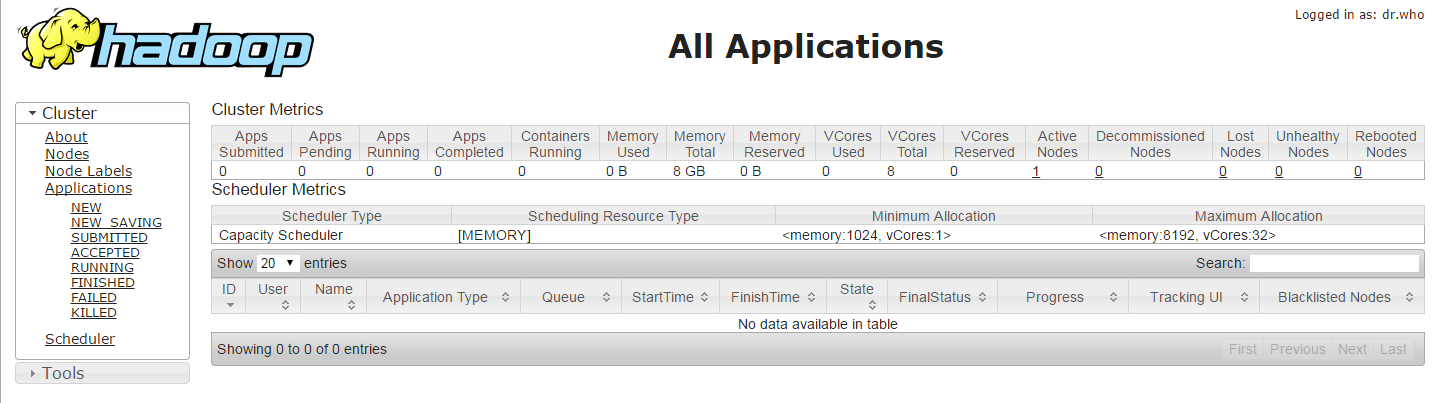
Accessing Hadpoop Services on Web:
Once you have started Hadoop lcuster services, you will be alble to access your server on port ‘50070’ in your favorite web browser as Hadoop NameNode started on port 50070 by default. You will get the complete information about your NameNode on the web as shown.
[cc]http://your_servers_ip:50070[/cc]

After that n order to get the information about cluster and all of its applications access your server with port 8088.
[cc]http://your_servers_ip:8088[/cc]
To get the information about your DataNode you can use port ‘50075’ with your servers IP address or FQDN.
[cc] http://172.25.10.178:50075/ [/cc]
Hbase Installation:
As we have successfully installed Hadoop in a fully distributed cluster mode as a prerequisite of Hbase fully distributed mode installation. Now we are going to move towads Hbase Hadoop 2 installation on our CentOS 7 server.
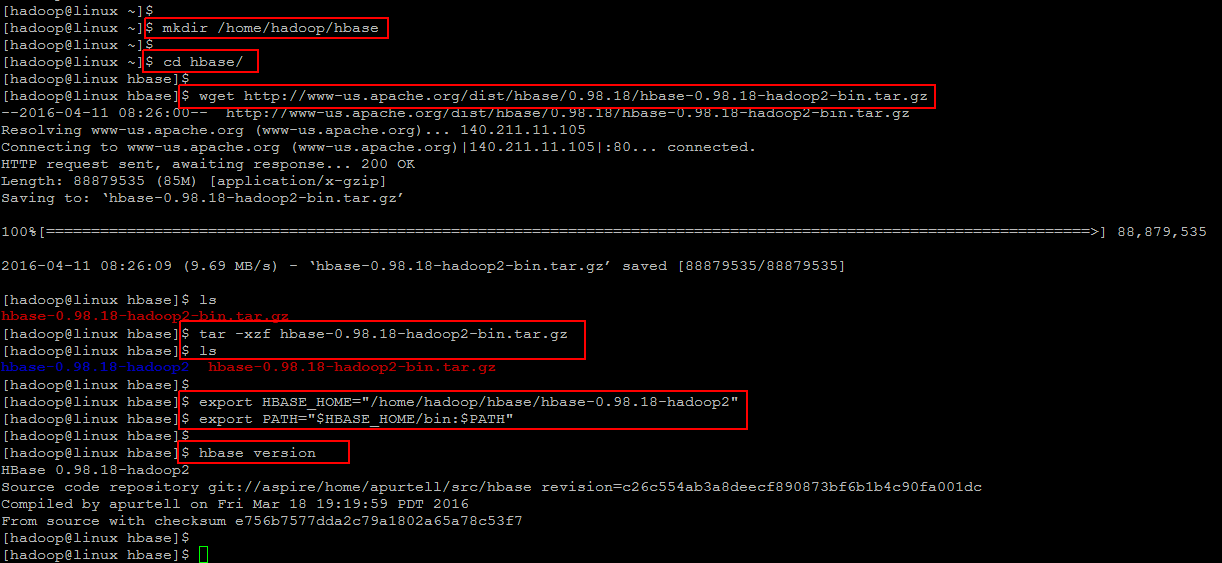
First we will download its package by following the Link to HBase Resource Page and download th package using wget command.
[cc] $ mkdir ~/hbase/[/cc]
[cc] $ cd ~/hbase [/cc]
[cc] $ wget http://www-us.apache.org/dist/hbase/0.98.18/hbase-0.98.18-hadoop2-bin.tar.gz [/cc]
After downloading , extract the package and then export setup its environment variables using below commands. To permanently add these environment variables add them into ‘.bashrc’ file and update source and make sure to do this on all of your NameNodes and DataNodes.
[cc] $ tar -xzf hbase-0.98.18-hadoop2-bin.tar.gz [/cc]
[cc] $ export HBASE_HOME=”/home/hadoop/hbase/hbase-0.98.18-hadoop2″[/cc]
[cc] $ export PATH=”$HBASE_HOME/bin:$PATH” [/cc]
Now verify that Hbase is successfully setup on your server by confirming its version using below command.
[cc]$ hbase version[/cc]
Hbase Cluster Configuration:
Before moving to the Hbase configurations make sure that you have updated the JAVA_HOME variables. Then Go to the following directory and open the file ‘hbase-env.sh’ in your editor to update below parameters on each of your Name and Data node servers in the cluster.
[cc] $ cd /home/hadoop/hbase/hbase-0.98.18-hadoop2/conf/ [/cc]
[cc] $ vim hbase-env.sh[/cc]
[cc]
export JAVA_HOME=/usr/lib/jvm/jre
export HBASE_MANAGES_ZK=true
export HBASE_PID_DIR=/var/hadoop/pids [/cc]
Then do the following updates in your Master server node in below configuration file.
[cc] $ vim hbase-site.xml [/cc]
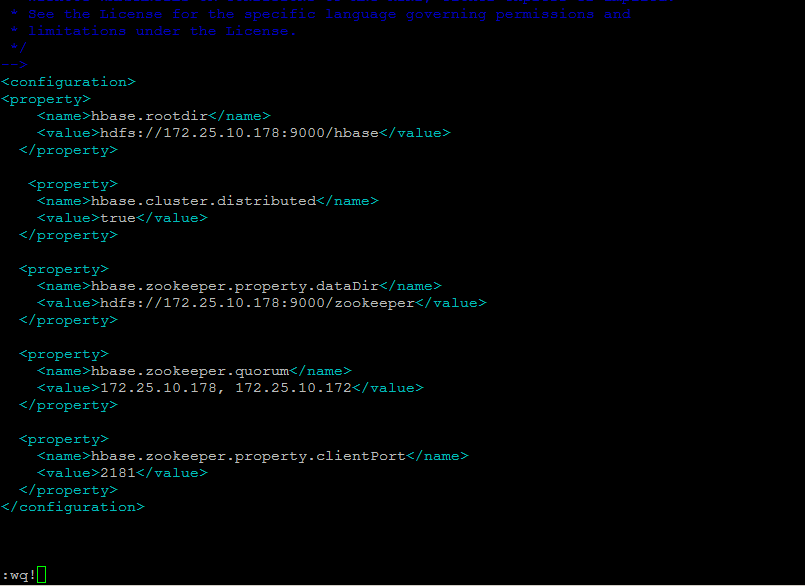
Save the configurations file and then move to you client node server and put the following configurations in the same file.
[cc]
hbase.rootdir
hdfs://your_namenode:9000/hbase
hbase.cluster.distributed
true
[/cc]
In the last open below file and put the hostnames of your master and client node servers in this file.
[cc] $ vim regionservers [/cc]
[cc]localhost
node2[/cc]

Now you have a fully distributed hbase cluster node configured, let’s move to the next step and start its services using below command just on your master server to run the region server daemons.
Starting HBase Cluster:
You can start HBase daemon using below command in your master server node.
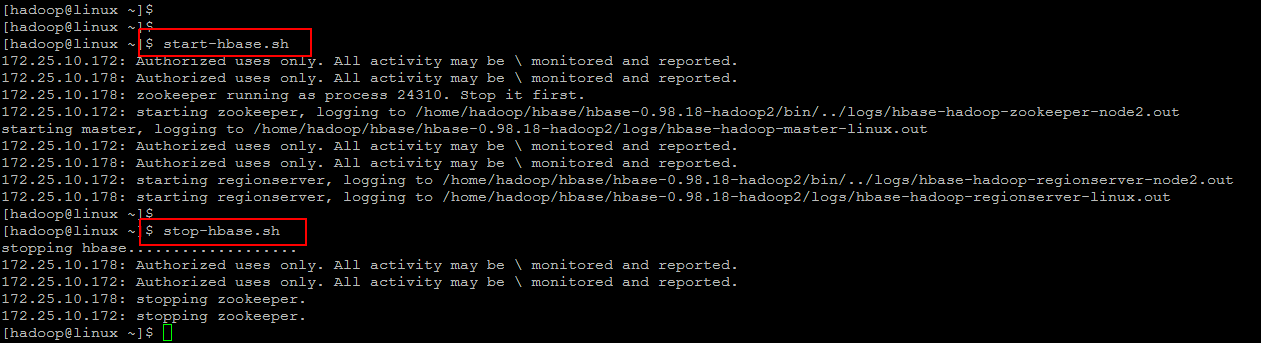
[cc]$ start-hbase.sh [/cc]
This will automatically connecting to your client nodes and will start the hbase daemons on both of your nodes. When you wish to stop hbase cluster then run below command.
[cc]$ stop-hbase.sh[/cc]
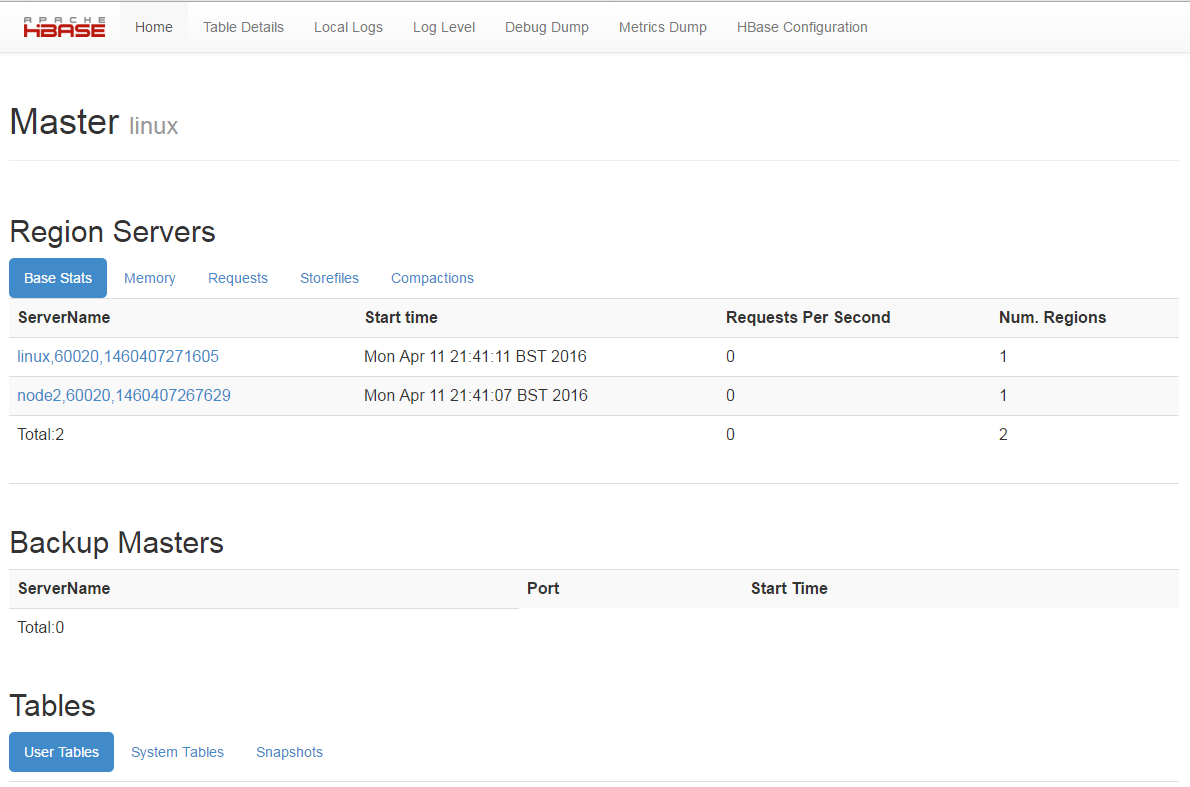
After starting Hbase you access its Web page using your master server node IP and port ‘60010’ as shown.
[cc] http://your_master_node:60010/ [/cc]
Conclusion:
That’s it. In this article we have successfully completed the configurations and installation of Fully distributed cluster node along with JAVA setup and Hadoop installation within fully distributed mode. I hope you have found this article much helpful that comprises of the steps from basic to advance for fully functional Hbase cluster setup. Thank you for reading and leave your valuable comments and suggestions.


