Introduction
Centreon is an Open Source software package alternative to Nagios Xi that lets you supervise all the infrastructure and applications comprising your information system.
CES Standard is the Open and free version of the product. Centreon Enterprise Server (CES) includes all Centreon functions in a unique product.
For more information, you can visit the website of Centreon, and check our article in this link .
Purpose and Target Audience
This article describes how to monitor Windows machines with Centreon using NSClient Agent. The NSClient++ agent can be obtained from direct download from the NSClient++ downloads page at http://nsclient.org/nscp/downloads.
The NSClient++ agent must be installed on the target Windows machine and configured before Centreon can monitor system metrics, services, processes, or performance data on the target machine.
This article is intended for use by Centreon Administrators who want to monitor Windows machines with Centreon.
If you still didn’t install Centreon , check this article to see how to do that.
Installing and Configuring NSClient On The Remote Windows Machine
Before you can monitor a Windows machine using NSClient, you’ll need to install and configure the necessary NSClient software on the remote server.
1- Download the NSClient++ installer package to the target machine you wish to install it on.
2- Run the NSClient++ MSI installer package to initiate the installation. The welcome screen will appear. Click Next to continue to the next step.
3- Once you have agreed to the License Agreement click Next to continue.
4- In the next step you will need to choose setup type that best suite to you. The type Typical is recommended for most users.
5- You can make change in the path of the installation if you want that. Else no changes are required for a working installation of the NSClient. Click Next to continue.
6- In the next step you will need to configure the NSClient++ agent. These steps are important! Make sure you:
- Enter the IP address of the Centeron server in the Allowed hosts box.
- Enter a password in the NSClient password box that will be required for communication between the Centeron server and the Windows machine.
- Check the following boxes in the Modules to load section:
- Enable common check plugins
- Enable nsclient server (check_nt)
Click Next to continue.
7- Click the Install button on the next screen to start the installation.
8- When the installation completes, click Finish to complete the setup.
You should now have the NSClient++ windows monitoring agent installed on your target window machine.Now you need to run NSClient as service which means the Windows machine is ready to be monitored with Centreon.
Test Your Agent Installation From The Command Line
It’s useful to be familiar with running your plugin from the command line, for both informational and debugging purposes. Check_nt plugin is located in the /usr/local/nagios/libexec directory. Login to your Centreon server, navigate to the plugins directory and run your plugin with the similar commands:
./check_nt -H $HOSTADDRESS$ -p 12489 -s password -v CLIENTVERSION
If the communication between Centreon server and the remote machine you should get this result as shown in the following example:
./check_nt -H 192.168.150.220 -v CLIENTVERSION -t 30 -s password -p 12489
NSClient++ 0,4,1,102 2013-07-15
Configuring Centreon to Monitor the Windows Host
Once the installation of NSClient is done, it’s about time we start with the configuration of our objects.
Log into the web interface via : http://[SERVER_IP]/centreon and enter your login information.
Introduction to the web interface of Centreon
Centreon web interface is made up of several menus, each menu has a specific function:
- The Home menu enables access to the first home screen after logging in. It summaries the general status of the supervision.
- The Monitoring menu contains the status of all the supervised elements in real and delayed time via the viewing of logs.
- The Views menu serves to view and configured the performances graphics for each element in the information system.
- The Reporting menu serves to view, intuitively (via diagrams), the evolution of the supervision on a given period.
- The Configuration menu serves to configure all monitored objects and the supervision infrastructure.
- The Administration menu serves to configure the Centreon web interface and to view the general status of the servers.
Host configuration
First step to do is to add the Windows host.
Go under « Configuration → Hosts → Add »:
In the general information, fill out the fields: :
Enter the information regarding the polling strategy:
Our host will then be checked every 5 minutes and an alert will be sent out 4 minutes after our host goes « DOWN » (2 check attempts with 1 check every 2 minutes will confirm its « HARD » state). The notification will be effective during the time period of 24 hours a day, 7 days a week.
At last, the notification parameters are as follows:
Then, click on « Save ».
After you should see that has been add into Centreon.
Services configuration
The configuration of our host is now done; all we have left to do is add the definitions of our services. In order to do so,
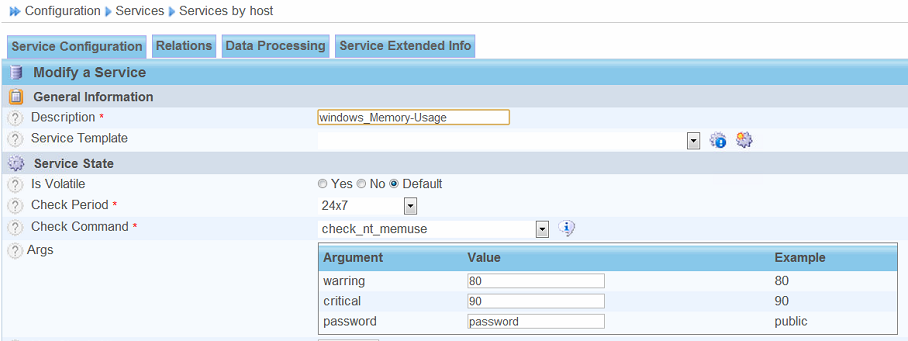
Go to « Configuration → Services → Services by hosts → Add »:
In order to create our service for checking the memory usage, enter the following:
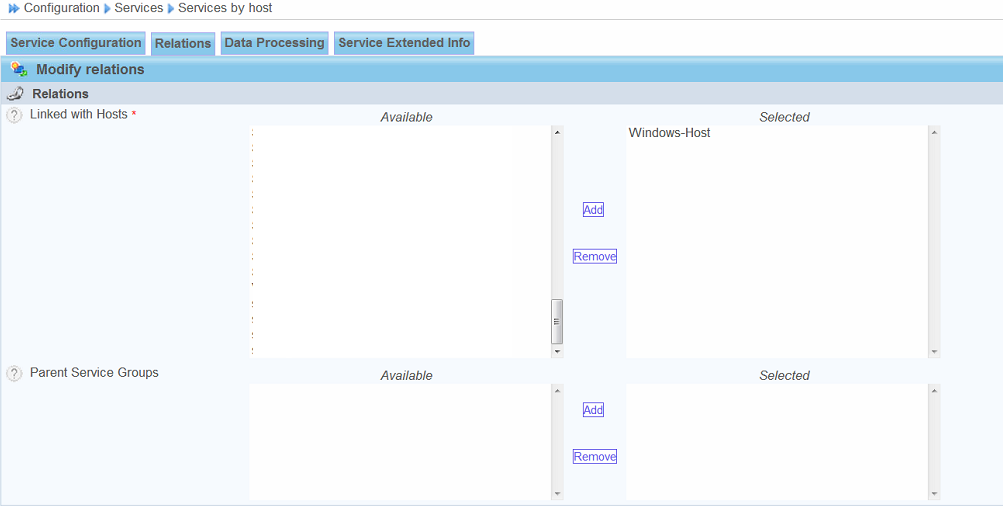
In the « Relations » tab, select the host that was previously created, then click on « Save »:
Follow the same procedure in order to create other services like CPU-Usage, Disk-Usage etc..
Generation of configuration files
Once the hosts and services are created and properly configured, it is required to generate the configuration files through two steps:
• configuration testing;
• configuration export.
Go to the « Configuration → Monitoring Engines → Generate » menu:
First, select the monitoring poller from the dropdown menu, check the first two check-boxes, and then click on the « Export » button:
If the output is the test is « Generating files… OK », then you can go to step #2. Otherwise, it is required to fix the problems which should be displayed in the console.
Now, check the two other check-boxes and click on the « Export » button again:
If the export process is successful, you should see the following displayed: “Restarting engine… OK”
Checking Host and Services Status
The results of the polling are visible in the « Monitoring → Hosts » or « Monitoring → Services » menus. First, our services and host have not been checked yet, so they appear with a « PENDING » status.
The screenshot below shows disk, cpu, memory, service, and process monitoring capabilities of Centreon.
That’s all.
Congratulations! Enjoy your new Monitoring platform Centreon.


