
Angry IP Scanner, also known as ipscan, is an open source network scanning tool that can be used to scan the ip addresses and ports on your network. It supports Linux, Windows, MAc OSX and other platforms. It has designed to be fast and simple to use. It has been used by Network administrators on almost all organizations.
Features
– Lightweight and cross-platform.
– Scans ip addresses in any range.
– Doesn’t require any installation
– Check for ip address if it is alive.
– Resolves hostnames, determines ip addresses and scans ports.
– Multi-threaded support to speed up scanning process.
Installation
As i mentioned before, we don’t have to install it. All we need is our system should have installed with Oracle java or openjdk. Just download the ipscan jar file and run it with command:
# java -jar ipscan.x.x.jar
Also you can install it if you wish. Just download deb/rpm packages and install as described below.
Hence all modern operating system comes with openjdk in their default repositories, we don’t have to worry about openjdk installation.
First install openjdk using command:
On Debian/Ubuntu:
$ sudo apt-get install openjdk-7-jdk
On RHEL/CentOS:
# yum install java-1.7.0-openjdk
Then grab Angry IP Scanner latest version from here depending upon your platform and architecture.
After downloading it, go to the directory where you have downloaded and install it using command:
On Debian/Ubuntu:
$ sudo dpkg -i ipscan_3.2.1_*.deb
On RHEL/CentOS:
[root@server ~]# rpm -Uvh /ipscan-3.2.1-*.rpm
Launch Angry IP Scanner
After installing, launch it either from Menu or Dash. At the first launch, you’ll pleased with Getting Started screen. You can read it by clicking on the Next button or click Close to exit Getting Started screen.
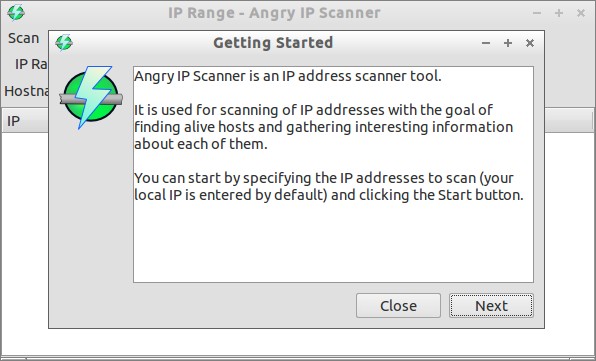 By default, your local ip address is selected. You can specify other ip addresses as well to start scan.

Scan Local System
Let us start with local system ip address. Click Start to scan. After a couple of seconds, you will get the Scan Statistics like below.
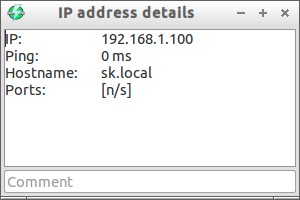
 To view the hostname, ports of the system, just double click on the ip address. You will get the details as shown here.
 Scan ‘n’ number of system
In the above test, we scanned only single system, i.e I entered the the same ip address on IP Range boxes. Now let me scan some remote systems on my network. Say for example, let us scan systems whose has ip address between 192.168.1.100 to 192.168.1.110.
Enter ip addresses 192.168.1.100 and 192.168.1.110 in the from and to column boxes of IP Range and click Start button.
Now you’ll see the list of alive hosts in the range of network that you have entered.
 As you see in the above statistics, i have two hosts running on my network. Pretty easy, isn’t?
More Commands
Not only it displays the alive hosts in your network, also it will allow you to manage the remote systems. Let us see how.
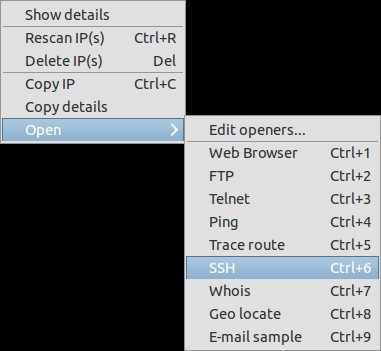
Let us say you want to ssh to a system on your network. Just right click on the ip address, go to Open and select SSH. Alternatively you can open it from Menu bar. Click on the Commands button on the menu bar and go to Open -> SSH.
 A new small window will appear and will ask the password the password to log in to the system. Enter it and you’re in business. Now you should be able to ssh to your remote system.
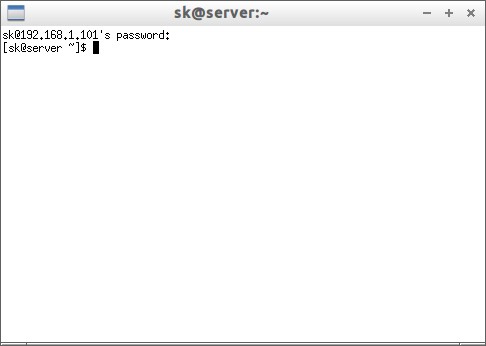 Be mindful that, your remote server have SSH installed, otherwise you won’t be able to connect via ssh. Like this way, you can do various commands such as ftp, trace route, telnet etc.
While testing this app, i found myself, it will be quite useful for Network administrators. It is simple, but powerful and it does the job as advertised. Hope it will be useful for you.
Good luck!
Reference Links:


