
FreeSWITCH – open source VoIP program. Have any features which must be on VoIP PBX. Have API which works with events. More details you can read from https://en.wikipedia.org/wiki/FreeSWITCH link.
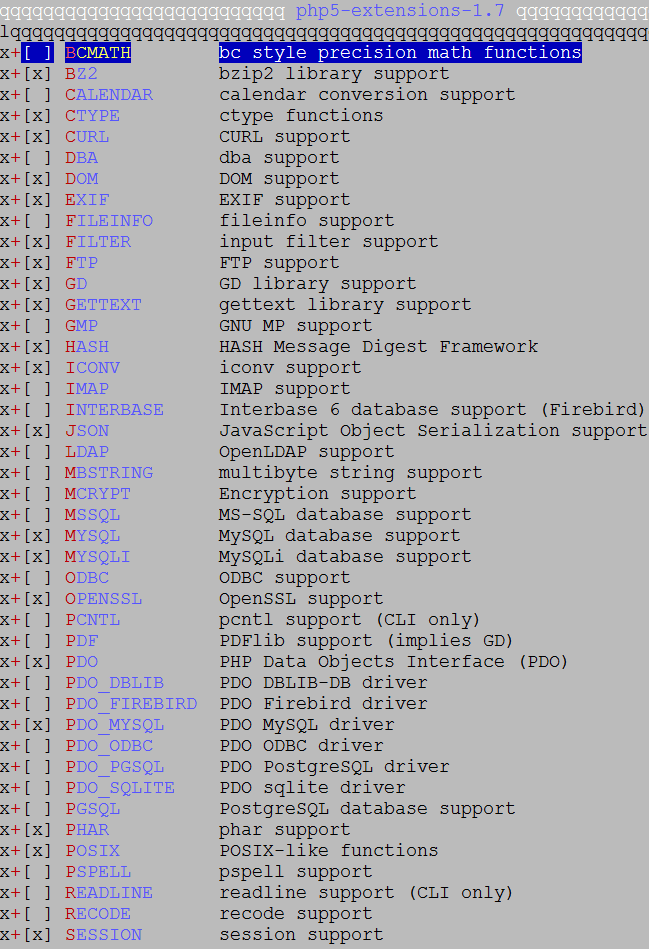
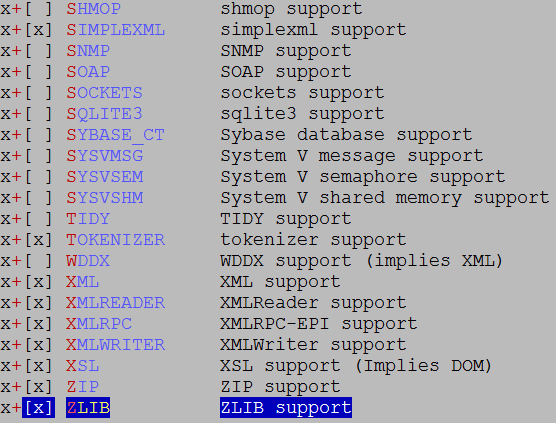
Our purpose of install FreeSWITCH to FreeBSD 10.1 x64 server and configure with WEB server. For that firstly we must install and configure FAMP(FreeBSD Apache MySQL PHP) to our server. But in php5-extensions you must choose modules as below:
The configuration for Virtual Host will be as follows:
# cat /usr/local/domen/fussip.unixmen.com
<VirtualHost *:80>
ServerAdmin jamal.shahverdiyev@unixmen.com
ServerName fussip.unixmen.com
AcceptPathInfo On
DocumentRoot /usr/local/www/fusionpbx/
<Directory “/usr/local/www/fusionpbx”>
AllowOverride All
Require all granted
</Directory>
</VirtualHost>
Note: If we want ODBC support in our FreeSWITCH, then we must install dependents packages. We can do this as below.
# cd /usr/ports/databases/unixODBC
# make config
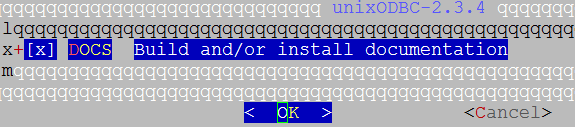
# make –DBATCH install
For MySQL you must use MySQL connector:
# cd /usr/ports/databases/mysql-connector-odbc
# make config

# make –DBATCH install
For PostgreSQL you must use PostgreSQL connector:
# cd /usr/ports/databases/postgresql-odbc/
# make config
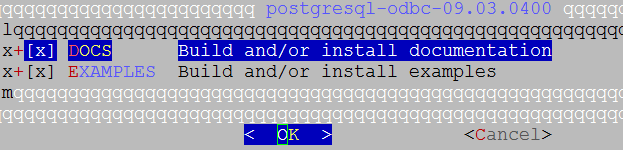
# make –DBATCH install
Then start to FreeSWITCH installation. Firstly we must create compile environment. For that we will install the following packages.
# pkg install autoconf automake curl git gmake jpeg ldns libedit libtool openssl pcre pkgconf speex sqlite3 wget sudo
# mkdir ~/src – Create folder for source code downloads and go to the folder
# cd ~/src
Synchronize source codes to our local folder:
# git clone -b v1.5.final https://stash.freeswitch.org/scm/fs/freeswitch.git
# cd freeswitch – Go to the cloned folder
# ./bootstrap.sh -j – Create compile environment
Note: If we want FreeSWITCH ODBC support from core, we must compile as following.
./configure –enable-core-odbc-support
# ./configure – After the configuration we must see the following lines
————————– FreeSWITCH configuration ————————–
Locations:
FHS enabled: no
prefix: /usr/local/freeswitch
exec_prefix: ${prefix}
bindir: ${exec_prefix}/bin
sysconfdir: /usr/local/freeswitch/conf
libdir: ${exec_prefix}/lib
certsdir: /usr/local/freeswitch/certs
dbdir: /usr/local/freeswitch/db
grammardir: /usr/local/freeswitch/grammar
htdocsdir: /usr/local/freeswitch/htdocs
logfiledir: /usr/local/freeswitch/log
modulesdir: /usr/local/freeswitch/mod
pkgconfigdir: ${exec_prefix}/lib/pkgconfig
recordingsdir: /usr/local/freeswitch/recordings
runtimedir: /usr/local/freeswitch/run
scriptdir: /usr/local/freeswitch/scripts
soundsdir: /usr/local/freeswitch/sounds
storagedir: /usr/local/freeswitch/storage
cachedir: /usr/local/freeswitch/cache
——————————————————————————
gmake – Start to compile
sudo gmake install cd-sounds-install cd-moh-install – Install features, sounds and music on holds
Create the /usr/local/etc/rc.d/freeswitch configuration file and add the following lines. This is startup file for freeswitch.
#!/bin/sh
#
# PROVIDE: freeswitch
# REQUIRE: LOGIN cleanvar
# KEYWORD: shutdown
#
# Add the following lines to /etc/rc.conf to enable freeswitch:
# freeswitch_enable: Set it to “YES” to enable freeswitch.
# Default is “NO”.
# freeswitch_flags: Flags passed to freeswitch-script on startup.
# Default is “”.
#
. /etc/rc.subr
name=”freeswitch”
rcvar=${name}_enable
load_rc_config $name
: ${freeswitch_enable=”NO”}
: ${freeswitch_pidfile=”/usr/local/freeswitch/run/freeswitch.pid”}
start_cmd=${name}_start
stop_cmd=${name}_stop
pidfile=${freeswitch_pidfile}
freeswitch_start() {
/usr/local/freeswitch/bin/freeswitch ${freeswitch_flags}
echo -n “Starting FreeSWITCH: ”
}
freeswitch_stop() {
/usr/local/freeswitch/bin/freeswitch -stop
}
run_rc_command “$1”
# chmod u-w,ugo+x /usr/local/etc/rc.d/freeswitch – Give execution access to script
Add freeswitch to startup file:
# echo ‘freeswitch_enable=”YES” ‘ >> /etc/rc.conf
# echo ‘freeswitch_flags=”-nc”‘ >> /etc/rc.conf
My root user shell environment is CSH and for that I will extend PATH variable in my /root/.cshrc file(FreeSWITCH binary file path is /usr/local/freeswitch/bin):
set path = (/sbin /bin /usr/sbin /usr/bin /usr/local/freeswitch/bin /usr/local/sbin /usr/local/bin $HOME/bin)
-nc – This means no console but after you can open console with fs_cli command
-nonat – If your FreeSWITCH server have PUBLIC IP address and is not works behind NAT, this parameter is using(This disables NAT traversal parameter for FreeSWITCH).
At the end create database, username and password for fusionpbx:
# mysql -uroot -pfsSQLR0otp@$$w0rd – Login to database as root user
> CREATE database freeswitch;
> GRANT ALL PRIVILEGES ON freeswitch.* TO ‘freeswitch’@’localhost’ IDENTIFIED BY ‘fsSQLR0otp@$$w0rd’;
> FLUSH PRIVILEGES; – Update the changes
Install and configure FusionPBX from ports and then configure from WEB browser.
# cd /usr/ports/www/fusionpbx/ – Go to the port path
# make config – Select the needed modules(We were used DB MySQL and for that choose PDO-MYSQL)
# make install – Install
We must give access FusionPBX for access to FreeSWITCH configuration files and to web server. Use the following commands:
# chown -R www:www /usr/local/www/fusionpbx/
# chmod -R 770 /usr/local/www/fusionpbx/
# chown -R root:www /usr/local/freeswitch/
# chmod -R 770 /usr/local/freeswitch/
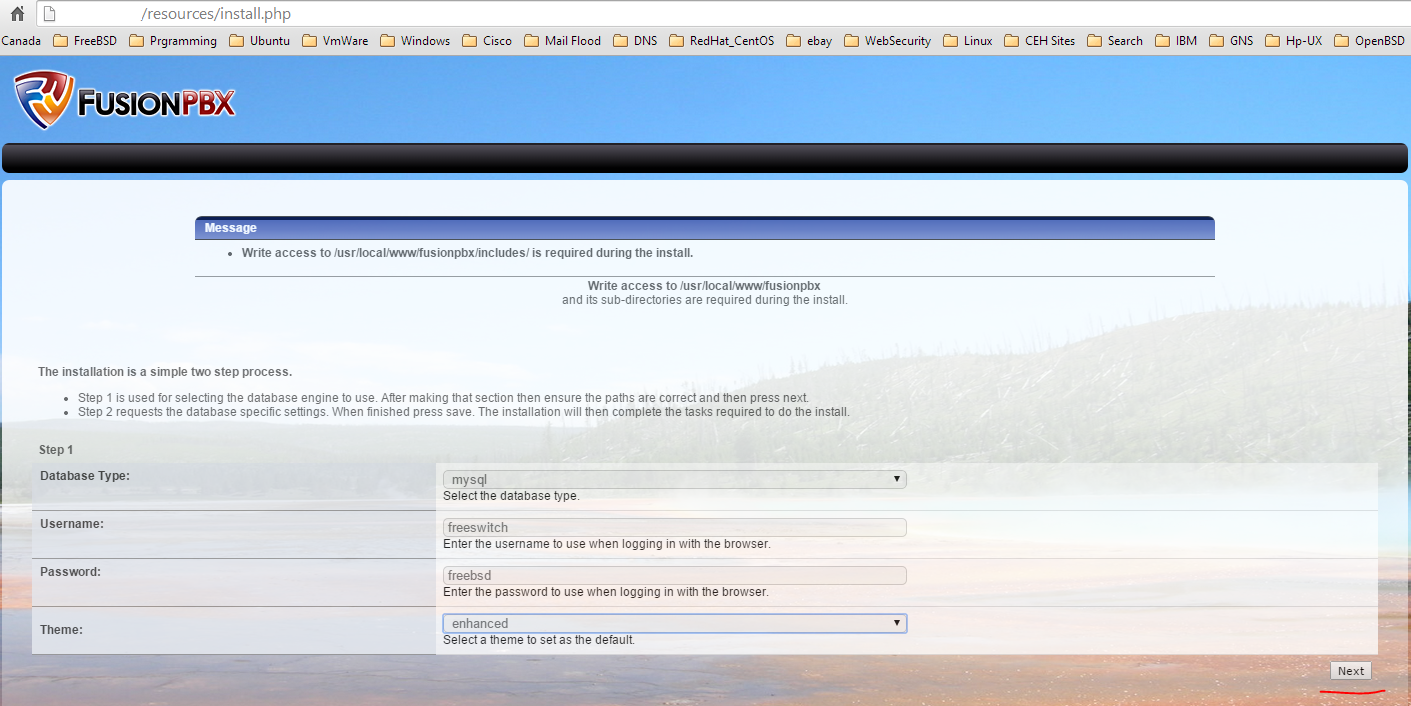
After installation open any web browser and write DNS name which used in installation. We used as fussip.unixmen.com. This is A record in our DNS server. Write the web administrator username and password and click the Next button:
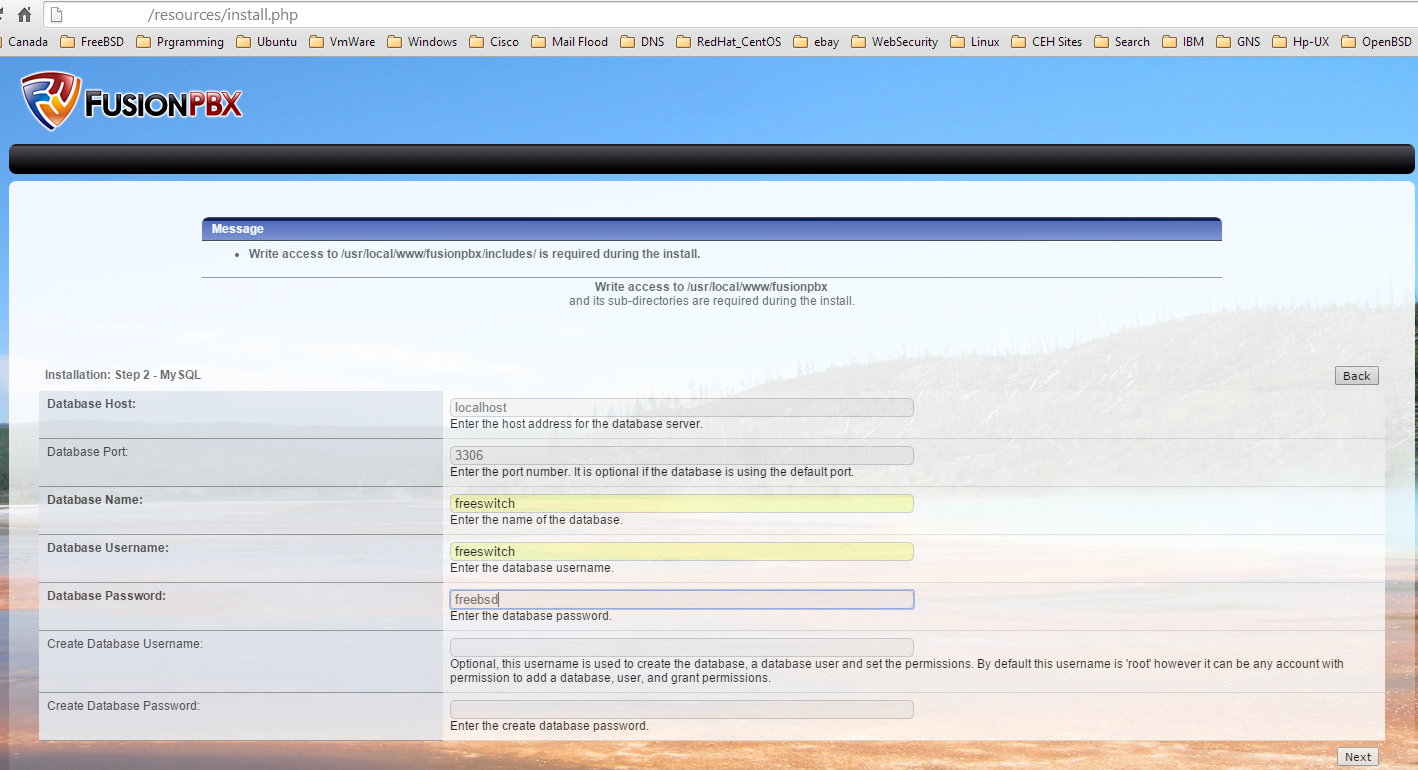
Write database credentials (username, password and host) and click the Next button:
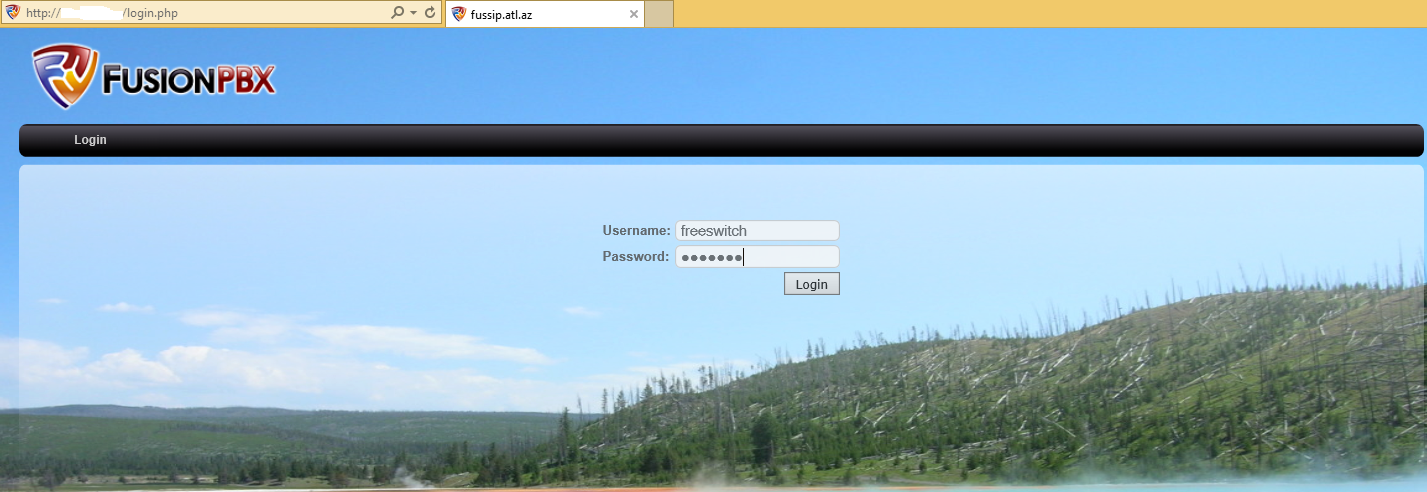
At the end click to login button, enter already created web admin username and password for login:
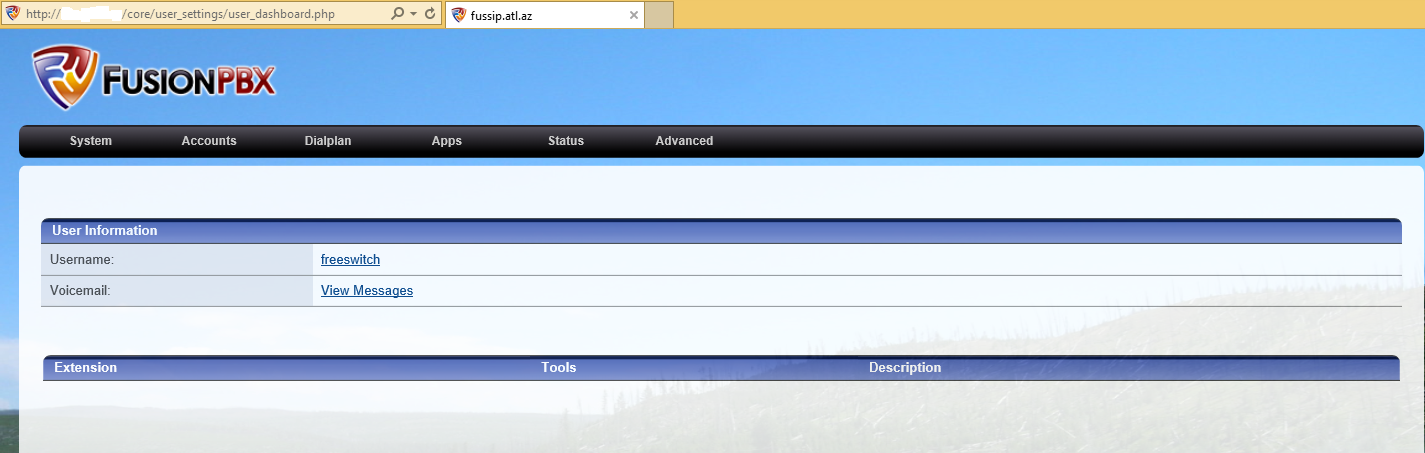
The last page will be as follows:


