About X2Go
X2Go is an Open Source remote desktop application for GNU/Linux that uses NX technology protocol. The main difference between X2Go and other remote desktop applications is it provides secure standalone remote desktop sessions via SSH. So, each session connected using X2Go is strongly encrypted and safe. X2Go allows you mainly to connect to Linux systems from Linux, Windows, or Mac OS systems. Also, many clients can simultaneously connect and use single X2Go server. It comes with two components, namely X2Go server and X2Go client. X2Go server is a system that is being accessed from a client system. And, the X2Go is a system which can be used to access the X2Go server. This Client will be able to connect to X2Go server(s) and start, stop, resume and terminate (running) desktop sessions. X2Go Client stores different server connections and may automatically request authentication data from LDAP directories. Furthermore it can be used as fullscreen loginscreen (replacement for loginmanager like xdm).
X2Go server package can only be installed in Linux systems, whereas X2Go client package can be installed on many OS, including Linux, Windows, and Mac OS X.
Features
-
Graphical Remote Desktop that works well over both low bandwidth and high bandwidth connections;
-
The ability to disconnect and reconnect to a session, even from another client;
-
Support for sound;
-
Support for as many simultaneous users as the computer’s resources will support;
-
Traffic is securely tunneled over SSH;
-
File and printer Sharing from client to server;
-
Easily select from multiple desktop environments (e.g., MATE, GNOME, KDE);
-
Remote support possible via Desktop Sharing;
-
The ability to access single applications by specifying the name of the desired executable in the client configuration or selecting one of the pre-defined common applications;
- Server-side list of available applications is displayed on the client, and you can run any number of them from within the same session like Citrix MetaFrame/Presentation Server/XenApp;
- The ability to access a Windows computer that supports RDP via X2Go-proxied RDP;
- X2Go client can also serve as a graphical front-end to a client-side rdesktop/xfreerdp installation;
-
A Thin Client Environment is available;
-
A Session Broker that supports centralized configuration and load balancing;
- And many.
Install X2Go Server
X2Go server and client installation is much easier compared to other remote desktop applications. X2Go development team has made separate repositories for different operating systems.
The following instructions describes how to install X2Go server on various distributions. As I mentioned before, the X2Go can only be installed in Linux based systems.
On Ubuntu 14.04:
Run the following commands to add X2Go repository and install it in Ubuntu 14.04 or higher versions.
sudo apt-get install software-properties-common
sudo add-apt-repository ppa:x2go/stable
sudo apt-get update
sudo apt-get install x2goserver x2goserver-xsession
On Ubuntu 12.04:
For Ubuntu 12.04 and previous versions, you can add X2Go repository and install it as shown below.
sudo apt-get install python-software-properties
sudo add-apt-repository ppa:x2go/stable
sudo apt-get update
sudo apt-get install x2goserver x2goserver-xsession
On Debian 7:
First add X2Go repository. To do that, edit,
sudo vi /etc/apt/sources.list.d/x2go.list
Add the following lines:
# X2Go Repository (release builds)
deb http://packages.x2go.org/debian wheezy main
# X2Go Repository (sources of release builds)
deb-src http://packages.x2go.org/debian wheezy main

# X2Go Repository (nightly builds)
#deb http://packages.x2go.org/debian wheezy heuler
# X2Go Repository (sources of nightly builds)
#deb-src http://packages.x2go.org/debian wheezy heuler
Add X2Go GPG key:
sudo apt-key adv --recv-keys --keyserver keys.gnupg.net E1F958385BFE2B6E
Then, update software repository list and install X2Go server using the following commands:
sudo apt-get install x2goserver x2goserver-xsession
On Fedora 19 and later:
X2Go server and client packages are available in the default repositories of Fedora 19 and later versions. So, install X2Go server using command:
sudo yum install x2goserver
On RHEL 7/Scientific Linux 7/CentOS 7 systems:
Add EPEL repository first.
yum install epel-release
Then, install X2Go server package using command:
yum install fuse-sshfs
yum install x2goserver x2goserver-xsession
On RHEL 6/Scientific Linux 6/CentOS 6 systems:
Similarly, add EPEL repository in CentOS/RHEL/Scientific Linux 6.x systems:
yum install epel-release
Then, install X2Go server package using command:
yum install fuse-sshfs
yum install x2goserver x2goserver-xsession
On openSUSE systems:
Add X2Go repository as shown below. Replace the version number with your own.
zypper ar http://packages.x2go.org/opensuse/<distro-version>/extras x2go-extras
zypper ar http://packages.x2go.org/opensuse/<distro-version>/main x2go-release
Then, install X2Go server using command:
zypper in x2goserver x2goserver-xsession
On SUSE systems:
Add X2Go repository as shown below. Replace the version number with your own.
zypper ar http://packages.x2go.org/sle/<distro-version>/extras x2go-extras
zypper ar http://packages.x2go.org/sle/<distro-version>/main x2go-release
Then, install X2Go server using command:
zypper in x2goserver x2goserver-xsession
OpenSUSE 11 and SLES/SLED 11 do not support /etc/sudoers.d as a place for custom sudoers config files.
If you are using any of these distributions and are having issues regarding running Qt applications with elevated privileges (e.g., via kdesu or sudo), please use this workaround.
Copy the contents of the “x2goserver” file residing in the documentation directory
.
Get elevated privileges. Either via:
su
or
sudo -i
visudo
On Gentoo:
Currently X2Go cannot connect to an openssh server compiled with the HPN patch. To make sure x2goserver works on your Gentoo server, you must recompile net-misc/openssh with HPN support disabled. Add the following line to /etc/portage/packages. use:
net-misc/openssh -hpn
Then recompile net-misc/openssh, update the configuration file, and restart the sshd server, as follows:
emerge -1 net-misc/openssh
dispatch-conf
/etc/init.d/sshd restart
Note: A local X.Org installation is not required on the X2Go Server
Install X2Go Client
X2Go Client is available for Windows, Mac OS X, and many Linux distributions.
Add X2Go repository as shown above in the X2Go server installation section depending upon the distribution you use.
Then, install X2Go client using command:
On Debian and Ubuntu like systems:
sudo apt-get install x2goclient
On RHEL and CentOS like systems:
yum install x2goclient
On SUSE and openSUSE like systems:
zypper in x2goclient
Usage
From your client systems, launch X2Go client either from Menu or Unity Dash.
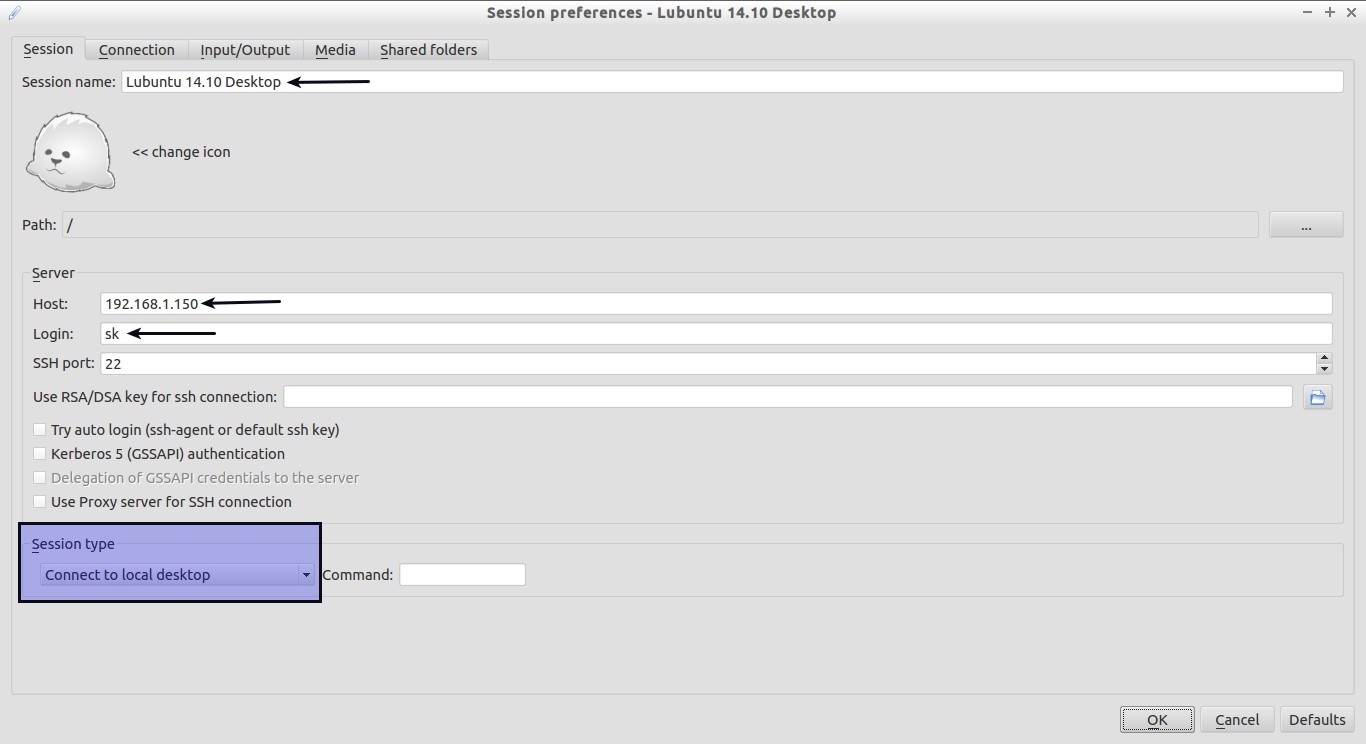
Enter the Session name, remote system’s IP address, remote system’s user name, and desktop environments (Ex.LXDE, KDE etc.).
For example, here I select “Connect to local desktop” session.
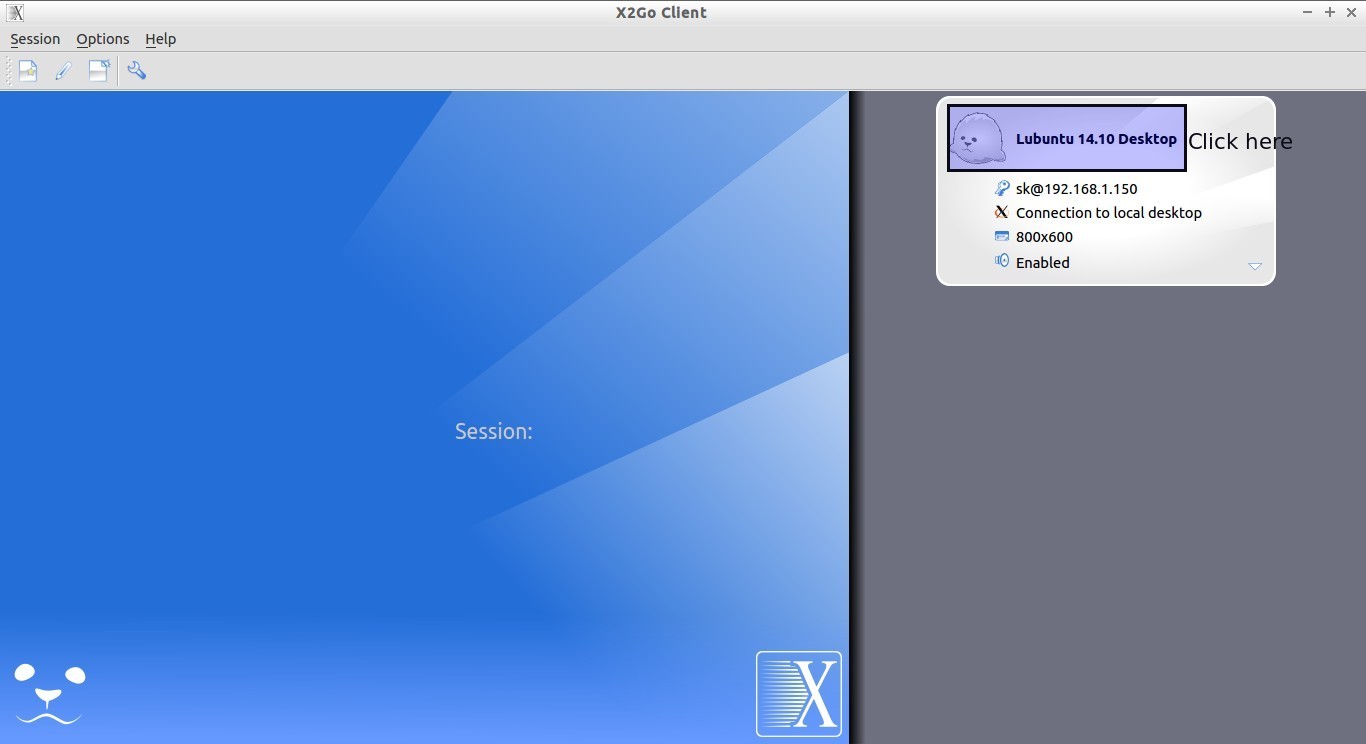
Finally, click Ok to continue.
Click on the session name to continue.
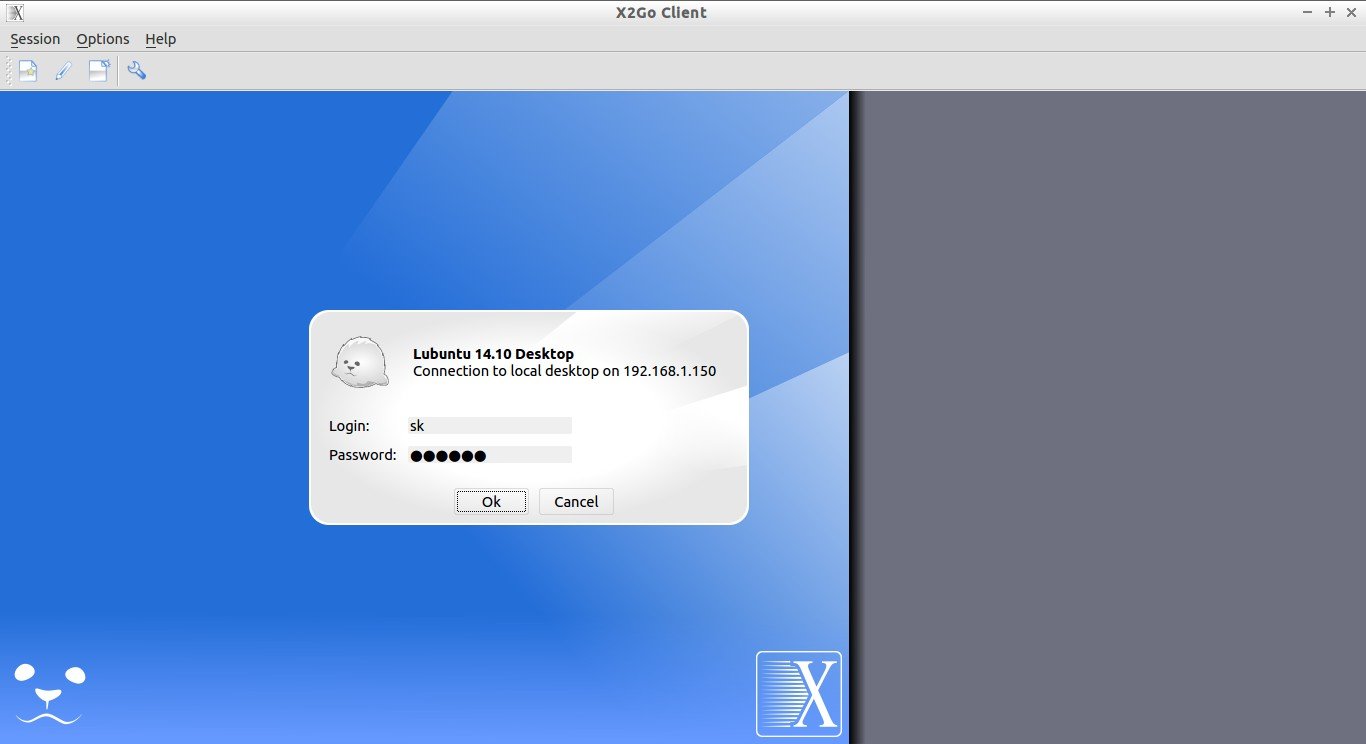
Now, enter the remote system’s password and click Ok to continue.
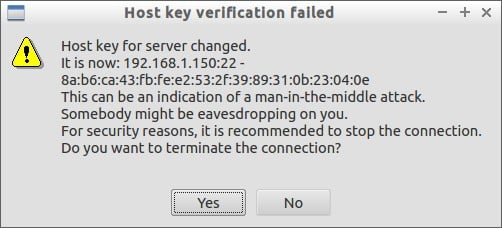
You might the get the following warning message.
Host key verification failed

Host key for server changed.
It is now: 192.168.1.150:22 - 8a:b6:ca:43:fb:fe:e2:53:2f:39:89:31:0b:23:04:0e
This can be an indication of a man-in-the-middle attack.
Somebody might be eavesdropping on you.
For security reasons, it is recommended to stop the connection.
Do you want to terminate the connection?
Just ignore the warning by clicking on the “No” button and continue.
Click Yes to continue.
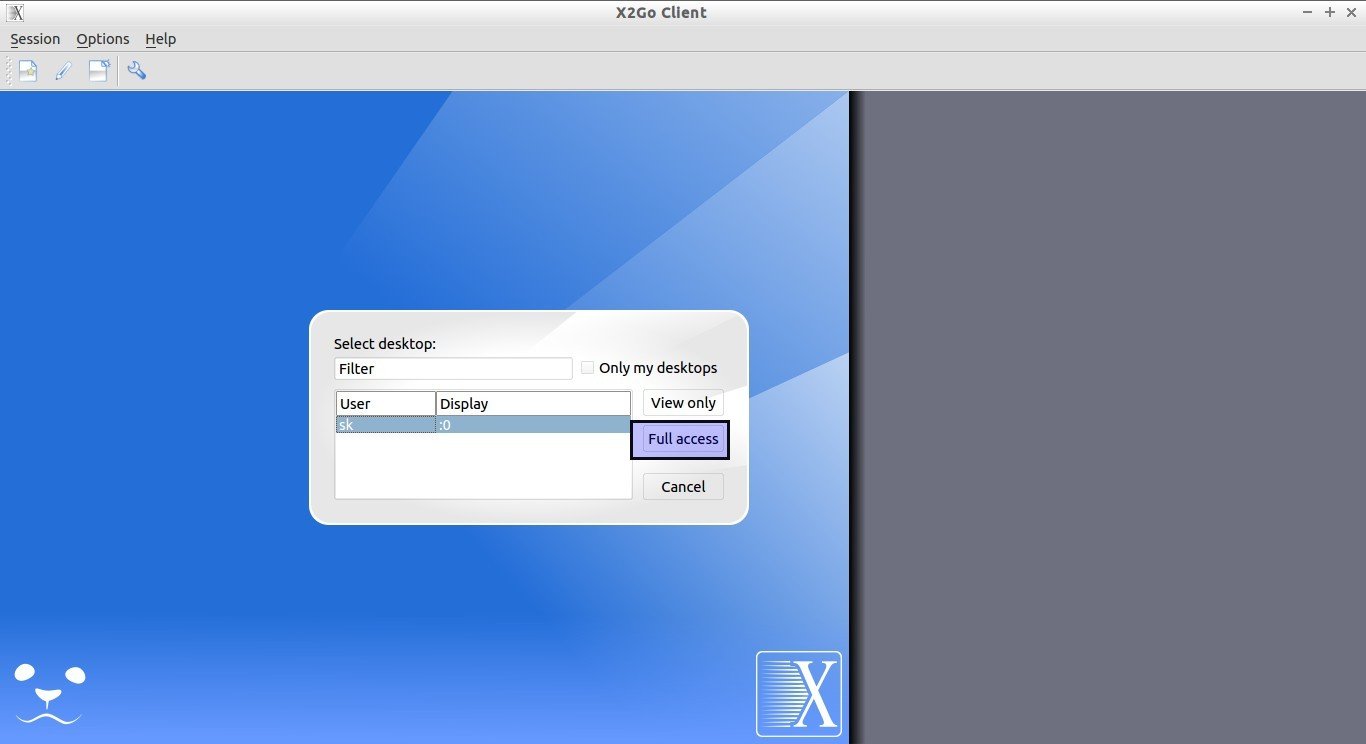
Select the type of access: Full or view only.
Here, I select “Full access”.
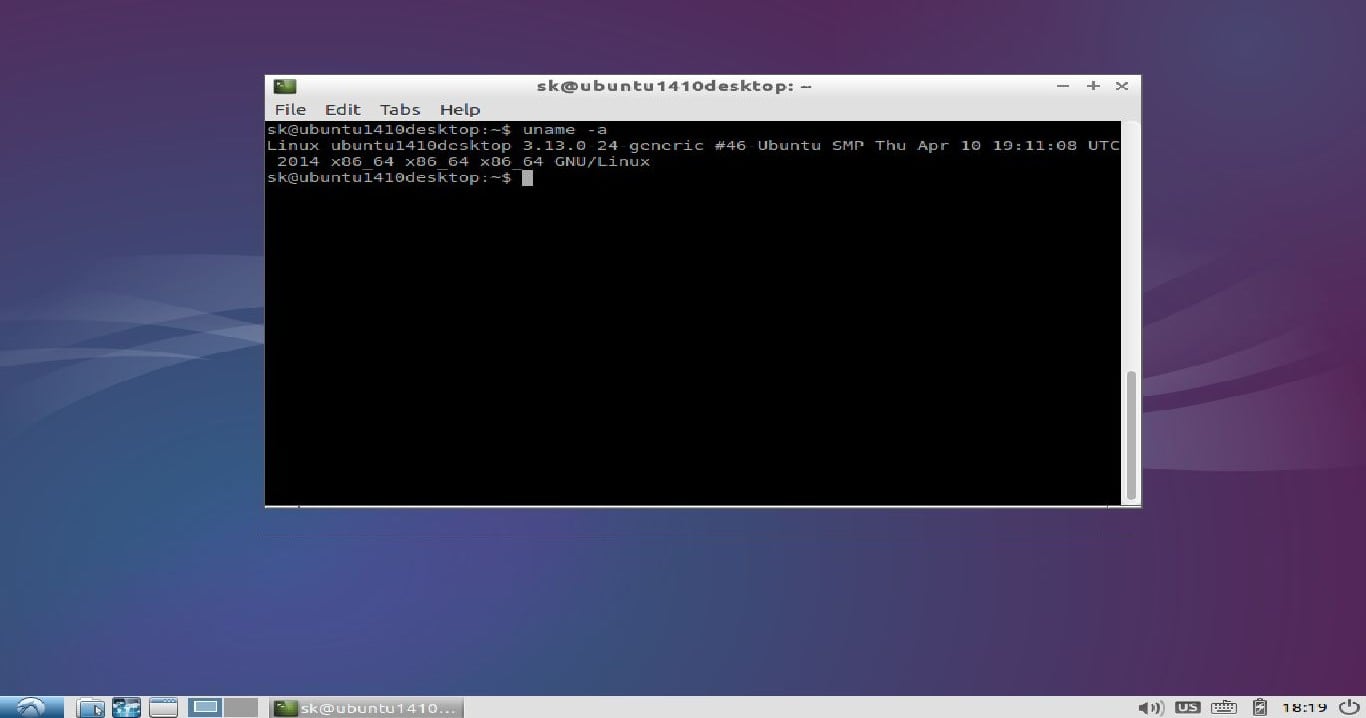
Congratulations! Now, you can access your remote desktop. This is how my Lubuntu 14.10 remote desktop session looks.
Now, you can explore your remote system as the way you do locally. Also, you can create multiple different sessions with different DEs. And, many users can access the same session simultaneously.
Conclusion
X2Go is a perfect tool for thin client environment. While testing this tool, I faced some problems. I can’t access other desktop environments like Unity, KDE, LXDE. But, I hope there must be a work around to solve those issues. Apart from that, other session types, such as Openbox, Terminal, Internet browser are worked well as expected. X2Go has options to select different resolutions for the remote sessions. Also, you can mount local shares to remote sessions if you want. All traffics are forwarded via SSH, so security won’t be big issue while using X2Go.
In case of any problems, X2Go team offers both community and professional support. If you have any problems, post your queries there.
Give it a try. I hope you won’t be disappointed.
Cheers!


