
Let us say, you have so many system running with Ubuntu on your office and have to install softwares, security updates and fixes often in all systems, then having a local Ubuntu repository is an efficient way. Because all required packages are downloaded over the fast LAN connection from your local server, so that it will save your Internet bandwidth and reduces the annual cost of Internet.
In this tutorial, I will show you how to install the local repository in Ubuntu 14.04 server in two methods. Moreover, If you use external hard drive, you can setup a portable repository too. You can use the portable repository on multiple locations on your LAN. Both methods are very easy to set up and configure.
Method 1: APT-Mirror
In this method, we are going to pull all packages from the public repository (Ubuntu global server) and save them in our local Ubuntu server hard drive. First install Apache server. Apache web server is important to share the packages over the network.
sudo apt-get install apache2
Now install APT-Mirror:
sudo apt-get install apt-mirror
Be mindful that, you need at least 50GB or more free space in your local or external hard drive.
Now create a directory on your harddisk to save all packages. For example, let us create a directory called “/myrepo”. We are going to save all packages in this directory:
sudo mkdir /myrepo
Now, open the file /etc/apt/mirror.list file,
sudo vi /etc/apt/mirror.list
and make the changes as shown below.
############# config ##################
#
set base_path    /myrepo
#
# set mirror_path  $base_path/mirror
# set skel_path    $base_path/skel
# set var_path     $base_path/var
# set cleanscript $var_path/clean.sh
# set defaultarch  <running host architecture>
# set postmirror_script $var_path/postmirror.sh
# set run_postmirror 0
set nthreads     20
set _tilde 0
#
############# end config ##############

deb http://archive.ubuntu.com/ubuntu trusty main restricted universe multiverse
deb http://archive.ubuntu.com/ubuntu trusty-security main restricted universe multiverse
deb http://archive.ubuntu.com/ubuntu trusty-updates main restricted universe multiverse
#deb http://archive.ubuntu.com/ubuntu trusty-proposed main restricted universe multiverse
#deb http://archive.ubuntu.com/ubuntu trusty-backports main restricted universe multiverse

deb-src http://archive.ubuntu.com/ubuntu trusty main restricted universe multiverse
deb-src http://archive.ubuntu.com/ubuntu trusty-security main restricted universe multiverse
deb-src http://archive.ubuntu.com/ubuntu trusty-updates main restricted universe multiverse
#deb-src http://archive.ubuntu.com/ubuntu trusty-proposed main restricted universe multiverse
#deb-src http://archive.ubuntu.com/ubuntu trusty-backports main restricted universe multiverse

clean http://archive.ubuntu.com/ubuntu
In the above configuration file, you can add the Ubuntu source lists depending upon the distribution you use. For this tutorial, I use the default 14.04 source list. Change them as per your requirements.
If you use both 32bit and 64bit architectures, you should name them separately in the above file. For example, if you use 32bit architecture, the lines should start with deb-i386 and for 64bit, they should be deb-amd64. Clear? Well, once you saved the configuration file, populate your repository using the following command:
sudo apt-mirror
Sample output:
Downloading 162 index files using 20 threads...
Begin time: Wed May  7 16:52:53 2014
[20]... [19]... [18]... [17]... [16]... [15]... [14]... [13]... [12]... [11]... [10]... [9]... [8]... [7]... [6]... [5]... [4]... [3]... [2]...
Now the packages from public repositories are being pulled and saved to your local directory(/myrepo). Depending upon your Internet speed, it will take hours.
You can cancel this process at any time. Once you started it again, it will resume the downloading process where you left it off. I strongly advise you to use a fast broadband Internet connection.
Do I need to run this command every day to get new softwares/updates? No, it is not necessary. You can schedule this process using a cron job. So your machine will automatically run the apt-mirror command on a regular daily basis and will keep your repository up-to-date.
To do that, edit file /etc/cron.d/apt-mirror,
sudo vi /etc/cron.d/apt-mirror
and uncomment the line shown in red color:
#
# Regular cron jobs for the apt-mirror package
#

## Uncomment ##
0 4    * * *   apt-mirror      /usr/bin/apt-mirror > /var/spool/apt-mirror/var/cron.log
As per the above example, the cron job will run every day morning 4am and will start to download the packages.
As I mentioned above, all downloaded packages are saved in “/myrepo” directory on our local server.
Let us have a look under the /myrepo directory to make sure the packages are downloaded as shown below:
ls /myrepo/
Sample output:
mirror skel var
Now the contents of /myrepo directory should be made available over HTTP (web) to our clients. To do that, simply create a symbolic link to the /myrepo directory:
cd /myrepo/
sudo ln -s /myrepo/mirror/us.archive.ubuntu.com/ubuntu/ ubuntu
Please note: I made this article only for the testing purpose. So I didn’t download the whole public repository. I canceled the download process after a couple of minutes.
Client Configuration
It’s quite easy to configure in client side. Just open your client systems /etc/apt/sources.list file,
sudo vi /etc/apt/sources.list
and add your local repository path:
[...]
deb http://192.168.1.2/ubuntu trusty universe
deb http://192.168.1.2/ubuntu trusty main restricted
deb http://192.168.1.2/ubuntu trusty-updates main restricted
[...]
That’s it. Here 192.168.1.2 is my Ubuntu server IP address. Now, you can use your Local repository. The clients need not to be connected to the Internet to download packages. Instead, it will get all packages, updates from your Ubuntu server’s local repository.
Method 2: APT-Cacher
APT-Cacher is different from APT-Mirror. It does not mirror the entire repository contents, instead it saves the packages requested by the clients on your local network and make them available to the rest of the clients for future use.
First install Apache server. This is required to share the packages over the network:
sudo apt-get install apache2
Now install APT-Cacher.
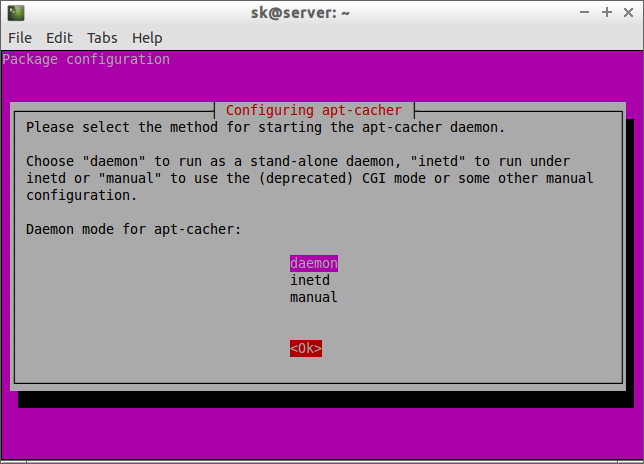
sudo apt-get install apt-cacher
Choose daemon to run as a standalone daemon and click OK.
Once you are done the installation, open the file /etc/default/apt-cacher,
sudo vi /etc/default/apt-cacher
and set autostart=1 if it is 0, else leave as it is.
# apt-cacher daemon startup configuration file

# Set to 1 to run apt-cacher as a standalone daemon, set to 0 if you are going
# to run apt-cacher from /etc/inetd or in CGI mode (deprecated).  Alternatively,
# invoking "dpkg-reconfigure apt-cacher" should do the work for you.
#
AUTOSTART=1

# extra settings to override the ones in apt-cacher.conf
# EXTRAOPT=" daemon_port=3142 limit=30 "
You can also allow or deny the no of hosts to access the cache (packages). To do that, open the /etc/apt-cacher/apt-cacher.conf file.
sudo vi /etc/apt-cacher/apt-cacher.conf
Uncomment and update the value for allowed_hosts to match the individual hosts. Once you done all the settings, restart the service:
[...]
## Uncomment and set the IP range ##
allowed_hosts = 192.168.1.20 - 192.168.1.30
#denied_hosts =
[...]
Now, create a file called /etc/apt/apt.conf.d/90-apt-proxy.conf,
vi /etc/apt/apt.conf.d/90-apt-proxy.conf
and add the following line:
Acquire::http::Proxy "http://192.168.1.2:3142";
Replace the IP address with your server IP address.
That’s it.
Conclusion
Due to lack of resources and time, I haven’t properly checked both methods. As far as I know, both methods should work fine and they are highly recommended to save your Internet bandwidth. Moreover, both are easy to configure and maintain, and you don’t to be a master In Linux. Just give it a try and share your thoughts in the comment section below.
Good luck!


