
Before moving into the article, let me tell you how this article has been written. This article starts with the introduction to knockd, and proceeds with the implementation of port knocking by using iptables. Note that the same port knocking can be achieved using knockd, as well, which will be discussed in the upcoming article.
– Intro to knockd
– Iptables
– Capabilities and limitations
– Implementation of knock scenarios using iptables
– Two approaches in setting up firewall
1) Rejecting all and accepting exceptions
2) Accepting all and rejecting exceptions
– Understanding of iptables
– Traversal of rules
– FILTER table
– Worst case scenarios while setting up firewall
– Commands to setup basic firewall and knock scenario on top of it
– Explanation
– The exciting part (testing knock)
Knockd – Definition from zeroflux.org:
knockd is a port-knock server. It listens to all traffic on an ethernet interface, looking for special “knock” sequences of port-hits. A client makes these port-hits by sending a TCP (or UDP) packet to a port on the server. This port need not be open — since knockd listens at the link-layer level, it sees all traffic even if it’s destined for a closed port. When the server detects a specific sequence of port-hits, it runs a command defined in its configuration file. This can be used to open up holes in a firewall for quick access.
Proceed further even if you don’t get it, since knockd will be discussed simpler, and in detail in the upcoming post on this, whereas here we are going to achieve the same thing using iptables alone.
It’s basically like, every request would knock the door to get through it. Knocking is necessary to get past the door. You shall either implement it using knockd and iptables or just iptables alone.
Iptables
The reason why I am starting with iptables is because there should be an existing firewall in your machine, so that you shall test your successful implementation of knockd. Or either way, you shall implement port knocking just using iptables alone, as well. Though major companies are using real time firewalls (hardware), still iptables play a crucial role in enhancing your security.
Capabilities and limitations
Capabilities include tasks like Port forwarding, port blocking, address blocking, restricting/limiting traffic to a certain port, nating etc..
Limitations are that it can handle only outside attacks. In case, if someone inside the company tries to do something, that can’t be prevented. Alo, virus attacks cannot be stopped, unless it’s a known virus.
Implementation of knock scenarios using iptables
First let’s start with setting up a basic firewall and then the knock
Iptables comes along with the linux installation package, else can be yum installed. In case when you want to use iptables for some specific task, there are few patches that need to installed to the kernel, which will also be installed by default, in most of the cases.
There are two approaches in setting up firewall
1) Rejecting all and accepting exceptions
2) Accepting all and rejecting exceptions
1 is preferable for the obvious reason, that it’s better to shut all the doors and open windows appropriately 🙂
There are various terminologies used in Iptables:
1) TABLES
2) CHAINS
3) ACTION
Below are the three types of tables and chains associated with it.
Filter
. INPUT
. OUTPUT
. FORWARD
Nat
. PREROUTING
. OUTPUT
. POSTROUTING
Mangle
. PREROUTING
. OUTPUT
ACTION is the one that decides what to do with a packet. Various ACTION include
– ACCEPT – Allowing a packet through the firewall
– REJECT – Rejects a packet with error
– DROP – The packet is simply dropped, no error message sent
– LOG – Logs the event
NAT is required in case, when you have shared a single ip among several hosts and Mangle, in case when you want to change some fields like TOS(Type of service) in the IP Packet.
Traversal of rules:
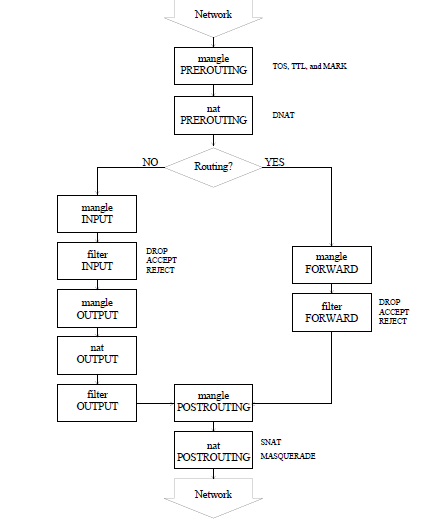
Here, we will discuss the FILTER part alone. As the name suggest, it’s to filter any incoming packets to your machine. It’ll match the packet against the defined rule and take actions defined.
Now, coming back to how to setup a firewall, we could either
– Reject everything and accept exceptions
– Accept everything and reject exceptions
By discussing one, you’ll have an understanding of both. Hence, we shall discuss the first one.
Reject everything and accept exceptions
Understanding the logic behind the idea is the very base which would help in understanding further.
Initially, we are going to define a rule stating “Reject everyone/everything”
And, on top of it, we are goind to state “Reject everyone/everything, except if –“ thus making a window through which the exceptions can enter
Caution: You need to be very careful if you’re setting up iptables in a remote machine. Improper sequence of commands might end ur terminal session and hence you can no longer access the machine remotely.
Again, you can setup firewall by running iptables command in terminal with corressponding table/filter/action or you shall edit the /etc/sysconfig/iptables and those commands to the file and restart the service.
Now, we shall start setup (basic and knocking scenario)
# iptables -I INPUT -p tcp -m state --state RELATED,ESTABLISHED -j ACCEPT
-I —– Inserting the rule as first line in the firewall setup
-p —– protocol
-m —–match against the states RELATED, ESTABLISHED, in this case
-j —– jump to action, which is ACCPET here.
This rule says to allow currently on-going session through firewall.
/* It is essential so that if you have currrently taken remote session on this computer using SSH, it will be preserved and not get terminated by further rules where you might define to block ssh or all such services
Note that here we didn’t mention the table name since FILTER is the default table, in case if you are using another table like nat, you need to mention it by using –t nat option along with the iptables command */
# iptables -I INPUT -p icmp -j ACCEPT
/* This is to make your machine ping-able from any machine, so that you can check the availability of your machine (whether it’s up or down) */
Defining knock scenario
# iptables -A INPUT -p tcp -m tcp --dport 1000 -m recent --set --name KNOCKING –rsource
-A —- appends the rule at last of the existing firewall
/* This checks for TCP packets to destination port 1000 of your machine and if it detects a packet, it sets a recent name called ‘KNOCKING’ to recent table. –rsource means it keeps track of Remote Source, from which the TCP packet came. */
# iptables -A INPUT -p tcp -m tcp --dport 22 -m recent --rcheck --seconds 15 --name KNOCKING --rsource -j ACCEPT
/* Note that this rule is appended, so that it comes in order. i.e) after it checks for port 1000 in the previous rule. This checks recent table for the ‘KNOCKING’ with –rcheck option and also checks for 5 seconds timeout of record, which means that SSH request has to be initiated within 5 seconds after knocking port 1000, else the ssh port will be closed again for the machine which knocked port number 1000 */
# iptables –A INPUT –j REJECT
/* Note that this rule is appended to the last line. Here is the catch, proving what we said initially, rejecting everything and on top of which other accepting rules are there.
In case if you use –I in place of –A in the above command, then your entire setup is spoiled, since this REJECT will be the first line, in which everything gets rejected and none gets pass through it to the next rule. In such cases, you shall delete the particular rule line alone by the command.
# iptables –D INPUT 1 /* deletes the first line of INPUT chain */
# service iptables save /* to save iptables */
# service iptables start /* to start firewall */
# chkconfig iptables on /* to make sure iptables is started on further reboots */
This is how my /etc/sysconfig/iptables file look after performing above steps
# Generated by iptables-save v1.4.7 on Mon Sep  2 18:22:24 2013
*filter
:INPUT ACCEPT [0:0]
:FORWARD ACCEPT [0:0]
:OUTPUT ACCEPT [31:2964]
-A INPUT -p tcp -m state --state RELATED,ESTABLISHED -j ACCEPT
-A INPUT -p icmp -j ACCEPT
-A INPUT -p tcp -m tcp --dport 1000 -m recent --set --name KNOCKING --rsource
-A INPUT -p tcp -m tcp --dport 22 -m recent --rcheck --seconds 15 --name KNOCKING --rsource -j ACCEPT
-A INPUT -j REJECT --reject-with icmp-port-unreachable
COMMIT
# Completed on Mon Sep  2 18:22:24 2013
~
As mentioned earlier, instead of above mentioned commands, you shall straight away edit this file accordingly and restart iptables.
You shall list the existing rules by:
# iptables –L
And delete all rules by,
# iptables –F
/* Note that you need to run #service iptables save to delete it permanently. Whenever you run iptables save, the changes are being written to /etc/sysconfig/iptables file */
Now, our firewall is ready which is configured to
– Allow ping requests
– Allow on-going current sessions
– Allow ssh after 5 seconds of port 1000 hit (knock scenario)
– Reject everything else
The exciting part: (Testing knock)
Let’s test it.
From another machine, run:
# ssh 192.168.42.132
/* where 192.168.42.132 is the machine where you have configured thefirewall and knock as in above steps*/
This will traverse through the defined rules
It doesn’t satisfy any of the ACCEPT rules. Hence it’ll traverse till bottom, where it will get rejected by
the base rule i.e) -A INPUT -j REJECT
Now, run:
# telnet 192.168.42.132 1000 ; ssh 192.168.42.132
/* This command hits the 1000 port of the server using telnet and then ssh-es immediately */
This matches with the rule
-A INPUT -p tcp -m tcp --dport 1000 -m recent --set --name KNOCKING --rsource
-A INPUT -p tcp -m tcp --dport 22 -m recent --rcheck --seconds 15 --name KNOCKING --rsource -j ACCEPT
And hence you would’ve passed through the firewall, successfully taking the remote session, like a boss.
This is it. Port 22 is being opened for 5 seconds after knocking port 1000, that too, only for the machine which knocked. If someone tries to ssh without knocking, then the door will not be opened at all, thus it gets rejected 🙂
You might want to check out my new article Knockd – Detailed and Simpler.
Thanks for reading. Cheers !


