
Mosh – The Mobile Shell.
Already we have shown you about what is Mosh and How to use it in our previous article. But that article covered just basic things only. Well, in this tutorial let us learn something brief about Mosh.
Before reading further, please be aware that this article is only for users who have used SSH before.
There is a site (http://mosh.mit.edu/) which holds all info about Mosh. But it’s not that easy to follow. Also, you just can’t execute commands given there and achieve the result, since it is likely to get several errors, face several challenges. Hence, a detailed/compiled/tested post on the same by me.
I’ll start with the existing definition of Mosh and explain further.
Remote terminal application that allows roaming, supports intermittent connectivity, and provides intelligent local echo and line editing of user keystrokes.
Mosh is a replacement for SSH. It’s more robust and responsive, especially over Wi-Fi, cellular, and long-distance links.
Now, in simpler words, we shall proceed with the existing questions.
1) What is Mosh and how it is different from SSH?
2) The architecture of Mosh and how it works?
3) How to install?
3.1 The easy method
3.2 The tough method
4) Usage
5) Workaround
1. What is Mosh and how it is different from SSH?
As mentioned earlier, Mosh is mobile shell. Unlike SSH, Mosh retains your connectivity across roaming, or network disconnection, in common. I’ll not go more deep into ‘how SSH works?’ and stuff. That will be a separate article altogether. As of now, we all know that SSH means Secure Shell and it’s one of the secure way to take remote control over some host.
Using SSH, there are several frustrations that you might have come across. Like,
– After taking remote control to host, if your connection goes down, SSH will never tell you that your connection to host is down. Rather, it will just hang, not allowing to exit the session or execute any command.
– Say, From host A, you have took control of host B through SSH. Now, you’re changing the ip_address of remote host B. What will happen to the established connection A to B? It will be disconnected. Also, the worst part is again, SSH won’t let you know that something’s wrong with the connection. Rather, it hangs.
Using Mosh, you can overcome above said frustrations, along with other few advantages as well, that are listed below.
– You can get rid of network lag. (Mosh uses UDP)
– Easy exit/enter the session (Shift+Ctrl+6)
– No privileged code (anybody can install Mosh). No daemon.
Now, read the existing definition again. Make sense? Cool 🙂
2. The architecture of Mosh and how it works?
If you’re just home user using linux, you shall skip this part and move to “How to install?” directly.
Now, for users who are willing to know it in-depth. Here we go.
Note that my source base is vast from which I have given only the most essential info here.
SSH uses octet stream for communication, whereas Mosh uses State Synchronization Protocol which runs over UDP.
Now, to understand efficiency of SSP over SSH, I shall explain few scenarios.
While using SSH, when you type something from client, it goes to the server (remote host) and the output from server again comes back to client and gets displayed, which means the input whichever u give from your end, basically goes to server and then gets reflected here, from server.
Whereas, SSP makes it simple. It just compares the state of client and server, and patches accordingly to display the latest screen.
Diff: make vector from state A to B /*compares screen A (client) & screen B (remote host or server*/
Patch: apply vector to A to make B. /*Synchronizes and thus gives latest screen of B at A */
SSH runs over TCP which obviously is of high latency. I believe that you know why. Whereas Mosh runs over UDP.
Another interesting feature that Mosh uses which in turn aids in giving the latest screen is “predictive local echo” – which means the Mosh guesses how the screen of remote host would be after command execution and displays that right away which will also be validated/compared with the actual screen of remote host after command execution.
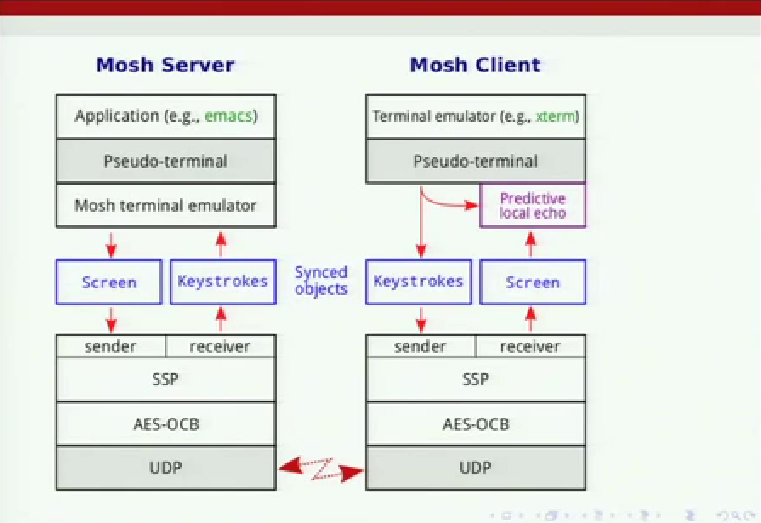 Uses SSH to bootstrap, which means SSH is a dependency for Mosh.
Mosh-server runs on the remote side and Mosh-client runs in the machine from where session is initiated.
AES-OCB is the encryption mechanism that Mosh uses.
To summarize what I’ve been saying.
(i) SSP is a protocol for low-latency object synchronization
with roaming
through suspend/resume
over lossy network paths
(ii) Mobile shell application to replace SSH
with “predictive” local echo
3. How to install?
You shall install Mosh either using yum or tar ball.
3.1 The easy method: (using yum)
Say, you’re root and you want to install it in your machine. Before installing it through yum, you need to verify whether you have the EPEL (Extra Packages for Enterprise Linux) repo.
To verify repo:
# yum repolist
Sample output:
Loaded plugins: refresh-packagekit, rhnplugin
This system is not registered with RHN.
RHN support will be disabled.
repo id          repo name                                                status                                     /*Typical output*/
base             local repo                                               20,586
epel             Extra Packages for Enterprise Linux 6 - x86_64            9,412
repolist: 29,998
If output lists epel as one of the repo, skip to “Installing Mosh”. Else, go on with following steps.
On RHEL/CentOS 6 32-Bit:
# wget http://download.fedoraproject.org/pub/epel/6/i386/epel-release-6-8.noarch.rpm
# rpm -Uvh epel-release-6-8.noarch.rpm
On RHEL/CentOS 6 64-Bit:
# wget http://download.fedoraproject.org/pub/epel/6/x86_64/epel-release-6-8.noarch.rpm
# rpm -Uvh epel-release-6-8.noarch.rpm
Now,
# yum clean all
# yum repolist                    /*to verify whether epel is enabled */
If the output doesn’t show epel yet, it means that you need to enable it by changing enabled=1 in epel.repo file under /etc/yum.repos.d/.
# vi /etc/yum.repos.d/epel.repo
Now, change
enabled=1
Save and exit the file.
# yum clean all
# yum repolist                    /* you can see that epel is enabled now */
Now install Mosh with following command:
# yum install mosh
Or
$ sudo yum install mosh /*prior to this, sudo needs to be configured */
3.2 The tough method: (using tar ball)
For installation using tar ball, the dependencies need to be resolved as well.
Dependencies
| Name | Typical package |
| Protocol Buffers | protobuf-compiler, libprotobuf-dev |
| ncurses | libncurses5-dev |
| zlib | zlib1g-dev |
| utempter (optional) | libutempter-dev |
| OpenSSL | libssl-dev |
After resolving dependencies,
$ tar -zxvf mosh-1.2.4.tar.gz
$ cd mosh-1.2.4
$ ./configure
$ make
# make install
Note that it needs to be installed in both machines. i.e Client and Server.
It is likely to face issues like, in case you don’t have root access. In that case, you shall try –prefix along with ./configure.
$ ./configure --prefix $HOME/local && make && make install
Usage
It’s pretty much same like ssh in usage.
$ mosh user@ip_addr/hostname
Examples:
$ mosh 192.168.42.129
$ mosh vms
$ mosh root@192.168.42.129
Mosh will log the user in via SSH, then start a connection on a UDP port between 60000 and 61000.
Selecting Mosh UDP port:
$ mosh -p 1234 user
Selecting SSH port:
$ mosh --ssh="ssh -p 2222" user
The session can be terminated by “exit/logout” command or Ctrl-^. Etc…
Workaround
If mosh command script doesn’t work for you, then what could be the immediate workaround?
Log in to the remote host, and run mosh-server.
$ mosh-server
MOSH CONNECT 60004 4NeCCgvZFe2RnPgrcU1PQw
mosh-server (mosh 1.1.3)
Copyright 2012 Keith Winstein <mosh-devel@mit.edu>
License GPLv3+: GNU GPL version 3 or later <http://gnu.org/licenses/gpl.html>.    /*Typical output*/
This is free software: you are free to change and redistribute it.
There is NO WARRANTY, to the extent permitted by law.
[mosh-server detached, pid = 30261]
On the local host, run:
$ MOSH_KEY=key mosh-client remote-IP remote-PORT
where,
“key” is the 22-byte string printed by mosh-server (in this example, “4NeCCgvZFe2RnPgrcU1PQw”.
“remote-PORT” is the port number given by the server (60004 in this case).
“remote-IP” is the IP address of the server. You can look up the server’s IP address with “host remotehost” command.
If all goes well, you should have a working Mosh connection.
Thanks for reading. Cheers!


