
Introduction
OpenNMS is a free, Open Source, and world’s first enterprise grade network monitoring system that can be used to monitor tens of thousands of unlimited devices with a single instance. It was started almost 15 years back (1999), and still it is being constantly developed by active community. OpenNMS will discover and monitor the services or nodes automatically in your network, or you can assign a particular service to monitor by OpenNMS. Also, If you want, OpenNMS will do both automated and directed discovery too.
OpenNMS can generate its own events, or receive events from outside sources such as SNMP Traps, syslog or TL/1. Also, it is possible to send custom events to OpenNMS in XML formatted text. OpenNMS will send Email or SMS notifications to the administrators, and has a trouble ticketing API that allows it to have bidirectional communication with many popular trouble ticketing systems like OTRS. You can find the complete list of features here.
Installation
In this tutorial, let us install OpenNMS on Ubuntu 14.04 server. Before installing make sure you’ve done the following prerequisites steps.
Update your system:
sudo apt-get update && sudo apt-get upgrade
Set proper FQDN in /etc/hosts file.
sudo vi /etc/hosts
Set your fully qualified domain name as shown below.
127.0.0.1   localhost localhost.localdomain localhost4 localhost4.localdomain4
::1         localhost localhost.localdomain localhost6 localhost6.localdomain6
192.168.1.150   server.unixmen.local    server
Save and close the file. Reboot your system.
Install PostgreSQL:
To install PostgreSQL refer the following link.
Now, allow user access to the database. By default, PostgreSQL only allows you to connect if you are logged in to the local account name that matches the PostgreSQL user. Since OpenNMS runs as root, it cannot connect as a “postgres” or “opennms” user by default, so we have to change the configuration to allow that.
To do so, you will need to edit your database’s pg_hba.conf file.
Edit file /etc/postgresql/9.4/main/pg_hba.conf:
sudo vi /etc/postgresql/9.4/main/pg_hba.conf
Find the following lines:
local   all         all                               peer
host    all         all         127.0.0.1/32          ident
host    all         all         ::1/128               ident
And, change them to look like the following:
local   all         all                               trust
host    all         all         127.0.0.1/32          trust
host    all         all         ::1/128               trust
Once you have finished making changes, restart the database (as root):
sudo service postgresql restart
Install JDK:
To install JDK, do the following steps
sudo add-apt-repository ppa:webupd8team/java
sudo apt-get update
sudo apt-get install oracle-java7-installer
Important note: While OpenNMS doesn’t support Java 8 yet, It is strongly recommended to use Java 7. The above link contains the installation instructions for Java 8 only. However, you can use the same procedure to install Java 7.
Install OpenNMS Repository:
Create a file called “opennms.list” within the “/etc/apt/sources.list.d” directory:
sudo vi /etc/apt/sources.list.d/opennms.list
Add the OpenNMS APT repository.
deb http://debian.opennms.org stable main
deb-src http://debian.opennms.org stable main
Add OpenNMS key:
wget -O - http://debian.opennms.org/OPENNMS-GPG-KEY | sudo apt-key add -
Now, update the repository lists using command:
sudo apt-get update
Then, install OpenNMS:
sudo apt-get install opennms
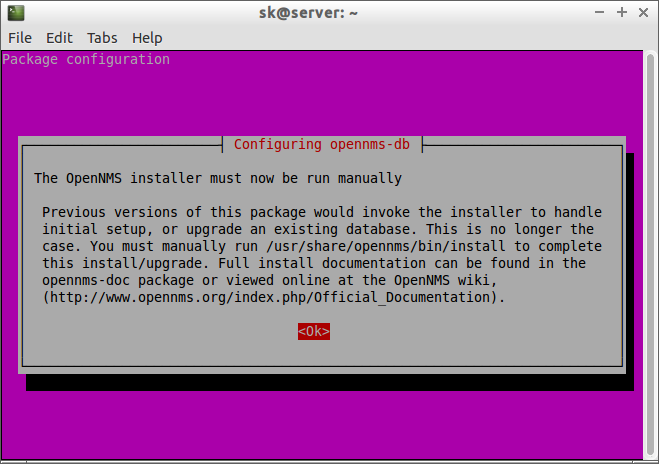
After a few minutes, you’ll be asked to run the installer manually.This is normal. Simply click Ok to proceed.
Also, the installer will tell you that IPLike installation has been failed.

You can install IPLIKE manually using this command:
sudo /usr/sbin/install_iplike.sh
Post Installation
Disable OpenNMS APT Repository:
You must disable OpenNMS repository if you want to do manual upgrade instead of automatic update. If you prefer automatic update, which is easy, you can skip this step.
To do that, edit file /etc/apt/sources.list.d/opennms.list and comment all lines in it. Or just delete the file.
Update the repository list using command:
sudo apt-get update
Configure Java:
Then, you need to tell OpenNMS which Java you want it to use. If you installed the recommended Sun/Oracle JDK, all you should need to do is point it at /usr/java/latest:
sudo /usr/share/opennms/bin/runjava -s
Sample output:
runjava: Looking for an appropriate JRE...
runjava: Checking for an appropriate JRE in JAVA_HOME...
runjava: skipping... JAVA_HOME not set
runjava: Checking JRE in user's path: "/usr/bin/java"...
runjava: found an appropriate JRE in user's path: "/usr/bin/java"
runjava: value of "/usr/bin/java" stored in configuration file
Create Database for OpenNMS:
sudo /usr/share/opennms/bin/install -dis
Here,
- -d – to update the database.
- -i – to insert any default data that belongs in the database.
- -s – to create or update the stored procedures OpenNMS uses for certain kinds of data access.
Finally, start OpenNMS service:
sudo service opennms start
Log in To OpenNMS Management Interface
Open up your browser, and point it to http://ip-address:8980/opennms. The following screen should appear. Enter the username and password. The default username and password is admin/admin.

if you can’t access the web interface, restart your system and check again.
This is how my OpenNMS dashboard looked.

it is not safe to leave the admin user password as default. So let us change it to something different and stronger.
To do that, click on the admin user on the top right corner.

Click Change password link, and enter the new password twice. Finally click OK to save changes.

That’s it. OpenNMS is up and running now. In our next tutorial, let us discuss how to monitor devices/nodes/services etc. Until then, stay happy.
Want to Install OpenNMS on CentOS? then check the following link.


