
Bacula is a free and open source application. It supports Linux, UNIX, Windows and Mac OS X backup clients, its back-end is a set of information stored by MySQL, PostgreSQL or SQLite. Moreover, it is designed to automate backup tasks that had often required intervention from a systems administrator or computer operator.
From the other side, Bacula-web is a free web based reporting and monitoring application used to provide information about Bacula infrastructure, to view its summarizes and graphs. It is released under the GPL license.
In this article, we will give you some of the Bacula-web features and the instructions to make the installation of this application on Ubuntu where you have already an installed Bacula server software.
Bacula-web features
Bacula-Web has been firstly created in 2004 by Juan Luis Frances. This tool provides useful information about Bacula backup jobs, pools and volumes. It is a free and open source PHP web application.
From its features, we can list the following ones:
- It enables users to control all their Bacula directories from a single point. After its installation, you will be able to manage all your Bacula instances.
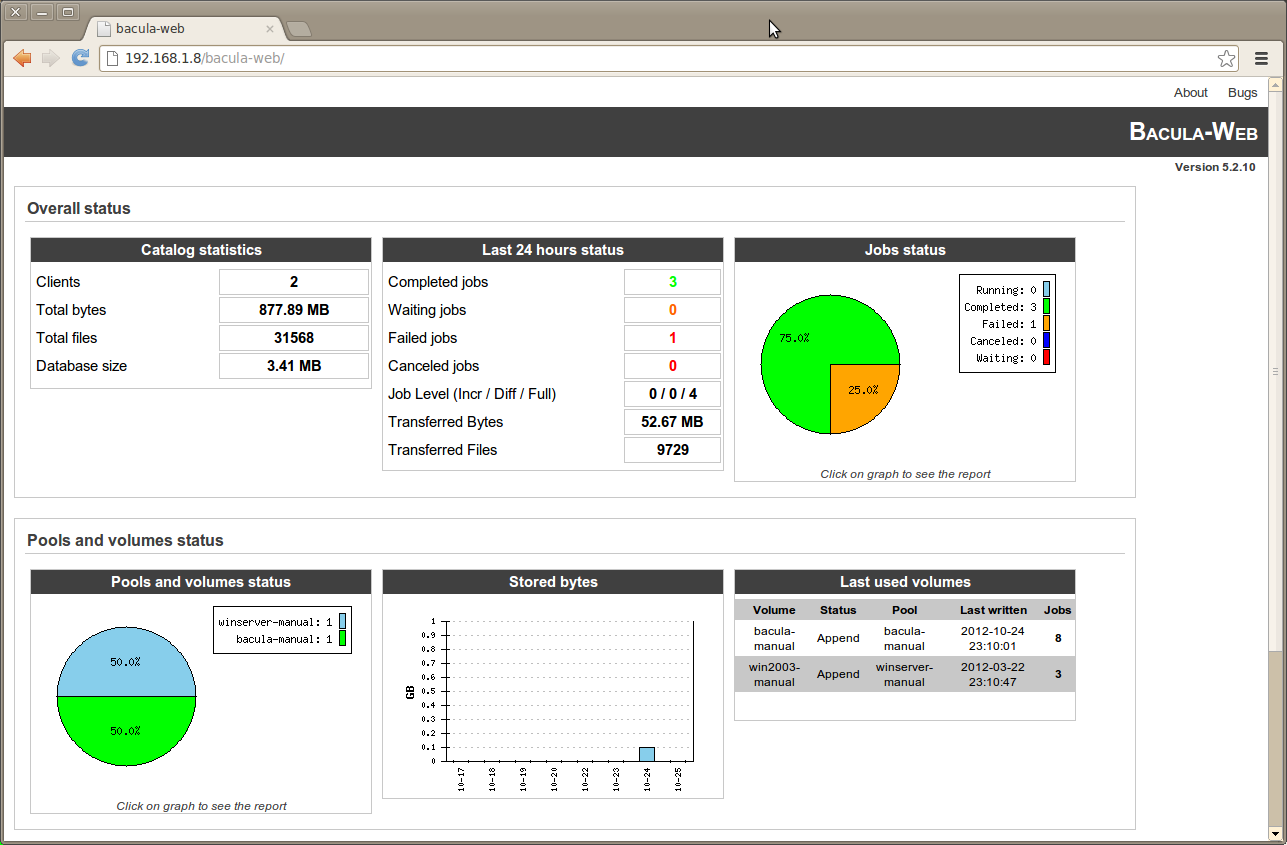
- You will have an overall overview of your Bacula jobs, volumes, pools, catalog statistics and others about 24 hours, last week, last month or even since the beginning of installation time due to Bacula-web dashboard.
- You can use Bacula-web for different languages as your choice. Like French, German, English, Polish, Spanish…(English is used by Default and others are the translated ones)
- It contains a lot of information in a single page.
- It is easy to install, the only thing you need is a well working and configured LAMP server and a valid database connection to your Bacula catalog.
- Bacula-web source code and documentation are both open source and licensed under GPL.
Prerequisites
Before starting the installation, it is required to have a Bacula backup server software installed in your Ubuntu server.
In this tutorial, we consider that you have MySQL with your Bacula setup. And, if you have PostgreSQL, you need just to make the corresponding adjustments.
So let is start our installation of the Bacula-web for an Ubuntu server.
Installation of Bacula-web
We will start the installation by installing the Nginx and PHP which are important. PHP because Bacula-web is a PHP web application and Nginx an example of web server which we need for our installation. So start by typing the following command:
sudo apt-get update
Then, use the following command to install the required packages:
sudo apt-get install nginx php5-fpm php5-mysql php5-gd apache2-utils
Now, we will configure the installed packages (Nginx and PHP) starting by the configuration of PHP by using the following command:
sudo nano /etc/php5/fpm/php.ini
We used the nano editor, but you can use any one you want. Then replace the line “cgi.fix_pathinfo” that you uncomment it previously with “0”:
cgi.fix_pathinfo=0
After that, uncomment the “date.timezone” line and give your time zone. It will look like the following line:
date.timezone =America/New_York
Then save and exit. You can use the following command to restart the PHP-FPM in order to put the changes correctly:
sudo service php5-fpm restart
Now will move to the configuration of the Nginx, we will use also the nano editor this time by typing the following command to open the Nginx default server block configuration file:
sudo nano /etc/nginx/sites-available/default
After opening the file replace its content by the following:
server {
      listen 80 default_server;
      listen [::]:80 default_server ipv6only=on;

      root /usr/share/nginx/html;
      index index.php index.html index.htm;

     server_name your_server_domain_name_or_IP;

     auth_basic "Restricted Access";
     auth_basic_user_file /etc/nginx/htpasswd.users;

     location / {
        try_files $uri $uri/ =404;
     }
     error_page 404 /404.html;
     error_page 500 502 503 504 /50x.html;
     location = /50x.html {
           root /usr/share/nginx/html;
     }

    location ~ \.php$ {
        try_files $uri =404;
        fastcgi_split_path_info ^(.+\.php)(/.+)$;
        fastcgi_pass unix:/var/run/php5-fpm.sock;
        fastcgi_index index.php;
        fastcgi_param SCRIPT_FILENAME
$document_root$fastcgi_script_name;
        include fastcgi_params;
    }
}
To restart the Nginx use the following command:
sudo service nginx restart
Note: if you don’t want to give access to unauthorized person that can check your Bacula-web, you have to make an htpassword file before starting the configuration of the Nginx. Use the following command to create an admin user, called by you:
sudo htpasswd -c /etc/nginx/htpasswd.usersyour_name
Enter your password at the prompt which will be later used to access to your Bacula-web. Before restarting the Bacula-web keep in mind your password it will be used there.
After the installation and configuration of PHP and Nginx, now we will start the installation of our Bacula-web. So, move to your home directory, and download the latest version of Bacula-web. You can do as below:
cd ~
wget --content-disposition http://www.bacula-web.org/download.html?file=files
/bacula-web.org/downloads/bacula-web-7.0.3.tgz
Then, create a new directory, called « bacula-web » using the mkdir command and change to it, extract the Bacula-web archive using the tar xvf command :
mkdir bacula-web
cd bacula-web
tar xvf ../bacula-web-*.tgz
Now use the following command to change to the configuration directory:
cd application/config
Then, use the following command:
cp config.php.sample config.php
Start the editing of the configuration file using your selected editor:
nano config.php
after finding the “//MYSQL bacula catalog” line, uncomment the connection details and replace the password value with your Bacula database password. You will do as below:
// MySQL bacula catalog
$config[0]['label'] = 'Backup Server';
$config[0]['host'] = 'localhost';
$config[0]['login'] = 'bacula';
$config[0]['password'] = 'your_bacula_password';
$config[0]['db_name'] = 'bacula';
$config[0]['db_type'] = 'mysql';
$config[0]['db_port'] = '3306';
After saving and exiting, your Bacula-web is properly configured. Now we will use the following commands to delete the default “index.html” and to change to the “/usr/share/nginx/html”:
cd /usr/share/nginx/htmlsudo rm index.html
Now by using the following command we will move the Bacula-web files to the Nginx document root and we will change the ownership of the files to “www-data”:
sudo mv ~/bacula-web/* .sudo chown -R www-data: *
now you have an installed Bacula-web in your server which is accessible on your server’s domain name or public IP address.
If you want to test your application, open the following URL in a web browser:
http://your_prublic_IP/test.php
You will get a table with a green check marker for the used database modules and with red check marker for the database modules that you don’t need.
After checking everything in the table and all are good, you can start using your dashboard by clicking on the top-left “Bacula-web” text, or by visiting your server in a web browser:
http://your_public_IP/
Conclusion
We gave you in this article the instructions of installing and configuring the Bacula-web application in your Ubuntu server. So you can easily monitor and manage your Bacula software.


