
Atomia DNS is a system to provision and improve administration of DNS settings across several DNSservers. DNS-servers can be geographically spread and are optimized to handle large amounts of DNSdata by using a local database instead of zone files.
The local databases of individual DNS-servers are updated from a main database which contains data for all servers.
Atomia DNS provides a API which lets applications update DNS-data in a very simple way.
Atomia DNS is a DNS system which enables easy management of DNS zones through a programmatic SOAP interface. The system consists of several parts which are described below.
Atomia DNS Features
The main features of Atomia DNS are:
• Programmatic interface: you can integrate Atomia DNS with your application by using the SOAP interface of Atomia DNS.
• Scalability: you can scale the DNS system up by adding more servers.
• Realtime updates: Support for massive amounts of zones without reconfiguration downtime
• Always valid DNS-data: it is impossible to add bad zone-data to the database
• Several data centers: administrate DNS servers in different data centers
Atomia DNS functionality
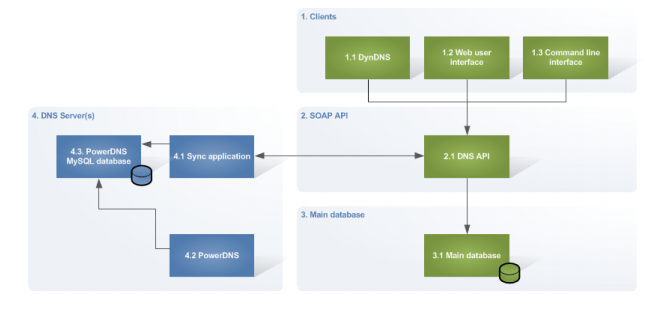
The Atomia DNS system consists of:
1. Atomia DNS Master server: The master server includes the Atomia DNS API that is used for communicating with nameservers and also used by external applications to provision DNS-data. Also on the master server is the Atomia DNS database which contains DNS-settings for all nameservers. It’s possible to install the Atomia DNS API and Atomia DNS database on different machines.
2. Atomia DNS PowerDNS Nameserver: The nameserver includes the popular PowerDNS nameserver configured to use a local MySQL database for zone data. All nameservers will also have the Atomia DNS PowerDNS Sync application installed which provisions changes to the local database and also settings and keys needed for DNSSEC.
3. Optional Atomia DNS Bind-DLZ Nameserver: The nameserver includes the popular BIND nameserver configured to use a local database instead of zone files. All nameservers will also have the Atomia DNS Sync application installed which provisions changes to the local database and also settings for BIND from the data in the Atomia DNS database.
Atomia DNS Master server default installation
This guide will install the Atomia DNS Master server using a default installation on Ubuntu 12.04 TLS. This means that both the Atomia DNS database and Atomia DNS API will be installed.
Before you start the installation, you should be a root user.
sudo su -
Then the second step is to add the Atomia APT Repository to the server using:
repo="$(wget -q -O - http://public.apt.atomia.com/setup.sh.shtml | sed s/%distcode/`lsb_release -c | awk '{ print $2 }'`/g)"; echo "$repo"
If you want to test if it’s ok with executing our APT repository install script, and then:
echo "$repo" | sh
Now you can install the Atomia DNS Master:
apt-get install atomiadns-masterserver
Before you start using the Atomia DNS client, If you would like to use the atomiadnsclient command line tool you will need to add the following parameters in /etc/atomiadns.conf:
-
soap_uri = http://localhost/atomiadns
-
soap_username = same as auth_admin_username
-
soap_password = same as auth_admin_password
Install the Atomia DNS web app
Now we will install the Atomia DNS web app on the same machine as the Atomia DNS Master server.
Use the following command to run the installation
apt-get install atomiadns-webapp
If you haven’t yet installed your first nameserver by following the guide at Install and configure a name server (PowerDNS), then you need to create your nameserver group for the webapp to work. You can do this by executing the following command:
atomiadnsclient --method AddNameserverGroup --arg default
You will also have enable authin atomiadns.conf and create an admin user.
The admin user name must be formatted as an email address.:
-
require_auth = 1
-
auth_admin_user = admin_user@name.com
-
auth_admin_pass = admin_password
Then restart apache service and start atomiadns-webapp.
service apache restart
service atomiadns-webapp start
Now add your first user (CURL example). For X-Auth, use the admin username and password set in atomiadns.conf:
curl -i -X POST -d '[ "new_user@name.com", "new_password" ]' -H 'X-Auth-Username: admin_username' -H 'X-Auth-Password: admin_password' 'http://localhost/pretty/atomiadns.json/AddAccount'
Finally , open your browser and log to to the webb app in with the newly created credentials:
http://ip-of-your-server:5380
For more informations, you can visit atomia dns website.


