
Today we will learn how we can implement Access Control List ( ACL ) For CentOS 7 Linux OS distribution. Though the process is almost similar for Red Hat Linux distribution as well.
What is Access Control List (ACL)?
Files and directories or folders have permission sets for the owner of the file along with the group associated with that file and all other users of that system. But these permission sets have some limitations. For example, different permissions cannot be configured for different users. Thus, Access Control Lists (ACLs) were implemented.
ACLs can be configured as follows
- Per user
- Per group
- For users not in the user group for the file
ACL provides an additional flexible permission mechanism for file system on a Linux system. It enhance the traditional UNIX file permissions for files & folder. With ACL, you can give permissions for any user or any group with fine-grained access rights.
ACLs can be configured per user, per group or via the effective rights mask. These permissions then can be apply to an individual user or a group, and also you can use the same as rwx (Read, Write, Execute) found in regular file / folder permissions.
ACLs requires kernel support and your kernel musk support ACL in order to implement ACL on your Linux distribution. Along with support in the kernel, the acl package is also required to implement ACLs. Acl package contains the utilities used to add, modify, remove, and retrieve ACL information from a file / folder.
Why CentOS Linux?
CentOS Linux is a community-supported distribution derived from sources freely provided to the public by Red Hat for Red Hat Enterprise Linux (RHEL). As such, CentOS Linux aims to be functionally compatible with RHEL. The CentOS Project mainly changes packages to remove upstream vendor branding and artwork. CentOS Linux is no-cost and free to redistribute. Each CentOS version is maintained for up to 10 years (by means of security updates — the duration of the support interval by Red Hat has varied over time with respect to Sources released). A new CentOS version is released approximately every 2 years and each CentOS version is periodically updated (roughly every 6 months) to support newer hardware. This results in a secure, low-maintenance, reliable, predictable and reproducible Linux environment.
You can download CentOS from here. You can directly download the ISO file format disk image from here.
Prerequisites
Before beginning, you must know whether your Linux OS kernel supports ACL or not.
First, switch to root user. This is not required if your current local user have sudo privileges. This is only for this tutorial. Do not practise this for regular system administration.
su -
Type your root user password for continue.
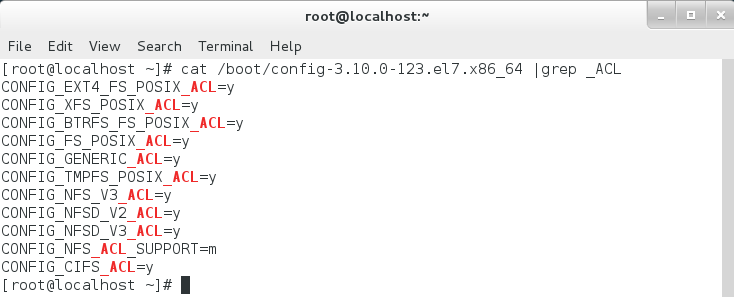
To know whether your kernel supports ACL or not, type the following command in a terminal.
cat /boot/config-3.10.0-123.el7.x86_64 | grep _ACL
After issuing the above command, you will see something like this which indicates that your kernel has the support for ACL.
Now, let’s check whether we have the ACL package installed on our system or not. To check such case, issue the below command in a terminal.
rpm -qa | grep acl
You you will see something like below image.

If you don’t have ACL package installed on your system, then issue the below command to install ACL package onto your system.
yum install acl
Let’s Start
Mounting File Systems
Before using any ACLs for a file or directory, the partition for the file or directory must be mounted with ACL support.
A local file system can be mounted with the following command syntax shown as below.
mount /dev/sdb /work
Here, /dev/sdb is a disk device block and work is the folder where it will be mounted for access.
After that, you need to edit the file /etc/fstab for the /dev/sdb partition and you need to include the acl as follows. This will mount /dev/sdb automatically whenever you are rebooting your system.
Open the file by using the following command.
vim /etc/fstab
and then type the following on the /etc/fstab file.
/dev/sdb /work ext4 acl 1 2
Save & exit from the file /etc/fstab. So, whenever you will reboot, your partition will be mounted automatically with acl support.
After editing the file we need to remount the partition again. To do so,
mount -o remount,acl /dev/sdb
You can issue the below command to confirm whether your previous remount command worked or not.
mount
or
df -h
To demonstrate the scenario with ACL, we need 2 (two) users as ACL in Linux is related to users. Let’s create a user first.
Issue these following command to add a user “russell”.
useradd russell
You can use whatever user name you wish for adding.
Now, let’s set password for this user account. You can set whatever password you wish for this article only but you have to remember those as well. Issue the below command to set a password.
passwd russell
To test acl, we will need at least two users and I will use root and russell. However you can use different users and it’s up to you.
First we create a file demoacltest.txt in folder /work folder path location.
vim /work/demoacltest.txt
Add some dummy text and save & exit from the file.
Issue the below command to move to the “work” folder path.
cd /work
Let’s change the file ownership for root only by doing the following.
chown root:root demoacltest.txt
Issue this command to see the permissions of the demoacltest.txt file.
ls -l
You will see something like this.

Here you can see that, the file has write permission only for the root user. No other user can write or read on it.
Also, you can test the same thing by issuing the below command.
getfacl /work/demoacltest.txt
You will see something like below image.
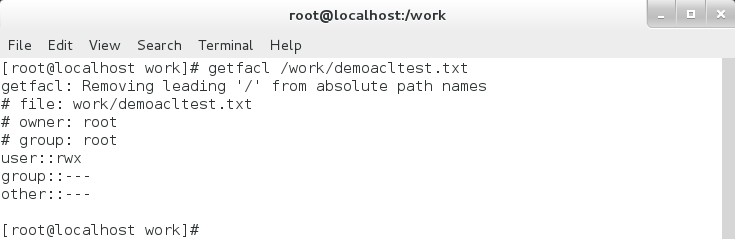
This will also confirms you that only root has the write permission for this file.
Logout from the system and login into the CentOS7 system by the user russell. Try to write something on the file demoacltest.txt and then save it. You will see that it will give you an error like “Permission denied” and you will not be able to save the added line on to the file as user russell don’t have write privilege for this file.
Now, login into the system by the root user again.
We will add acl for user russell which will allow russell user to write /work/demoacltest.txt file.
setfacl -m user:russell:rwx /work/demoacltest.txt
Here m stands for modify.
Now, logout from the system and login into the system by the user russell. Now try to edit this file. This time you can do this with the help of acl .
Removing any acls
To remove all of the currently defined ACLs from a file or folder, issue the below command.
setfacl -b demoacltest.txt
Here, demoacltest.txt is a file name.
I hope this will help you to learn more about acl in Linux.
Thanks for your time.
Have a great day.


