
PowerDNS is an open source, high performance, and DNS server. It runs on many GNU/Linux, Unix, and Mac OS X systems. It is written using C++, and released under the GPLv2. It uses popular Databases, such as MySQL, MariaDB, PostgreSQL, and Oracle etc., to read the Zone files and records.
In this tutorial, let us see how to install PowerDNS on Ubuntu 14.04. Also, the same steps will work on Debian and it’s derivatives.
Install PowerDNS On Ubuntu
Scenario:
Operating system: Ubuntu 14.04 LTS server
IP Address: 192.168.1.250/24
Hostname: server.unixmen.local
Update your system:
First of all, update your system:
sudo apt-get update && sudo apt-get upgrade -y
Setup MySQL:
sudo apt-get install mysql-server mysql-client
During installation you’ll be asked to set MySQL root user password. While it’s not mandatory, It is highly recommended.
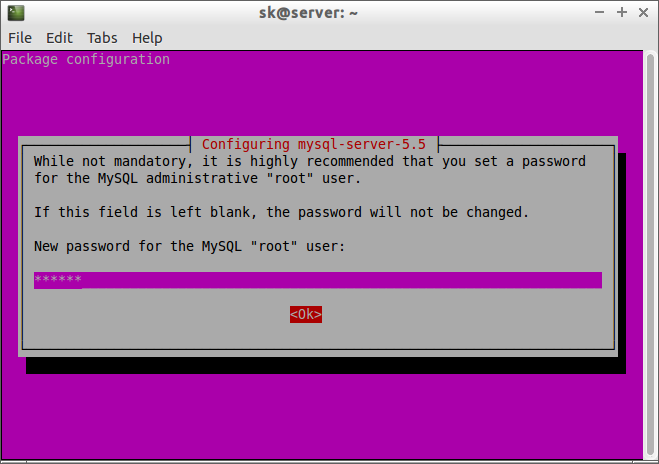
Re-enter the password.

Now, edit /etc/mysql/my.cnf to make MySQL to listen all interfaces.
sudo vi /etc/mysql/my.cnf
Find the following line, and comment it out.
[...]
#bind-address           = 127.0.0.1
[...]
Save and close the file. Restart MySQL service.
sudo service mysql restart
We completed the installation now. Next, we will Install PowerDNS.
Install PowerDNS:
Run the following command to install PowerDNS.
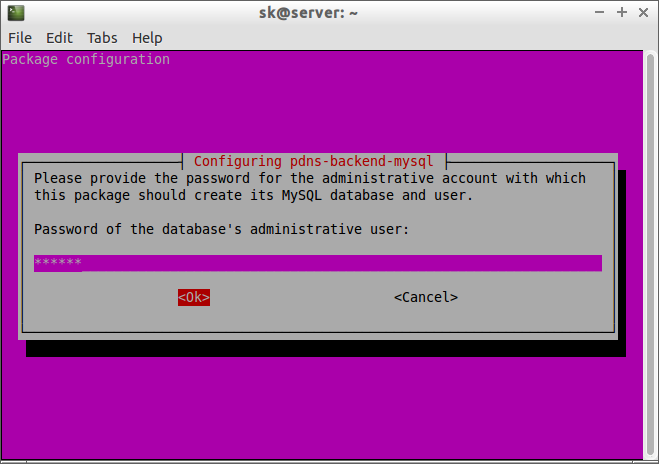
sudo apt-get install pdns-server pdns-backend-mysql
Press ‘Yes’ to configure database for pdns-backend-mysql with dbconfig-common.

Provide MySQL root user password:
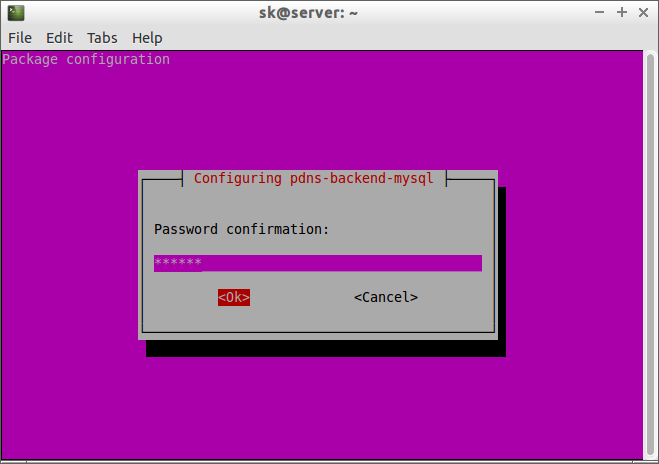
Then, provide a password for pdns-backend-mysql to register with the database serve.
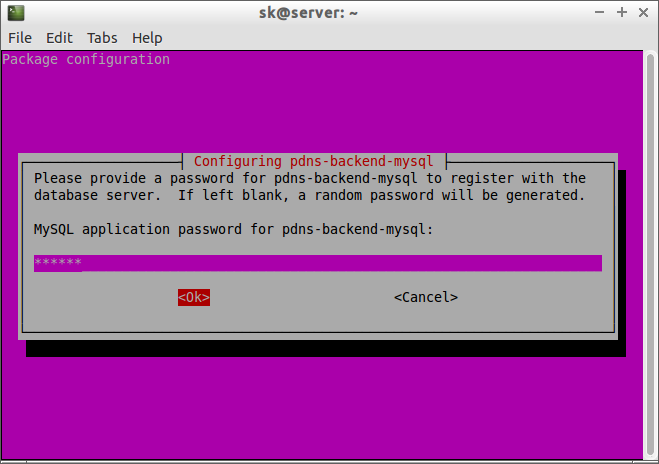
Re-enter password:
PowerDNS has been installed now.
Create PowerDNS Database and User in MySQL
The next step is we should now create the necessary database, user account, tables, and records etc., for the PowerDNS.
Enter to MySQL prompt using command:
sudo mysql -u root -p
Create database, namely ‘powerdns’. You can define your own.
CREATE DATABASE powerdns;
Create database user, namely ‘poweruser’.
GRANT ALL ON powerdns.* TO 'poweruser '@'localhost' IDENTIFIED BY 'ubuntu';
Here,
powerdns – is the database;
poweruser – is the database user,
ubuntu – is the password for the ‘poweruser’ user.
I recommend you to use any strong password to tighten the security.
Enter the following command to update the user settings.
FLUSH PRIVILEGES;
Now, use the powerdns database with command:
USE powerdns;
Create the necessary tables and records.
First, let us create domains table:
CREATE TABLE domains (
id INT auto_increment,
name VARCHAR(255) NOT NULL,
master VARCHAR(128) DEFAULT NULL,
last_check INT DEFAULT NULL,
type VARCHAR(6) NOT NULL,
notified_serial INT DEFAULT NULL,
account VARCHAR(40) DEFAULT NULL,
primary key (id)
);
Create Unique Index for domains table:
CREATE UNIQUE INDEX name_index ON domains(name);
Create records table:
CREATE TABLE records (
id INT auto_increment,
domain_id INT DEFAULT NULL,
name VARCHAR(255) DEFAULT NULL,
type VARCHAR(6) DEFAULT NULL,
content VARCHAR(255) DEFAULT NULL,
ttl INT DEFAULT NULL,
prio INT DEFAULT NULL,
change_date INT DEFAULT NULL,
primary key(id)
);
Create the following indexes for records table:
CREATE INDEX rec_name_index ON records(name);
CREATE INDEX nametype_index ON records(name,type);
CREATE INDEX domain_id ON records(domain_id);
Create the supermasters table:
CREATE TABLE supermasters (
ip VARCHAR(25) NOT NULL,
nameserver VARCHAR(255) NOT NULL,
account VARCHAR(40) DEFAULT NULL
);
Finally, exit from MySQL prompt using command:
quit;
Configure PowerDNS
Now, we should configure PowerDNS to use MySQL as backend to store Zone files and records.
Remove the existing PowerDNS configuration files.
sudo rm /etc/powerdns/pdns.d/*.*
Then, create file /etc/powerdns/pdns.d/pdns.local.gmysql.conf file;
sudo vi /etc/powerdns/pdns.d/pdns.local.gmysql.conf
Add the following lines. Set the correct database name and database user which we created earlier.
# MySQL Configuration
#
# Launch gmysql backend
launch=gmysql

# gmysql parameters
gmysql-host=localhost
gmysql-dbname=powerdns
gmysql-user=poweruser
gmysql-password=ubuntu
Finally restart powerdns service.
sudo service pdns restart
Test PowerDNS
First, edit /ect/resolv.conf file,
sudo vi /etc/resolv.conf
Set the name server IP address:
auto lo
iface lo inet loopback

# The primary network interface
auto eth0
iface eth0 inet static
address 192.168.1.250
netmask 255.255.255.0
network 192.168.1.0
broadcast 192.168.1.255
gateway 192.168.1.1
dns-nameservers 192.168.1.250
dns-search home
We completed all installation and configuration parts. Now, we will check whether PowerDNS is really working or not.
First check if PowerDNS is listening:
sudo netstat -tap | grep pdns
Sample output:
tcp 0 0 *:domain *:* LISTEN 1549/pdns_server-in
Now, enter the following command to check PowerDNS is working:
sudo dig @127.0.0.1
Or,
sudo dig @localhost
Sample output:
; <<>> DiG 9.9.5-3-Ubuntu <<>> @127.0.0.1
; (1 server found)
;; global options: +cmd
;; Got answer:
;; ->>HEADER<<- opcode: QUERY, status: NOERROR, id: 65075
;; flags: qr rd; QUERY: 1, ANSWER: 0, AUTHORITY: 0, ADDITIONAL: 1
;; WARNING: recursion requested but not available

;; OPT PSEUDOSECTION:
; EDNS: version: 0, flags:; udp: 2800
;; QUESTION SECTION:
;.                IN    NS

;; Query time: 4 msec
;; SERVER: 127.0.0.1#53(127.0.0.1)
;; WHEN: Mon Mar 30 14:38:58 IST 2015
;; MSG SIZE  rcvd: 29
Or,
sudo dig @192.168.1.250
Where, 192.168.1.250 is my PowerDNS server’s IP address.
Sample output:
; <<>> DiG 9.9.5-3-Ubuntu <<>> @192.168.1.250
; (1 server found)
;; global options: +cmd
;; Got answer:
;; ->>HEADER<<- opcode: QUERY, status: NOERROR, id: 39576
;; flags: qr rd; QUERY: 1, ANSWER: 0, AUTHORITY: 0, ADDITIONAL: 1
;; WARNING: recursion requested but not available

;; OPT PSEUDOSECTION:
; EDNS: version: 0, flags:; udp: 2800
;; QUESTION SECTION:
;.                IN    NS

;; Query time: 0 msec
;; SERVER: 192.168.1.250#53(192.168.1.250)
;; WHEN: Mon Mar 30 14:39:49 IST 2015
;; MSG SIZE  rcvd: 29
That’s it. PowerDNS is ready to use.
I have successfully installed and configured PowerDNS, now what? It is time to manage PowerDNS using Poweradmin administration tool.
Want to setup PowerDNS on RHEL based systems like CentOS, Scientific Linux? Well, refer the following link.
Cheers!!


