
The objective of this tutorial
The main goal of this tutorial is to discuss what is Foreman and Puppet tools, it’s usage in real time, how to manage nodes using Foreman, and how to automate repetitive tasks.
About Foreman
Foreman is an open source application that can be used to manage, provision, configure, and monitor a single or group of servers. Foreman smart proxy architecture allows you to automate repetitive tasks, quickly deploy applications, proactively manage change using configuration management systems such as Puppet, Chef and Salt. Foreman has an interactive and robust web front-end, API, CLI to manage, provision servers in private or public clouds.
Using Foreman, we can:
- Discover, provision and upgrade your IT infrastructure
- Create and manage instances both in private and public clouds
- Group your hosts and manage them in bulk, regardless of location
- Review historical changes for auditing or troubleshooting
- Extend as needed via a robust plugin architecture
- Automatically build images (on each platform) per system definition to optimize deployment
Foreman will run on almost all modern Linux operating systems, such as:
- RHEL / CentOS / Fedora / Oracle Enterprise Linux / Scientific Linux
- SUSE/openSUSE
- Debian/Ubuntu
- CoreOS
- JunOS
And, It can provision on physical as well as the following cloud providers, such as:
- VMWare
- Amazon EC2
- Libvirt
- OpenStack
- oVirt and RHEV
- Rackspace
- Google Compute engine
Using Foreman, we can manage 10s to 10,000s of physical or virtual servers via a web browser.
About Puppet
Puppet is an open source configure management tool developed by Puppet Labs, founded by Luke Kanies in 2005. It is written in Ruby and released as free software under the GNU General Public License (GPL) until version 2.7.0 and the Apache License 2.0 after that. The main goal of Puppet is to simplify a system administrator’s work who manages a large scale IT infrastructure. Puppet can be used to manage the configuration of physical or virtual servers. With Puppet, you define the state of your IT infrastructure, and Puppet automatically enforces the desired state. Puppet automates every step of the software delivery process, from provisioning of physical and virtual machines to orchestration and reporting; from early-stage code development through testing, production release and updates.
Puppet comes as two flavors:
- Puppet Open Source Edition
- Puppet Community Edition
Puppet open source edition is free to use, and it helps system administrators to automate repetitive tasks easily. Enterprise edition has all the features of open source edition plus Puppet Apps, commercial-only enhancements, supported modules and integrations etc. Puppet will run almost all Unix-like systems, Microsoft Windows, and Solaris.
Well, I hope you have a basic knowledge of Fireman and Puppet utilities. Now, let us see how to install Foreman with Puppet in CentOS and Ubuntu.
Installation
I tested this tutorial in CentOS 7 and Ubuntu 14.04 systems, however these steps would be same to other distributions too. In case these steps didn’t work for you, I suggest you to refer the official Quickstart guide which I mentioned at the end of this tutorial.
Prerequisites
Before installing Foreman, we need to do some important prerequisites which will help you to setup a proper Foreman. These steps needs to be run on both CentOS and Ubuntu.
First of all, make sure you have setup a proper FQDN for your server.
To do that, edit /etc/hosts:
vi /etc/hosts
Enter your FQDN as shown below.
[...]

192.168.1.150 server1.unixmen.local server1
Save and close the file. Like wise edit /etc/hostname and setup valid FQDN.
server1.unixmen.local
Save and close the file.
Install Foreman In CentOS 7
There are several different methods of installing Foreman. The recommended way is with the puppet based Foreman Installer but you may also use your distribution’s package manager or install directly from source. Let us proceed with Foreman installer.
The Foreman installer is a collection of Puppet modules that installs everything required for a full working Foreman setup. It uses native OS packaging (e.g. RPM and .deb packages) and adds necessary configuration for the complete installation.
The Foreman installer will install the following necessary components:
- Foreman web UI
- Smart Proxy
- Passenger (for the puppet master and Foreman itself)
- TFTP
- DNS
- DHCP
Add the Foreman, Puppet and EPEL repositories.
rpm -ivh http://yum.puppetlabs.com/puppetlabs-release-el-7.noarch.rpmyum -y install epel-release rpm -ivh http://yum.theforeman.org/releases/1.9/el7/x86_64/foreman-release.rpm
Next, run the following command to download Foreman installer:
yum -y install foreman-installer
Then, run the Foreman installer to start installing Foreman:
foreman-installer
The installation run is non-interactive. But you can run “foreman-installer -i” without quotes for interactive mode. For more details run: foreman-installer –help.
The Foreman-installer command will start to download and install all necessary softwares to setup a working Foreman environment. After few minutes, you will see a output something like below.
[...]

Success!
 * Foreman is running at https://server1.unixmen.local
 Initial credentials are admin / pKmHDXnRDFnR5xhR
 * Foreman Proxy is running at https://server1.unixmen.local:8443
 * Puppetmaster is running at port 8140
 The full log is at /var/log/foreman-installer/foreman-installer.log
Note down the initial credentials which are shown in bold. We need them later to access the Foreman’s dashboard.
Next, you need to allow the following ports through your FirewallD/Router.
| Port | Protocol | Required For |
|---|---|---|
| 53 | TCP & UDP | DNS Server |
| 67, 68 | UDP | DHCP Server |
| 69 | UDP | * TFTP Server |
| 80, 443 | TCP | * HTTP & HTTPS access to Foreman web UI – using Apache + Passenger |
| 3000 | TCP | HTTP access to Foreman web UI – using standalone WEBrick service |
| 3306 | TCP | Separate MySQL database |
| 5910 – 5930 | TCP | Server VNC Consoles |
| 5432 | TCP | Separate PostgreSQL database |
| 8140 | TCP | * Puppet Master |
| 8443 | TCP | Smart Proxy, open only to Foreman |
firewall-cmd --permanent --add-port=53/tcp
firewall-cmd --permanent --add-port=67-69/udp
firewall-cmd --permanent --add-port=80/tcp
firewall-cmd --permanent --add-port=443/tcp
firewall-cmd --permanent --add-port=3000/tcp
firewall-cmd --permanent --add-port=3306/tcp
firewall-cmd --permanent --add-port=5910-5930/tcp
firewall-cmd --permanent --add-port=5432/tcp
firewall-cmd --permanent --add-port=8140/tcp
firewall-cmd --permanent --add-port=8443/tcp
Restart Firewall to take effect the changes.
firewall-cmd --reload
Next, we will see how to install Foreman in Ubuntu.
Install Foreman In Ubuntu 14.04
Make sure you have completed the prerequisites steps as shown above.
Now we will install Foreman in Ubuntu 14.04 LTS server.
The following commands needs to be run as root user.
To switch to root user run:
sudo su
or
su
Enable Puppet labs and Foreman repositories:
apt-get -y install ca-certificates
wget https://apt.puppetlabs.com/puppetlabs-release-trusty.deb
dpkg -i puppetlabs-release-trusty.deb
echo "deb http://deb.theforeman.org/ trusty 1.9" > /etc/apt/sources.list.d/foreman.list
echo "deb http://deb.theforeman.org/ plugins 1.9" >> /etc/apt/sources.list.d/foreman.list
wget -q http://deb.theforeman.org/pubkey.gpg -O- | apt-key add -
Update the source lists using command:
apt-get update
Download the Foreman-installer script.
apt-get -y install foreman-installer
Finally, run Foreman-installer using command:
foreman-installer
After a few minutes, you’ll see an output something like below.
[...]

Success!
 * Foreman is running at https://server.unixmen.local
 Initial credentials are admin / jrPiWSpSBXBdzv57
 * Foreman Proxy is running at https://server.unixmen.local:8443
 * Puppetmaster is running at port 8140
 The full log is at /var/log/foreman-installer/foreman-installer.log
Note down the initial credentials which are shown in bold. We need them later to access the Foreman’s dashboard.
Configure Foreman
First of all, we need to enable “diffs”, which will help you to see configuration file changes from within Foreman’s Reports view.
To do that, edit /etc/puppet/puppet.conf file:
vi /etc/puppet/puppet.conf
Find the following line and change its value to true.
[...]

show_diff = true

[...]
Save and close the file.
Next, we’ll need to add Foreman host to Foreman’s database. To do that, run:
puppet agent --test
Sample output:
Warning: Unable to fetch my node definition, but the agent run will continue:
Warning: Error 400 on SERVER: Failed to find server1.unixmen.local via exec: Execution of '/etc/puppet/node.rb server1.unixmen.local' returned 1:
Info: Retrieving pluginfacts
Info: Retrieving plugin
Info: Caching catalog for server1.unixmen.local
Info: Applying configuration version '1441613934'
Notice: Finished catalog run in 0.22 seconds
Note: Puppet 3+ versions will show a warning message the first time that the node can’t be found. Just ignore the warning and continue.
Access Foreman Web console
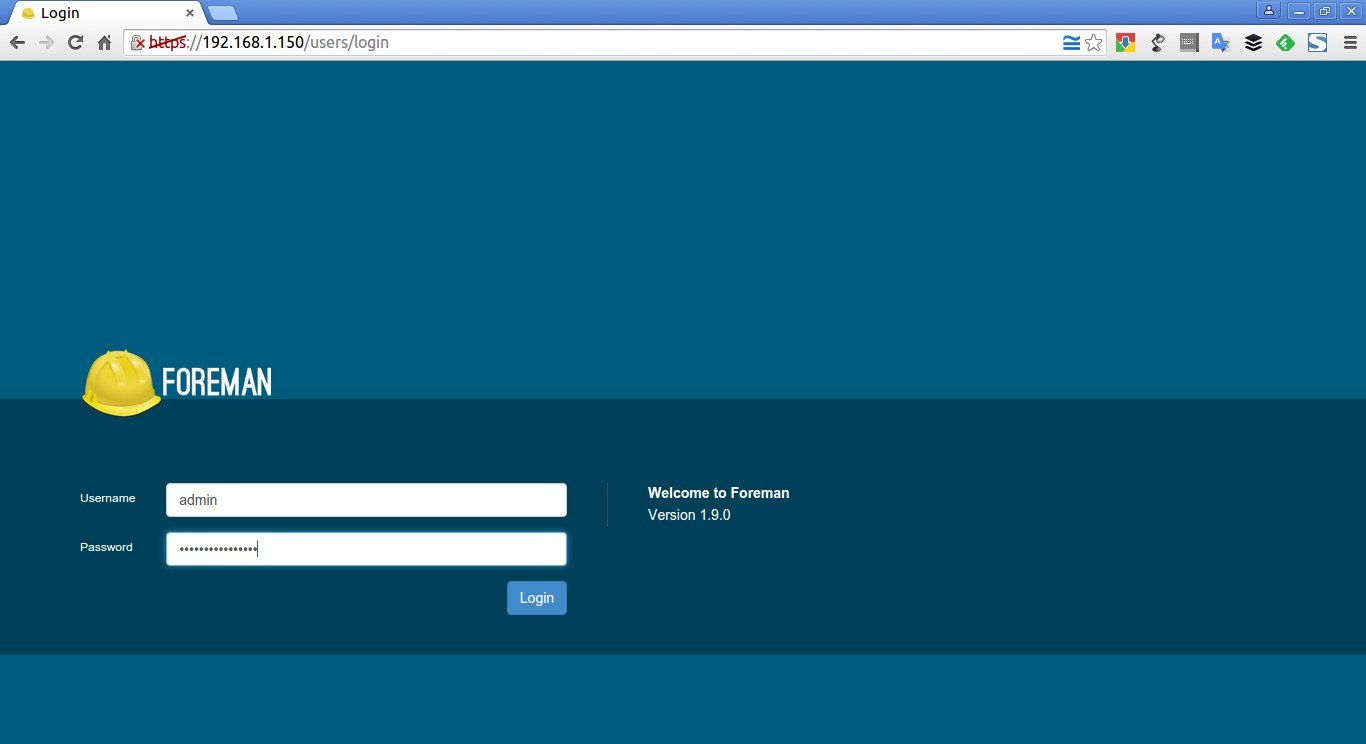
Open up your web browser and navigate to: https://IP-address/ or https://FQDN/.
The following screen should appear.
Enter your Foreman credentials.
Here it is what my Foreman’s web console looks. Here you can see the Overview of your Puppet environment.
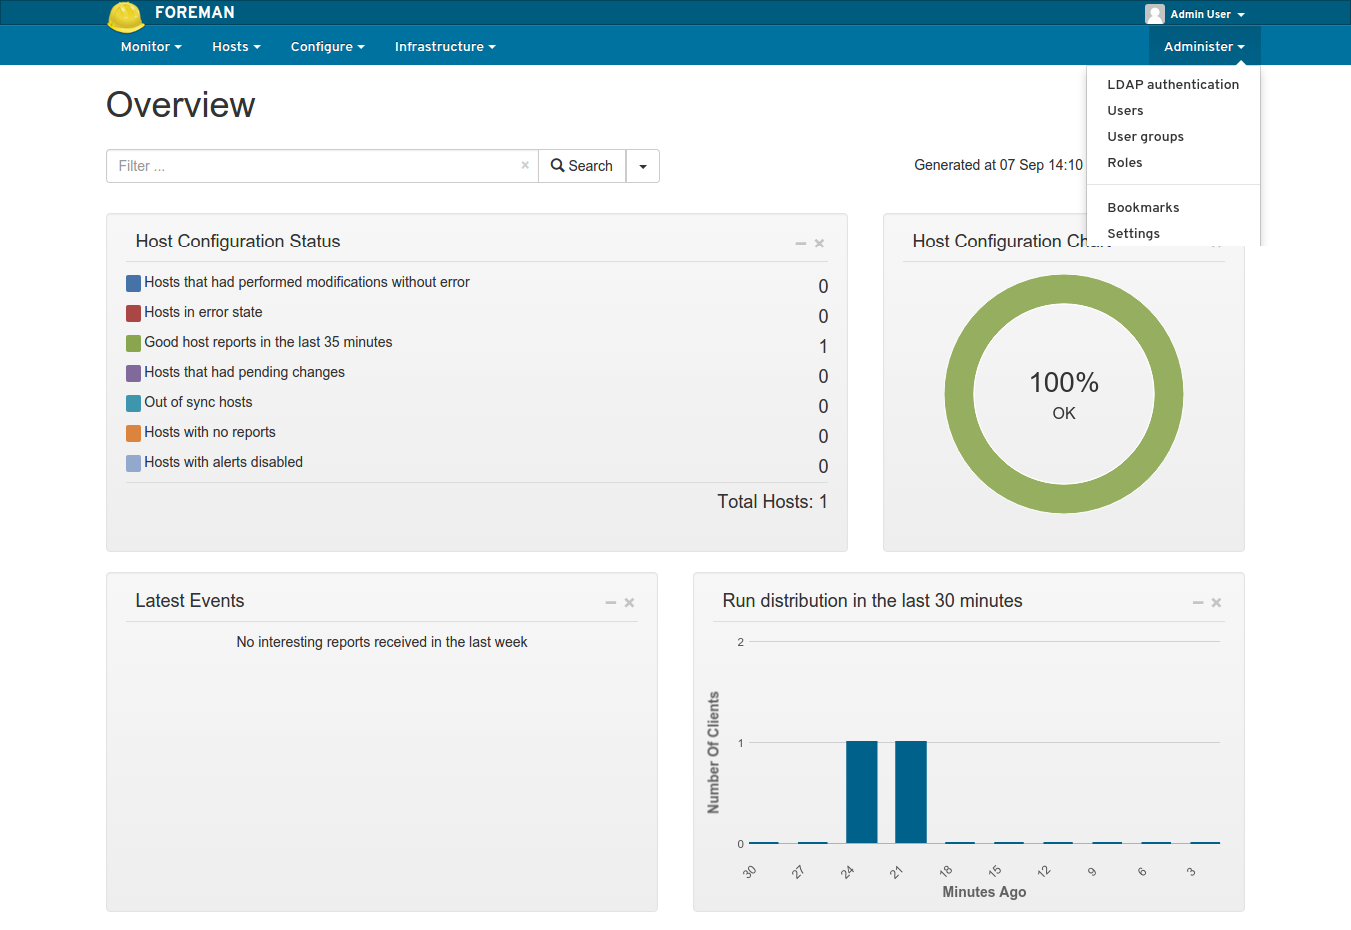
This Overview section will display the list of Puppet agent nodes and their configuration statuses. Now, we only have the Foreman host itself, so It shows the total hosts as 1.
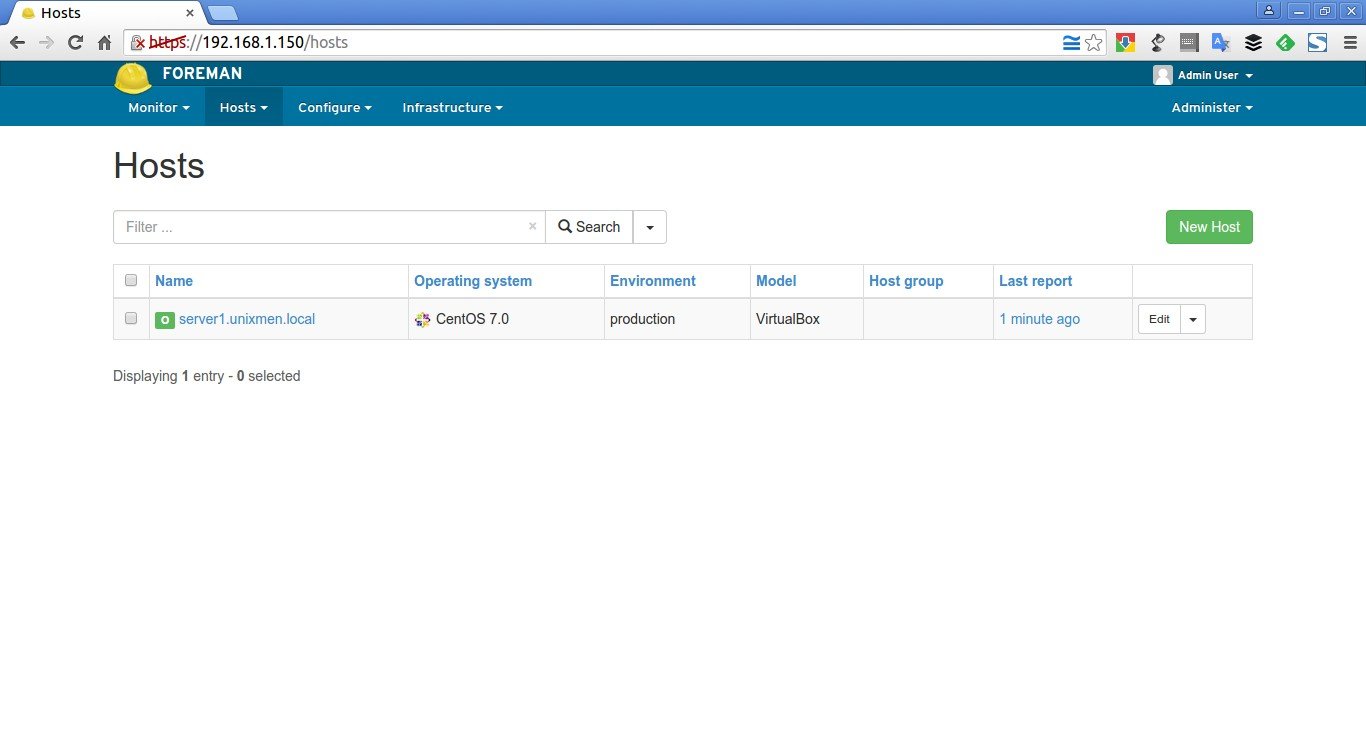
To view the list of available hosts, go to Hosts > All hosts from the Menu bar.
Change Admin user’s default password
After logging in to the Dashboard, the very first step is to change the admin user’s default password. To do that, click on the Admin user’s drop down box and select My account on the top-right corner.
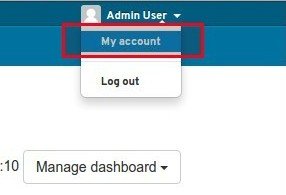
Enter a strong password of your choice twice and click Submit.
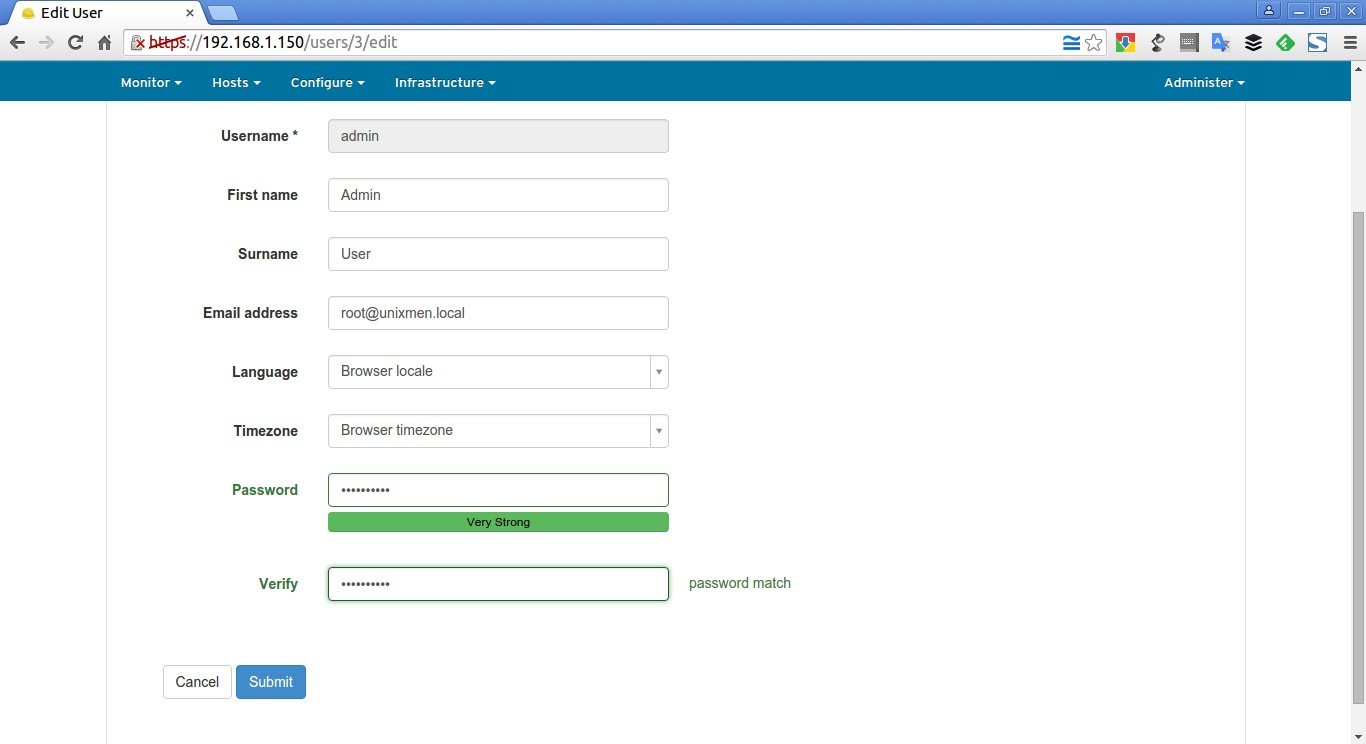
That’s it. Log out and log in back to your Foreman’s web console using the new password.
In our next tutorial, we’ll see how to add nodes to Foreman.
Reference links:


