I spent lot of time thinking whether to write one on Git or just leave it, since it takes quite lot of time to explain Git and it’s functions. But still, I have given detailed steps in term of installation/usage some of which is not documented anywhere else. This is for users who really want to learn it in-depth, quick and simple. Make sure to empty yourselves from the concept of other tools like svn, cvs, etc.. If you’re not aware of such tools, well and good.. Let’s get started.
So, what is Git?
It is a prerequisite, if you want to be a kernel hacker.
From Wikipedia: In software development, Git is a distributed revision control and source code management (SCM) system with an emphasis on speed. Git was initially designed and developed by Linus Torvalds for Linux kernel development in 2005. Based on a recent survey of Eclipse IDE users, Git is reported to have 30% adoption as of 2013.
In simple words, it’s an utility to powerfully manage/organize the source code of any project.
As you might know, Linux kernel is a project with so many contributors and hence a demand rises for a tool to efficiently manage the source code of it, and hence, Linus Torvalds build this up, after being fed-up with other tools like svn, cvs etc..
It is a distributed revision control and source code management. What distributed implies here?
This is what that makes Git awesome. There is no central repo you have to access to do your work. You can commit, branch and party on your own repo on your local machine even without internet access. Then, when you have a connection again, you can push your changes to any other git repo you have access to.
How Git works?
Look at this self-explanatory diagram.
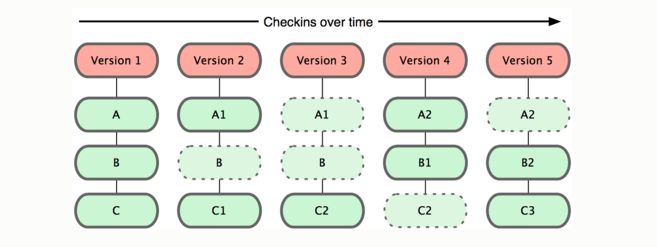 In Git, everything is saved as a snapshot. In case, if the particular file doesn’t undergone any changes, then Git simply creates a pointer to refer the previous snapshot.
In the above diagram,
Version 1 – contains 3 files. (Note that the files can be anything – Coding or merely just a “README” file)
Version 2 – A and C has undergone changes, whereas B is just the same.
Version 3 – C alone has undergone changes. And so on.
As mentioned earlier, here, almost every operation is local.
Everything in Git is check-summed before it’s stored and is then referred to by that checksum. The checksumming mechanism that Git uses is SHA-1 hash.
Local Operations
The following pic shows how it works in your machine. Later all these changes can be altogether pushed to your remote repo. Note that, here remote repo is what everyone have access to. And apart from that, everyone has a local repo too, where they commit changes, that are to be pushed to remote repo once they connect to the network, or simply whenever they want to.
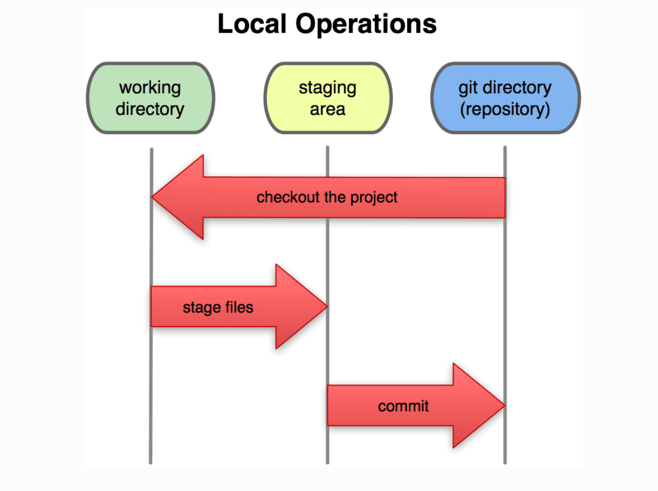 Here, working directory is where Git stores the metadata (data about the data. Details of what is committed, and the version of file that is committed and such) and object database for your project.
The work flow is like this.
è You modify some files
è You stage those files
è You commit all those staged changes at once.
Installation
# yum install git-core
You shall install it using source code as well and later update by running git clone.
Now that you have installed Git, you shall clone the remote repo so that you shall update Git easy & fast.
# git –version      /* To check the installed version of Git */
# git clone git://git.kernel.org/pub/scm/git/git.git    /* You're cloning git's project altogether */
This will create a directory called git in your home directory.
# cd /root/git/
# git tag /* this will list all versions of Git */
# git checkout v1.8.4 /* I want to update to version 1.8.4*/
# autoconf /* yum install autoconf, if command not found. This command is to generate configure script from configure.ac */
# ./configure –prefix=/usr; make; make install
# git --version
git version 1.8.4
Now that you have installed Git and updated it as well, Let’s go with the initial setup.
Caution: Continue further as a normal user, just in case, to avoid the risk of messing things up.
First time Git setup
There are several parameters that need to be set.
# git config --global user.name “Gokul Kannan”
# git config --global user.email gokul.tuxradar@gmail.com
# git config --global core.editor vim   /*Default editor to be used in git ex: when you commit */
# git config --global merge.tool vimdiff /*Default tool to solve merge conflicts */
# git config --list          /* to check current config */
This creates a .gitconfig in your home directory with the parameters set. Note that these parameters are specific to this user alone. In case, if you want to set parameters for all the users of this system, then use –system instead of –global. This will create a gitconfig file under /usr/etc/.
Accessing help
# git help <verb>    /* ex: use commit in the place of verb, if you need help in committing*/
# git <verb> --help
# man git-<verb>
Getting a git repository & working
# mkdir myfirstproject
# cd myfirstproject
# pwd
/root/myfirstproject
# git init           /* This will initialize git repository in /root/myfirstproject/.git/ */
Know the difference between working directory and repository. Here, my working directory is /root/myfirstproject and your repository is /root/myfirstproject/.git/.
Working directory is where I keep my files and repository is where it’s being tracked.
Lifecycle of status of your files
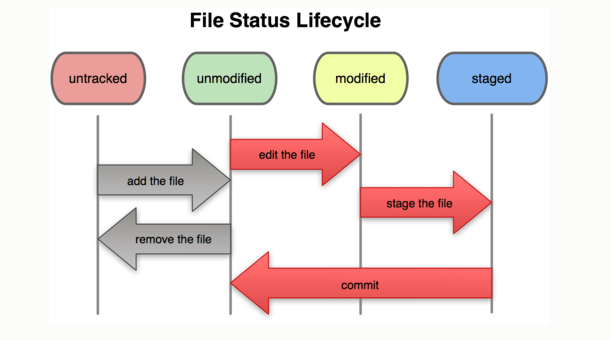 This might be little confusing. So, read carefully. Ignore the middle part of the above pic. Say, you have just added a file. Now, it is in untracked stage. Let’s stage/commit it. Now, what happens? Untracked -> Staged -> Committed. “Unmodified and modified” comes into play when you make changes to the committed file and not now.
Here, note that Commit arrow runs right to left. What does this mean? Committing is nothing but recording your snapshot (added/saved files in working dir) to the history.
Now, say that you are modifying the added file. Now, refer the full pic , along with the middle part.
While removing a file, the process flow is same. Say, you have removed a file. As of now, even though you removed it, changes has not been committed yet. So, to commit it, you need to stage the removal, and then Commit. Untracked -> Staged -> Committed
Recording changes to the repository
# vim README
This is a test project.
Save and exit
Read all outputs of # git status carefully and you shall learn undoing (unstaging / discarding changes etc..) yourself.
# git status /* This gives the current status of your project. The output is self explanatory */
# On branch master
#
# Initial commit
#
# Untracked files:
#   (use "git add <file>..." to include in what will be committed)
#
#       README
nothing added to commit but untracked files present (use "git add" to track)
# On branch master – Don’t worry about this now. As of now, we just have one main branch i.e) master.
# Initial commit – As of now, we didn’t commit anything yet
# Untracked files – I created a new file, which is not staged yet. Refer Lifecycle of status of your files pic
Staging and Committing
# git add README /* This is to stage the file “README” */
# git status
# On branch master
#
# Initial commit
#
# Changes to be committed:
#   (use "git rm --cached <file>..." to unstage)
#
#       new file:   README
#
Now, that you have staged the file “README”, it comes under “Changes to be committed”.
# git commit –m “My first commit” /* -m to mention the commit msg */
1 file changed, 1 insertion(+)
create mode 100644 README
# git status /* as we didn’t add/modify anything after commit, work dir clean now */
# On branch master
nothing to commit, working directory clean
Note that you can skip the staging area by providing -a option to git commit command
Viewing commit history
# git log /* lists the commit made in the repository */
commit bfae2f77c96615d46035602d87a84d755ad62e5d
Author: Gokul Kannan <gokul.tuxradar@gmail.com>
Date:   Sun Sep 29 06:22:36 2013 +0530
My first commit
The digits after commit is the checksum. As mentioned earlier, everything in Git is check-summed before it’s stored and is then referred to by that checksum.
Staging Modified Files
Now, lets modify README and also add another file.
# vim README
This is a test project.
Testing further
Save and exit.
# touch sample
# git status
# On branch master
# Changes not staged for commit:
#   (use "git add <file>..." to update what will be committed)
#   (use "git checkout -- <file>..." to discard changes in working directory)
#
#       modified:   README
#
# Untracked files:
#   (use "git add <file>..." to include in what will be committed)
#
#       sample
no changes added to commit (use "git add" and/or "git commit -a")
Note that README is being tracked, but the recent changes are not staged. Whereas sample is not even being tracked.
You can discard the changes you mead to README by running the command # git checkout — README (Refer above output. Read other outputs carefully)
# git add . /* track/stage everything in working dir */
# git status
# On branch master
# Changes to be committed:
#   (use "git reset HEAD <file>..." to unstage)
#
#       modified:   README
#       new file:   sample
#
# git commit /* this will open a file, where you can enter your commit message and save it to commit */
 The editor in which the file will be opened is the editor you mentioned initially while configuring# Please enter the commit message for your changes. Lines starting
# with '#' will be ignored, and an empty message aborts the commit.
# On branch master
# Changes to be committed:
#   (use "git reset HEAD^1 <file>..." to unstage)
#
#       modified:   README
#       new file:   sample
#
Added few lines to README file and added a new file "sample"
~
~
~
~
~
~
~
~
".git/COMMIT_EDITMSG" 11L, 310C
Save and exit.
# git log
commit 4a966bbdf759dda15bf3ae524ca95e8d3a523062
Author: Gokul Kannan <gokul.tuxradar@gmail.com>
Date:   Sun Sep 29 06:36:40 2013 +0530
    Added few lines to README file and added a new file "sample"

commit bfae2f77c96615d46035602d87a84d755ad62e5d
Author: Gokul Kannan <gokul.tuxradar@gmail.com>
Date:   Sun Sep 29 06:22:36 2013 +0530
    My first commit
# git log -p
commit 4a966bbdf759dda15bf3ae524ca95e8d3a523062
 Author: Gokul Kannan <gokul.tuxradar@gmail.com>
 Date:   Sun Sep 29 06:36:40 2013 +0530
Added few lines to README file and added a new file “sample”.
diff --git a/README b/README
 index 3ac131b..1494579 100644
 --- a/README
 +++ b/README
 @@ -1 +1,3 @@
  This is a test project.
 +Testing further.
 +
 diff --git a/sample b/sample
 new file mode 100644
 index 0000000..e69de29
commit bfae2f77c96615d46035602d87a84d755ad62e5d
 Author: Gokul Kannan <gokul.tuxradar@gmail.com>
 Date:   Sun Sep 29 06:22:36 2013 +0530
    My first commit
# git log --pretty=oneline
ea54cffd13d09ea75f96308ddf02d38a7149914b Added few lines to README file and adde
 bfae2f77c96615d46035602d87a84d755ad62e5d My first commit
There are several other options that can be used along with git log (Refer #man git-log).
You can use # git commit –amend if you want to change the previous commit message.
From output of earlier # git status, you might be aware of undoing certain things.
Ignoring files
Now, when you build your code (here i have just used text files like README/sample and no codes) ,
or
— object and archive files may be the product of building your code. Now, there is a need to ignore these files (by-product) and to preserve the code alone. If you don’t ignore these files, # git status will go on listing these files as untracked.
# vi .gitignore
*.[oa]
Save and exit.
You need to stage/commit this file, so that, moving forward, you shall ignore .o and .a files.
# git add .gitignore
# git commit -m ""Added a .gitignore files to ignore .o and .a files"
Now,
# vi test.o
This is a test object file
Save and exit.
# git status
# On branch master
 nothing to commit, working directory clean
Now, as you could see, git has ignored test.o, since we have committed a .gitignore file, in which we have asked to ignore .o and .a files. Whenever you want to ignore some type of files, edit the same .gitignore and commit it.
Viewing your staged and unstaged changes
Sometimes, you want to know exactly what you changed, not just which files were changed. To check files that were changed, you can use # git status command. But to know exactly what you have changed, use the # git diff
command.
To be precise,
# git diff /* to view unstaged changes. This compares your working directory and staging area */
# git diff --cached /* to view staged changes. This compares your staging area and previous commit. */
Now, do this yourself. Create 2 files. Stage just 1 file alone (# git add filename to stage it) and run # git diff and # git diff –cached and you could see that commands work the way i mentioned above.
Removing and Moving files
Say, for example, you want to remove the file sample.
# git rm sample /* to add files we used git add, here to remove, hence rm. This deletes the file sample and also stages file removal for committing. You need not run a # rm sample seperately*/
# git commit -m "deleted sample file"
Now, you have successfully removed the “sample” file from your working directory.
Similarly, to rename files, use mv in the place of rm.
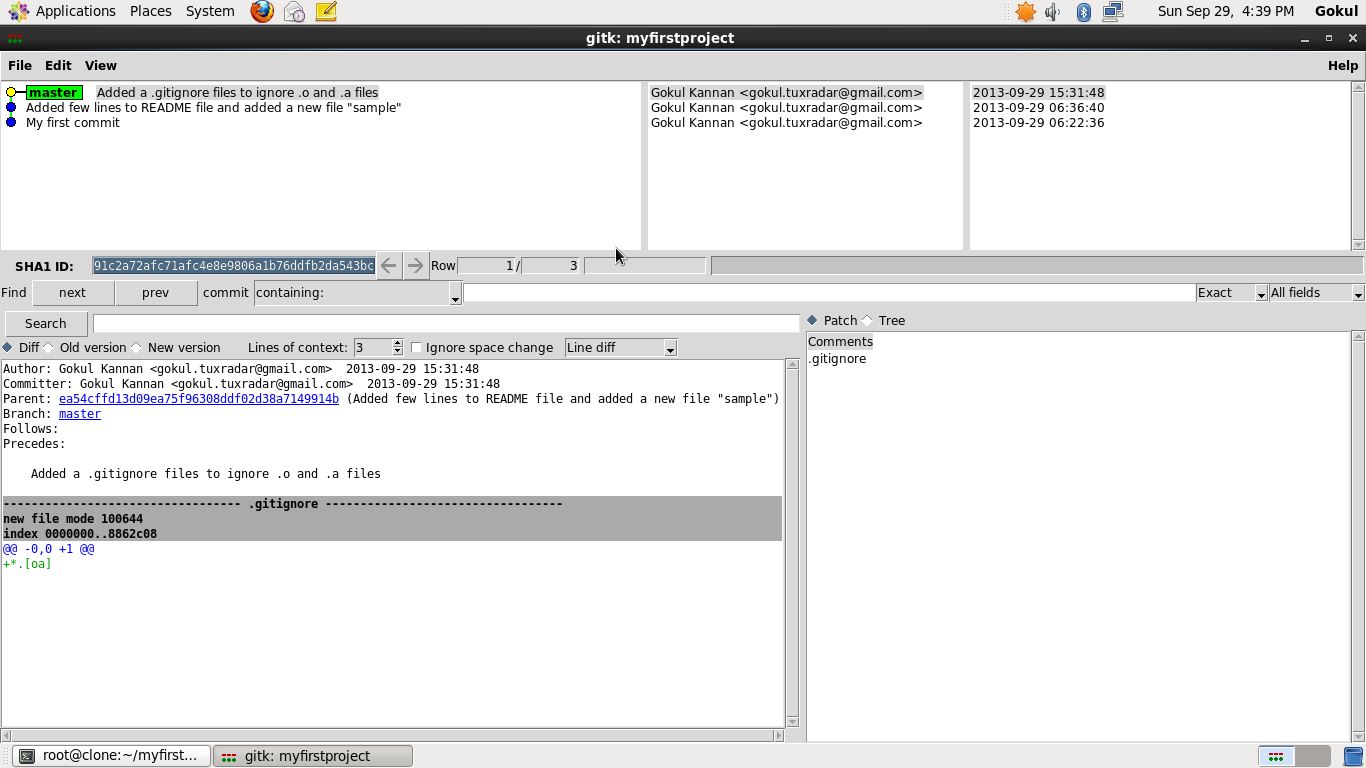
Using GUI to visualize history
If you like to use a graphical tool for viewing your commit history, you can use gitk command. It’s basically a visual git log tool, and it accepts nearly all filtering options that git log accepts.
 Shall discuss further on Git/Remote Git/Tagging/Branching/Public Git server (like github) in my next article. Stay tuned.
Thanks for reading. Cheers!


