![openSUSE 13.2 Desktop [Running] – Oracle VM VirtualBox_005](https://www.unixmen.com/wp-content/uploads/2015/11/openSUSE-13.2-Desktop-Running-Oracle-VM-VirtualBox_005.jpg "openSUSE 13.2 Desktop [Running] - Oracle VM VirtualBox_005")
Hello everyone.
Sharing files / folders is one of the most common thing that every that we need to do now & then. Today, we will learn how we can share a folder with all sorts of file sharing methods that we have.
We will see how we can share a folder by using
- NFS ( Network File System )
- FTP ( File Transfer Protocol )
- Samba
First let’s learn a bit about these things.
What is NFS?
According to history, in 1984 Sun Microsystems designed & developed Network File System (NFS) which is a client / server application program with distributed file system protocol allowing any user on a client computer to access files over a network much like local storage is accessed for computers of different types. NFS is build on the Open Network Computing Remote Procedure Call (ONC RPC) system. Currently, NFS runs on top of TCP/IP protocol though originally operated only over UDP.
NFS v3 added support for 64-bit file sizes for handling files larger than 2 GB. NFS v4 has higher performance improvements including security and also supports stateful protocol. WebNFS is an extension of Version 2 & 3 which allows NFS to integrate more easily onto Web-browsers.
User can set privileges for each folder such as read-only or read-write mode.
What is FTP?
FTP stands for File Transfer Protocol which is a standard network protocol commonly used to transfer computer files between a client machine and a server on a computer network over TCP/IP connections. FTP is built based on a client-server model architecture. Back on 1971, Abhay Bhushan published the original specification for the File Transfer Protocol.
This is the most common method for sharing files. Every Linux distribution has its own FTP server for providing their own distribution iso file format disk image. FTP can run in active or passive mode, which determines how the data connection will be established. Normally it runs on port 21. Now a days, FTP server can responds with a three-digit (3) status codes in ASCII with an optional text message. With FTP you can easily transfer ( Upload / Download ) any types of file.
What is Vsftpd?
Vsftpd stands for ( Very Secure FTP Daemon ) which is a very commonly used popular FTP server for Linux. As usual, It is licensed under the GNU General Public License. Vsftpd is the default FTP server in many Linux distribution like Ubuntu, CentOS, Fedora and RHEL Linux distributions etc etc.
What is Samba?
This is not the Brazilian dance guys. Samba is a free software licensed under the GNU General Public License and a re-implementation of the SMB/CIFS networking protocol which was originally developed by Andrew Tridgell. Samba is used for sharing files & folders between UNIX & Linux like system towards a Windows OS driven PC. Samba allows a non-Windows server to communicate with the same networking protocol as the Windows products and that’s the interesting part of it. Samba was originally developed for UNIX but now a days it can run on Linux, FreeBSD and other UNIX variants.The name Samba comes from SMB (Server Message Block). Samba works on the majority of modern operating systems available today.
Too many theoretical study for one day. Let’s start the real life hand on practices for these services.
Prerequisites
Before beginning let’s update all software / packages for our OpenSUSE 42.1. To do so, open a terminal and issue the below command.
sudo zypper update
It may take a while depending on the internet speed of yours. After successful update, you must reboot your system as well and this is a good practice to reboot your server if any major updates take place.
Also, you must have a IP address set to your NIC / LAN card statically / manually. You cannot get your server IP address via a DHCP server.
Setting up NFS
To install NFS on your server, issue the following command to your terminal.
sudo zypper install nfs-kernel-server rpcbind
This will download & install all the necessary files for setting up NFS. As we are done installing NFS, let’s configure it for us now.
Now, load the NFS driver into your kernel and test whether it is loaded or not.
To Load the NFS driver onto kernel
sudo modprobe nfs
Now, start the NFS server services.
sudo systemctl start rpcbind.service
sudo systemctl start nfsserver.service
And to test it
sudo cat /proc/filesystems | grep nfs
This will show you something like this.

If you don’t see something like above image, it means your NFS driver is not loaded onto your kernel or your NFS package is not installed correctly. Then try more testing with the following command to ensure that
sudo rpcinfo -p | grep nfs
Now it’s time to share a folder via NFS. Say we have a folder named “Unixmen” and we need to share it via NFS.
Let’s create the folder by using the below command. And place any files in to this directory.
sudo mkdir Unixmen
Now, open /etc/exports file with your favorite file editor. I am using vim over here for my file editor.
vim /etc/exports
And type the following on to that file and save & exit from the file.
/home/iftekher/Unixmen 192.168.1.2 (rw,sync)
After editing, the file will look like this.
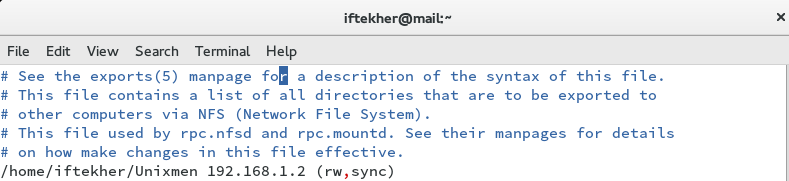
Here, /home/iftekher/Unixmen is the folder path that we wish to share. 192.168.1.2 is the host or IP address of that machine which will have the access of this /home/iftekher/Unixmen folder only. And rw stands for read and write permission to that folder with synchronization.
If you want to share this folder for a whole network, then you must you use the CIDR notation value. Say, I want to share this folder to the whole network then I need to write the following
/home/iftekher/Unixmen 192.168.1.0/24 (rw,sync)
If you don’t want to give the write permission privilege then use the following command.
/home/iftekher/Unixmen 192.168.1.0/24 (ro,sync)
Here, ro stands for read only permission.
Now, let’s restart the NFS service for our server.
sudo systemctl restart rpcbind.service
sudo systemctl restart nfsserver.service
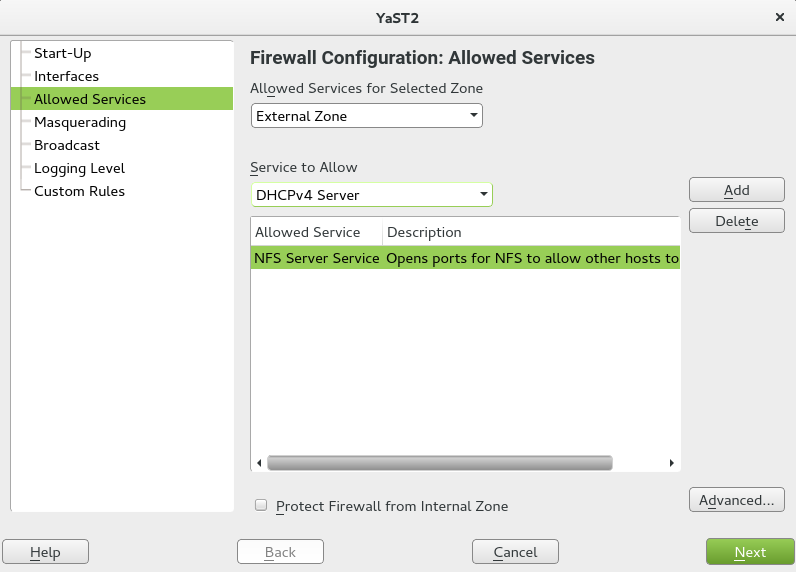
But thing is like, by default, openSUSE firewall doesn’t allow remote clients to connect to NFS server. So, we need to allow it from the firewall. To do so,
Goto YAST control center -> Security and Users -> Firewall and then navigate to Allowed Services tab. From there, select NFS Secure Service from Service to Allow drop down box and click add. Finally click Next to allow the nfs service through OpenSUSE firewall.
We are done from our sever part.
Now, we need to use a client machine to mount the shared the folder. Now turn on your your Client machine and install the necessary NFS client packages accordingly.
If you are running Cent OS, Fedora or Red Hat, issue the below command to install NFS client package.
sudo yum -y install nfs-utils nfs-utils-lib
Or if you are running Debian / Ubuntu then like below
sudo apt-get install rpcbind nfs-common
Now, open a terminal from your client machine and issue the following command to check whether your NFS server is broadcasting that folder path or not.
sudo showmount -e 192.168.1.12
Here, 192.168.1.12 is the OpenSUSE NFS server IP address. You have to replace this IP address by your own server IP address where your NFS service is running. After issuing this command, you will see something like this.

From the above picture, you can see that your client machine has been detected or aware of your NFS server folder and it is also showing it.
Let’s mount the NFS server folder to your client machine.
Create a folder where you will mount that folder.
sudo mkdir mountedfolder
Simply type the following to mount the folder.
sudo mount 192.168.1.12:/home/iftekher/Unixmen mountedfolder
Here, 192.168.1.12 is the NFS server IP address. /home/iftekher/Unixmen is the folder path and mountedfolder is the folder where it will be mounted.
If you face any error with the above command then try the following.
sudo mount -t nfs 192.168.1.12:/home/iftekher/Unixmen mountedfolder
We are done with NFS 🙂
Setting up FTP
As you already know that we will install Vsftpd for serving the FTP. Open a terminal and type the following the following command to install vsftpd onto your system.
sudo zypper install vsftpd
We are done installing vsftpd on to our system.
Let’s start the vsftpd service and also set it to start automatically for every restart / reboot of the server.
sudo systemctl start vsftpd
sudo systemctl enable vsftpd
Now, we need to edit /etc/vsftpd.conf file for configuring vsftpd. Simply issue the below command.
sudo vim /etc/vsftpd.conf
And now type the following or change the values accordingly.
write_enable=YES
ftpd_banner=Welcome to My FTP Server.
ls_recurse_enable=YES
local_enable=YES
anonymous_enable=NO
local_root=/home/iftekher/Unixmen
ascii_upload_enable=YES
ascii_download_enable=YES
use_localtime=YES
vsftpd_log_file=/var/log/vsftpd.log
Now, save & exit from the file. Please note that the above configuration are the very basic of configuring Vsftpd. You can dive deep on it as well according to your requirements. Also note that we are setting the folder location /home/iftekher/Unixmen as the default FTP path.
Restart Vsftpd daemon service so that your changes can take place.
sudo systemctl restart vsftpd
Testing FTP
Its time to test our FTP from the server itself first whether it is listening to port 21 or not. Just to remind you again that FTP runs on port 21. To test it, simply type the following.
sudo telnet localhost 21
If everything goes correctly, then you will see something like this.
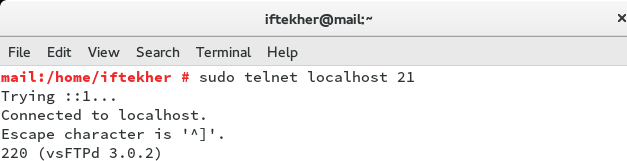
The above image indicates that your FTP server is listening to port 21 for any incoming connection and hence it is successfully done.
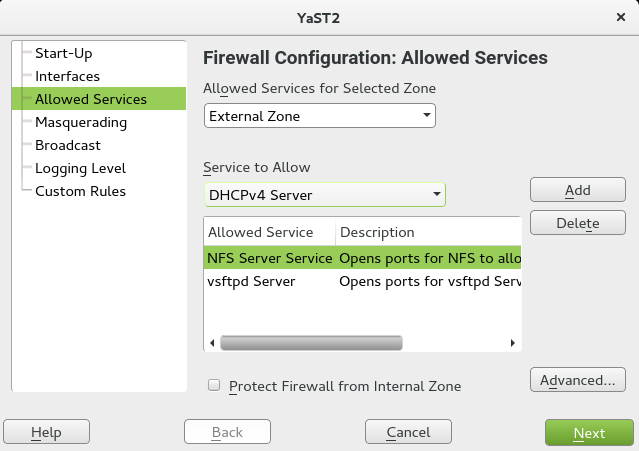
Now, to access this FTP server from a different machine/ host, we need to allow port 21 to listen from outside from the firewall. To do so, go to Yast -> Security and Users -> Firewall. It will open the the firewall window GUI for you. Now click only the Firewall section, go to Allowed Services and select External Zone and then select vsftpd server and click add. You can have a clear idea from the below image as well.
We are done configuring our FTP server. Now, let’s test it from another machine/host. Use any FTP client to get the FTP folder access. Or open any of your web browser from your client machine and type this following
ftp://192.168.1.12/
Here, 192.168.1.12 is my FTP server IP address. Please replace this IP address by yours.
So till now, we share the same folder location /home/iftekher/Unixmen over NFS and FTP protocol and home/iftekher/Unixmen is now accessible both via NFS & FTP. Let’s do the same thing with Samba.
Setting up Samba
We will share the same folder which is /home/iftekher/Unixmen with Samba.
To install Samba, open a terminal and issue the below command
sudo zypper install samba*
This will download and install all the necessary packages for Samba. Let’s configure it now.
Open the file /etc/samba/smb.conf in your favorite file editor as this is the Samba configuration file. I am using vim over here.
sudo vim /etc/samba/smb.conf
Just copy & paste the following in the end of the file and save & exit from the file.
[MyShare]
         path = /home/iftekher/Unixmen
         writable = yes
         browsable = yes
         guest ok = yes
         guest only = yes
         create mode = 0777
         directory mode = 0777
The above mentioned parameters values are not fixed and can be changed upon your requirements. Say, you don’t want to permit any guest. Then you need to write it down like below
[MyShare]
         path = /home/iftekher/Unixmen
         writable = yes
         browsable = yes
         guest ok = no
         guest only = yes
         create mode = 0777
         directory mode = 0777
Also, lot other parameters with value can be added and those are optional.
As, we are done configuring Samba, let’s start the Samba daemon / service on our system by doing the following.
sudo systemctl start smb.service
sudo systemctl start nmb.service
You may wondering what is NMB and why we are starting NMB. NMB is the NetBIOS name resolution protocol and hence it is required to perform Samba properly.
Test & verify Samba
Let’s test our configuration & syntax with the following command to verify Samba is working properly or not.
sudo testparm
After issuing the command, you will see something like below image.
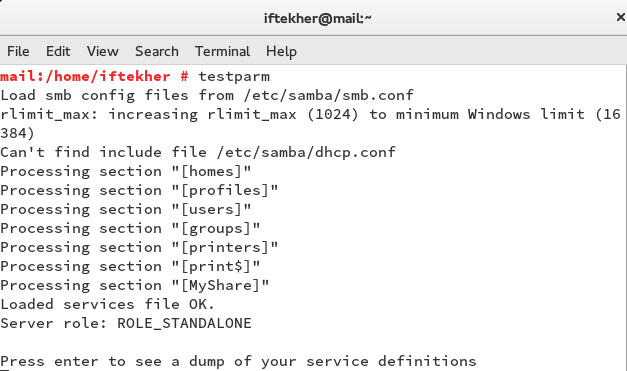
You can see from the above image that there is no problem with our configuration.
Now, to access this folder “/home/iftekher/Unixmen” from a Windows PC / machine, go to Start Menu and click Run. This will open the Run window and then type the following in the Run window.
\\192.168.1.12
Here 192.168.1.12 is the IP address of my server where Samba is running. You must use your server IP address instead of using mine. If you are running any firewall on your OpenSUSE server, please allow Samba to get connect from the outside through your firewall.
So, I showed you how we can a share a folder by using NFS, FTP & Samba.
That’s all for today. Hope it will help you.
Have a great day.


