Sendmail is the default SMTP (Simple mail transfer protocol) server installed on CentOS and although it can be slightly more complicated for beginners to learn than similar alternatives such as Postfix, it can be quite powerful and useful to learn. Sendmail by itself as the name suggests is a MTA (Mail transfer agent) which is useful for sending emails from your server to other servers. However in order to create a proper mail server you will also need a few other pieces of
software such as a MUA (Mail user agent) to connect to the MTA and a POP3/IMAP (Post office protocol / Internet message access protocol) server to listen for incoming emails. These will all be covered in later tutorials, but in this tutorial we will just cover some of the basics of Sendmail to help you become familiar with email servers.
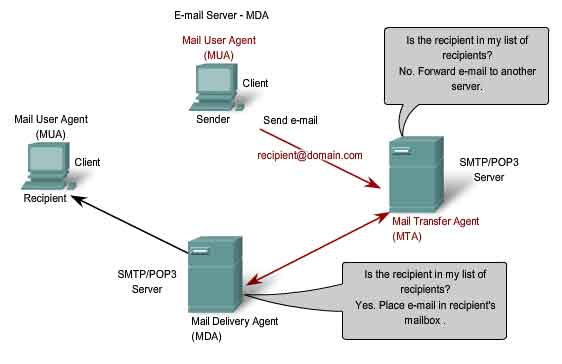
1- Terms
This all might be a bit confusing to understand at first, but it’s actually quite straight forward once you get to know all of the terms. I have included some more information below which will help you to remember some of the terms and their role in a mail server.
MTA – Mail Transfer Agent – Sendmail, Postfix
MDA – Mail Delivery Agent – Procmail
MUA – Mail User Agent – Outlook, Thunderbird
SMTP – Simple Mail Transfer Protocol – Sendmail, Postfix
POP3 – Post Office Protocol 3 – Dovecot
IMAP – Internet Message Access Protocol – Dovecot
Sendmail can also be used exclusively for the use of scripts and programs that do not require an email back. One example of this is PHP, many web applications require Sendmail to be installed in order to send out Administrator emails containing password information.
I will begin by presuming that you have a domain name and that you know how to modify the DNS records for your domain name.
To check what version of Sendmail is installed you can enter the following command
rpm –qa sendmail
If you are not using the latest version of Sendmail you can update Sendmail by using yum
yum update sendmail
Next you should make sure that the sendmail service is running and that it loads on startup
service sendmail restart
chkconfig sendmail on
Next we will need to open up and modify the Sendmail config file located in /etc/mail/sendmail.mc and remove the line which limits Sendmail to work only from the local IP.
DAEMON_OPTIONS(`Port=smtp, Addr=127.0.0.1 Name=MTA’)dnl
to
DAEMON_OPTIONS(`Port=smtp, Name=MTA’)dnl
Once you have saved the configurations restart Sendmail again.
service sendmail restart
You will also need to make sure that if you are using a firewall that you allow incoming and outgoing connections to port 25.
2-DNS Records
Next you will need to modify your DNS records so that you can use your domain name as an email address. First you will need to create a sub-domain under your domain name, for example mail.example.com then you will need to forward the MX records of mail.example.com to point to the IP address of your server. Modifying the records of your DNS server particularly if you are using an external hosting company may take 24 to 48 hours to propagate, so make sure that your settings are correct before you modify them.
3- Accepting incoming mail
You will also need to specify on your server which domains you would like to accept mail from. You can do this by editing the /etc/mail/local-host-names file and adding the domain names as well as the sub-domains that you wish to accept.
For example you can add the following lines to the file.
example.com
mail.example.com
4- Testing Sendmail
Finally you can test out if Sendmail is working by either using the mail command or Sendmail itself. Sending emails from mail is much easier as it formats the email for you, but Sendmail will allow you to pipe a file into the email.
mail example@gmail.com
cat email.txt | sendmail example@gmail.com
5- Using your domain name
When you check your email the first thing you will notice is that your email came from your hostname not your domain name. If you want a quick fix to change this you can simply change your hostname to become your domain name either through the /etc/hosts file or by entering the following command.
hostname example.com
You can also masquerade as another domain name through the sendmail.mc file. Adding the following lines to your sendmail.mc file will allow all your emails to appear as though they are coming from the domain name example.com.
MASQUERADE_AS(`example.com’)dnl
MASQUERADE_DOMAIN(localhost)dnl
FEATURE(masquerade_entire_domain)dnl
6- Forwarding emails
Sendmail also has the ability to forward emails to multiple addresses; you can do this by editing the alias file located at /etc/aliases. The aliases file allows you to forward emails to local accounts or other emails. This is especially useful for people who want to create a simple mailing list or create email groups.
For example if you have a set of users to answer support emails you could add the following line to /etc/aliases to allow them all to receive supports emails.
support: bob, henry, john, support@example.com
7- Setting relay access
By default only the localhost is setup to be able to relay emails to other servers. You can give relay access to users by specifying the servers you’d like them to connect to or the IP that they are connecting from.
To modify the relay access open the /etc/mail/access file
You can relay or reject domain names by adding the lines below
To:gmail.com RELAY
To:spam.com REJECT
You can also specify IP addresses of hosts you would like to relay or reject
Connect:127.0.0.1 RELAY
Connect:123.123.123.123 REJECT
That is all.
{module user9-footer}


