
The structure of Hadoop project
This project includes the following subprojects:
- Common – distributed file systems and components and interfaces for common input output.
- MapReduce – distributed processing models, it is considered for paralel processing on big datas( till some petabayts)
- HDFS – Distributed file system, it works with very big clusters.
Subprojects that included before (Now it works as a separate program under ASF):
- Avro – it is for between different programing languages RPC calls system and saving data long-term.
- Pig – executing environment for large datas and language for contolling flow of datas.
- Hive – Distributed data stock. It controls datas on HDFS and allows in SQL database which has request languages for working with datas there. Shared database stock.
- HBase – distributed database which is not based on column-line principe.
- ZooKeeper – distributed coordinated service presents opportunity for configuration distributed software.
- Sqoop – A tool for sending datas between HDFS and structured information database.
- Oozie – A service for planning and registration of Hadoop tasks.
Cloudera, Hortonworks and MapR are the distributives that works under the license of Hadoop Open. Cloudera has the following essential components:
- Cloudera Hadoop(CDH) – It is Hadoop itself.
- Cloudera Manager – Configuration, monitoring and controlling of Hadoop cluster.
Cloudera Hadoop components is broadcasting as binary packets and these packets are called parcels. Parcels packets distinguishes from standart packets for following priorities:
- The simplicity of installation: every parcel is a file which has all components in it.
- Internal agreement: All components in parcel are tested attentively, put in order and agreed among themselves. And that is why the incompatibility problem between components is very little.
- Sharing and activation limit: All parcels can be installed to controlled nodes and then can be activated with an action. Therefore updating the system work fast with very little work.
- Update at work time: When minor version updates, all new processes will work with this version, but old processes will continue their work with old version until they finish their work. If you want to update major version you have to stop functionality of cluster and all its work and then you can update.
- Returning simple changes: It is possible to return previous version when you face with any problem by working with CDH.
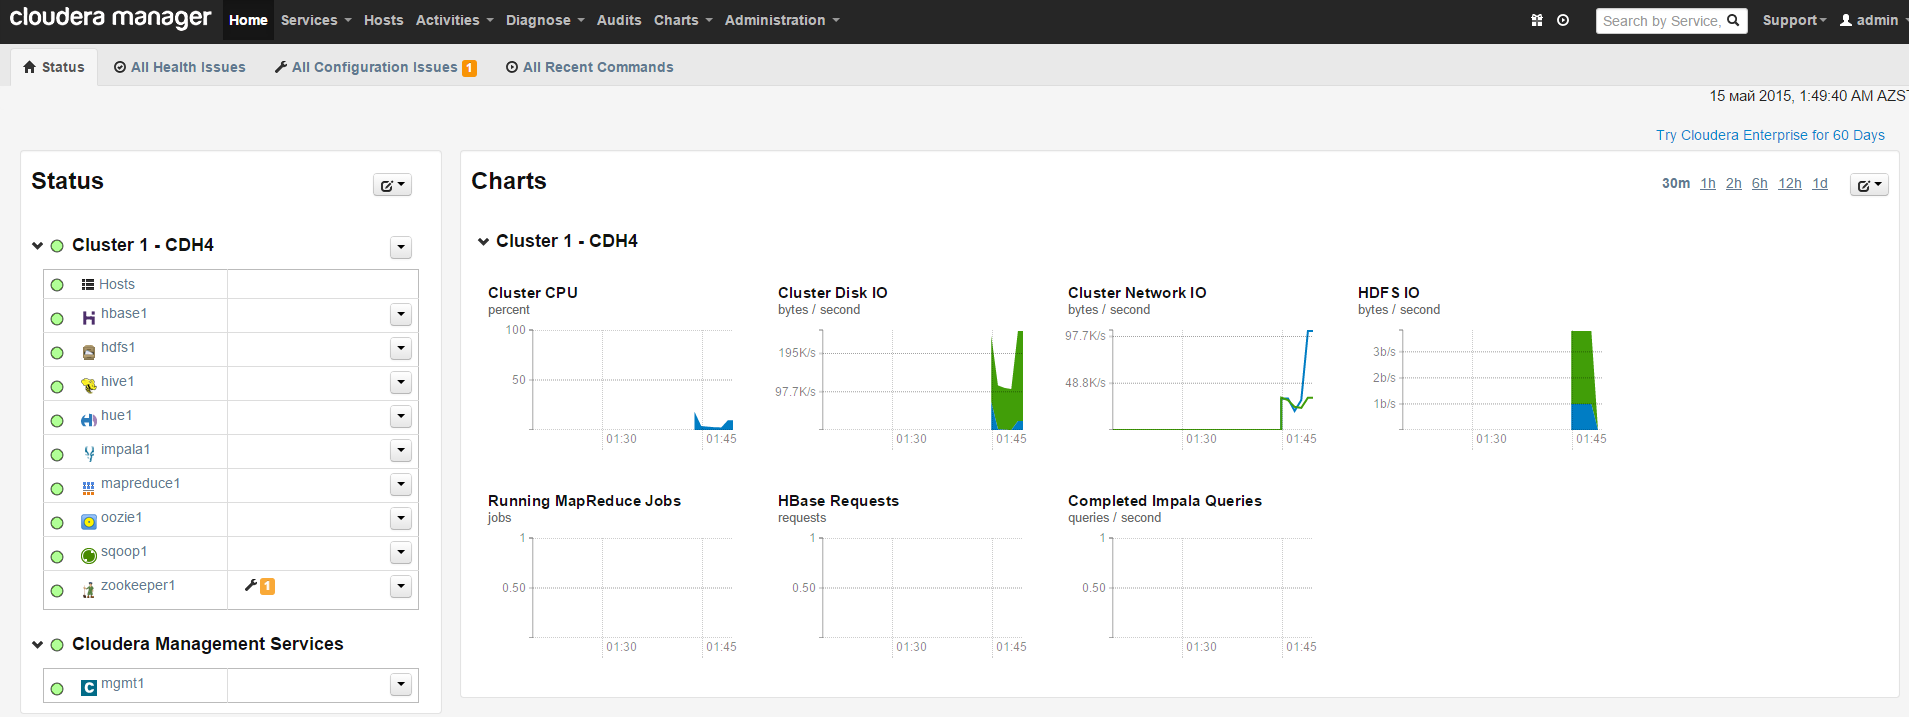
The cluster with 7 nodes on Cloudera is as following screenshot:
The Installation and configuration of ClouderaTThe installati
The installation is possible on any Linux. I installed on CentOS 6.6 x64.
It is recommended of being RAID1 in Cloudera Manager server(I used default disc structure). Server resource is as follows.
Cloudera Manager: HDD 150GB, DDR 8GB, 1 CPU 4 Core
hostname: chm.unixmen.com
It is needed to separate HDD into 2 parts for Hadoop nodes. For Linux and install software’s / slice will be 100GB and for HDFS disk we will create /dfs another disk. SWAP will be 8GB
Hadoop node resources: HDD 150GB(/ -100GB,/dfs –50GB), DDR 8GB, 1 CPU 4 Core
Hostname’s:
hdn1.unixmen.com
hdn2.unixmen.com
hdn3.unixmen.com
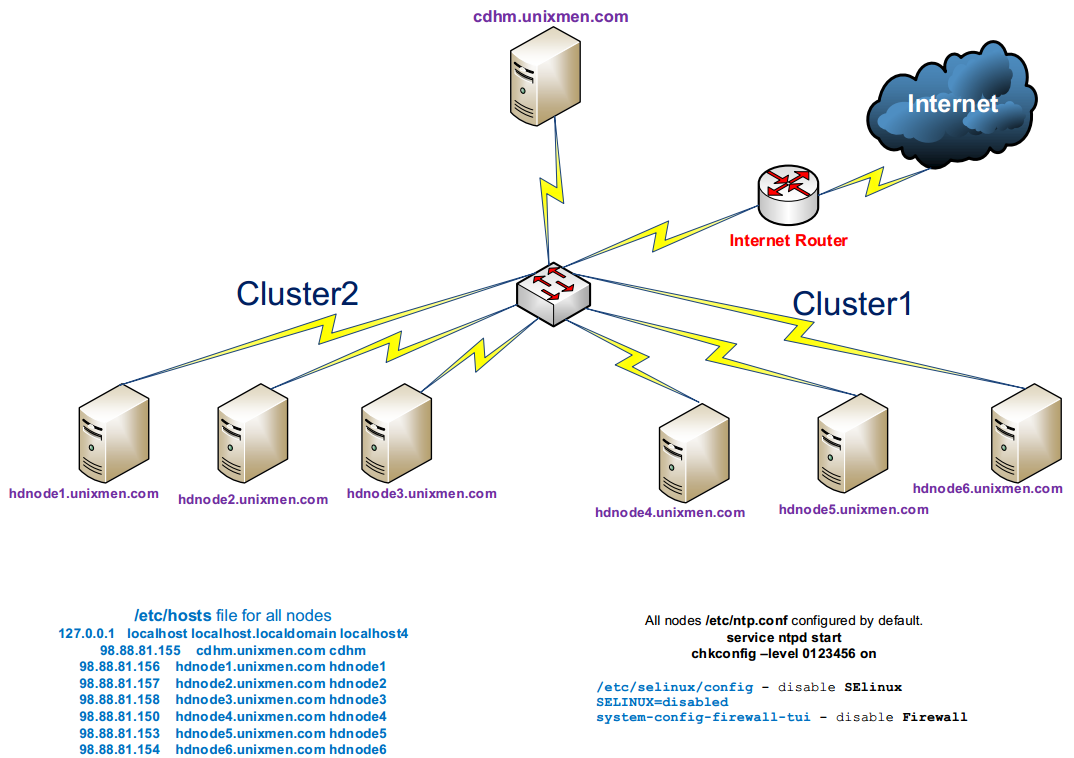
Cluster structure will be as follows:
We shut down SELinux and firewall in all nodes and Cloudera Manager server. (All linux’s installed as Basic Server):
# vi /etc/selinux/config # Stop the SElinux
SELINUX=disabled
# system-config-firewall-tui # Stop the Firewall and save it
# reboot # restart the server
We have to be sure that all followings are ready before installation and configuration of Cloudre manager and all nodes:
- In all servers SSH must be active, SSH keys must be generated or all servers must have the same root password.
- All servers must the internet(or must have local respository)and must have access to standart repositories for standart packets.
- In all members of cluster must have an access to cloudera.com repositories(Or local repository server with needed packets).
- In all servers ntp must be installed and configured.
- For Cloudera manager and all nodes must be written DNS A and RTR record or /etc/hosts file must be configured with the same name(I did it with /etc/hosts file).
Do the following sequence in all servers:
# yum update –y – Update all packets Butun paketleri yenileyirik
# wget http://dl.fedoraproject.org/pub/epel/6/x86_64/epel-release-6-8.noarch.rpm
# rpm -Uvh epel-release-6*.rpm
# yum -y install iftop nload htop
# reboot
# ntpdate 0.asia.pool.ntp.org
# chkconfig –level 0123456 ntpd on
# service ntpd start
# ssh-keygen -t rsa – Generate key pairs in all servers(In output lines just push Enter)
# cd ~/.ssh/ – Go to the keys folder.
# cp id_rsa.pub `hostname -f`.id_rsa.pub – copy the keys matched to our host name
# cat `hostname -f`.id_rsa.pub >> authorized_keys
# wget -q -O /etc/yum.repos.d/cloudera-manager.repo http://archive.cloudera.com/cm4/redhat/6/x86_64/cm/cloudera-manager.repo
# rpm –import http://archive.cloudera.com/cdh4/redhat/6/x86_64/cdh/RPM-GPG-KEY-cloudera
# cat /etc/hosts – The content of hosts file in all machines. 127.0.0.1 localhost localhost.localdomain
98.88.81.152 chm.unixmen.com chm
98.88.81.143 hdn1.unixmen.com hdn1
98.88.81.144 hdn2.unixmen.com hdn2
98.88.81.148 hdn3.unixmen.com hdn3
The next steps will be done in only Cloudera Master Server, so in our CHM server(We add the repos and install needed packets):
# cd /root/.ssh/ – enter the address where SSH keys are and copy the public key to each 3 nodes.
# scp `hostname -f`.id_rsa.pub hdn1:/root/.ssh/
# scp `hostname -f`.id_rsa.pub hdn2:/root/.ssh/
# scp `hostname -f`.id_rsa.pub hdn3:/root/.ssh/
# yum -y install jdk
# yum -y install cloudera-manager-daemons
# yum -y install cloudera-manager-server
# yum -y install cloudera-manager-server-db
Start the Claudera database and itself:
# /etc/init.d/cloudera-scm-server-db start
# /etc/init.d/cloudera-scm-server start
Add the key that taken from master server to the end of authorized_keys file in each 3 node:
[root@hdn1 /]# cd /root/.ssh/; cat chm.unixmen.com.id_rsa.pub >> authorized_keys
[root@hdn2 ~]# cd /root/.ssh/; cat chm.unixmen.com.id_rsa.pub >> authorized_keys
[root@hdn3 ~]# cd /root/.ssh/; cat chm.unixmen.com.id_rsa.pub >> authorized_keys
And now let’s start our cluster
After our works above we have no work in CLI. Open any web browser and enter http://chm.unixmen.com:7180 to open cloudera web installation. Default login and password is(admin, admin).
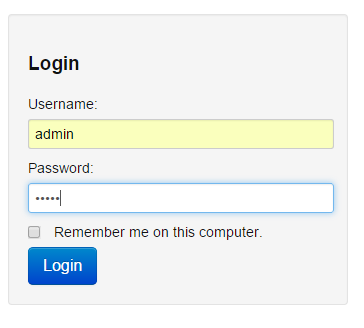
As enter on the right at the top push the admin -> change password button and change the password in order that nobody can login.

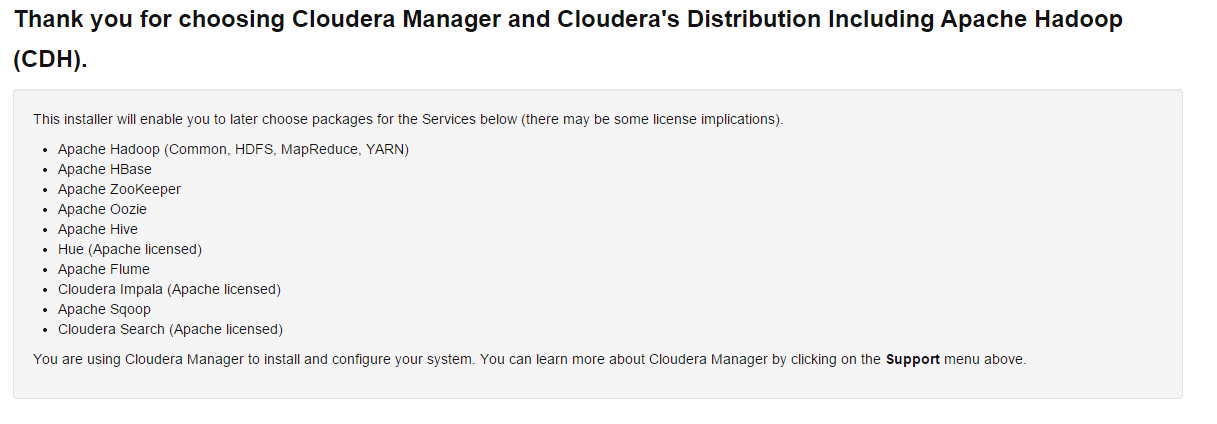
Then we exit and reenter with our new password and choose Cloudera Standart and push the Continue button(as in screenshot):
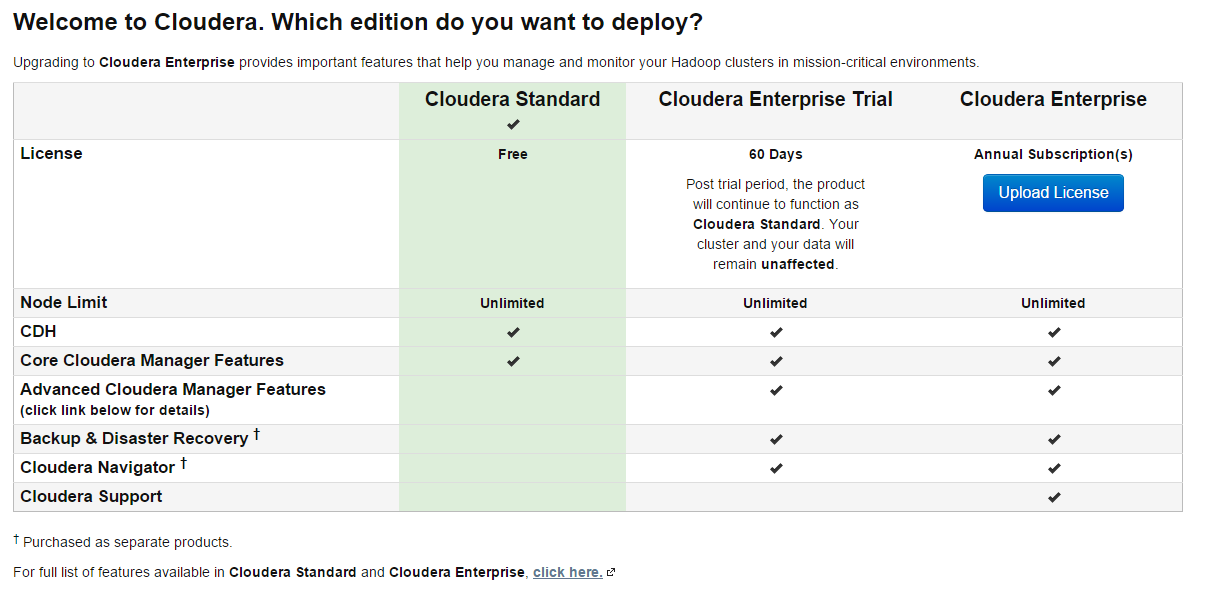
In the next page push the Continue button again:
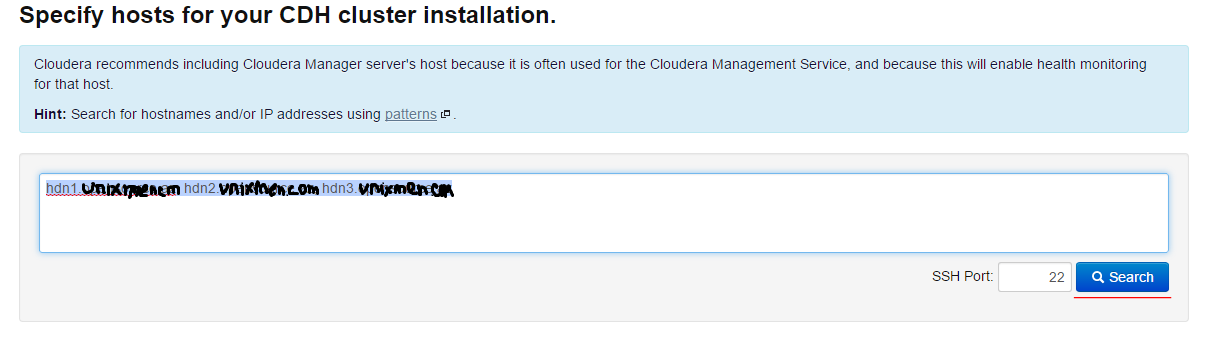
We add nodes by separating comma as in screenshot with name or IP address and push the Search button. If we want to write network we can do it as 10.10.10.[2-254] rule. This syntax covers only the network(Nodes are shown in screenshot):
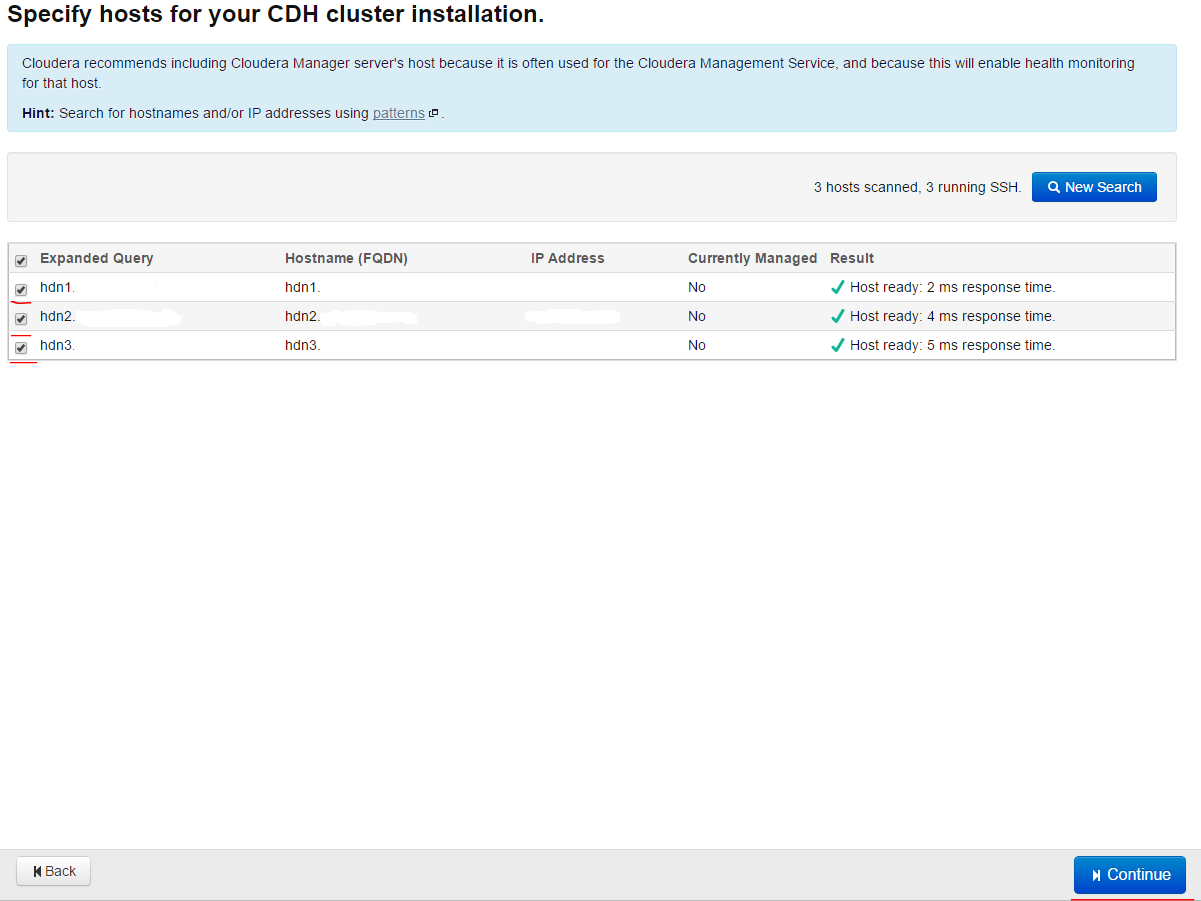
We mention all the nodes on the left in opened page and press Continue button (it is shown in screenshot):
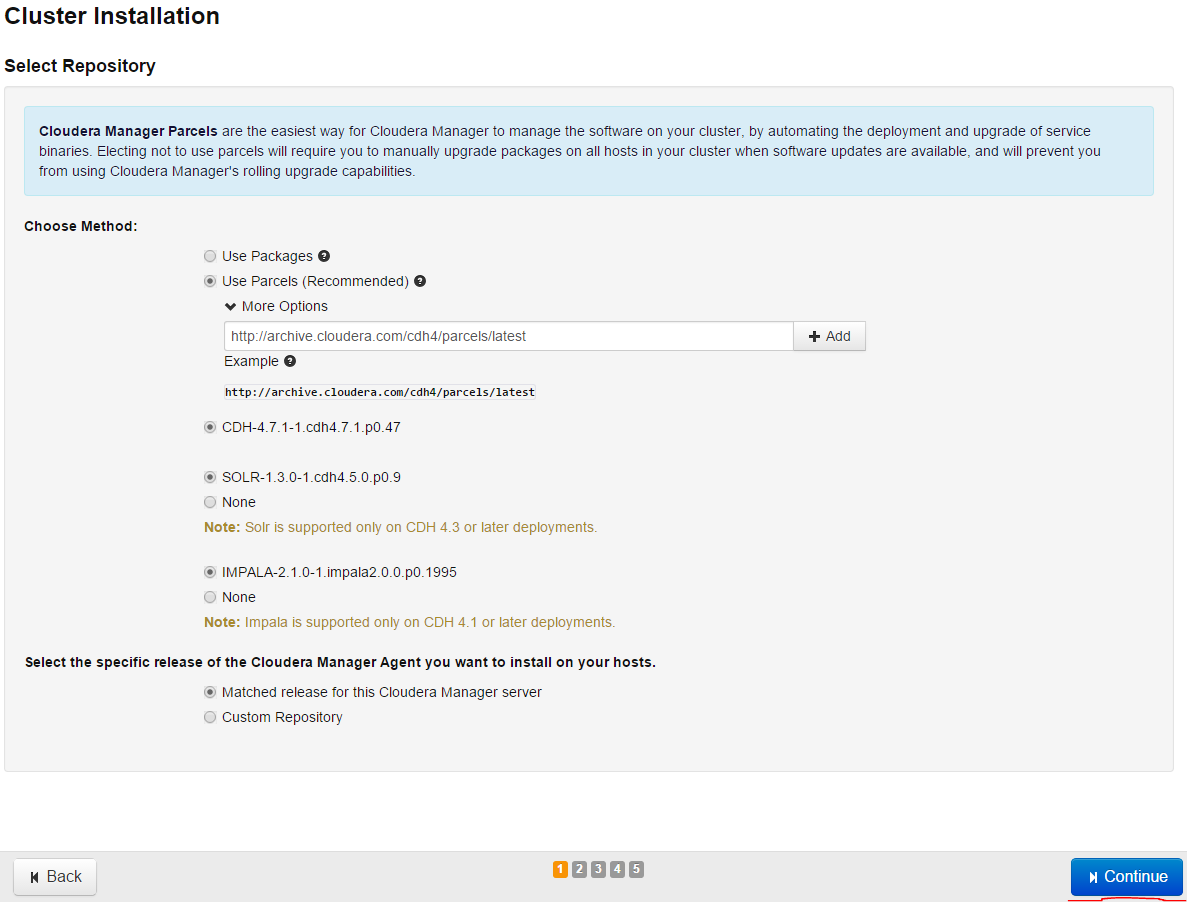
We choose the next page as it is shown and press Continue button:
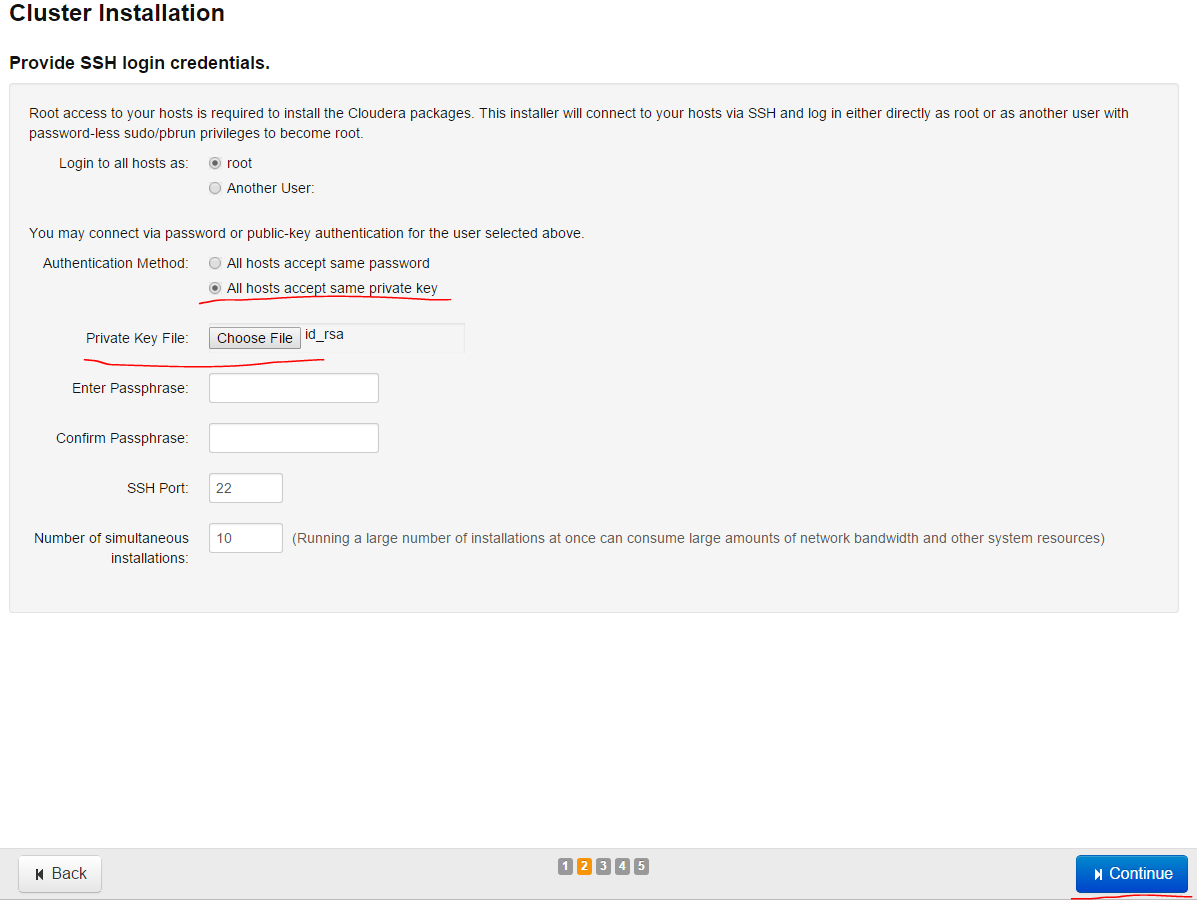
Then we copy id_rsa key of a pair of SSH key which we generated in CHM server before to our Windows desktop and then press Choose file button to install to server as it is shown in screenshot, in order that, when we connect to our nodes for speaking with the key PUB that was sent by itself we can use this key file. Then press Continue button:
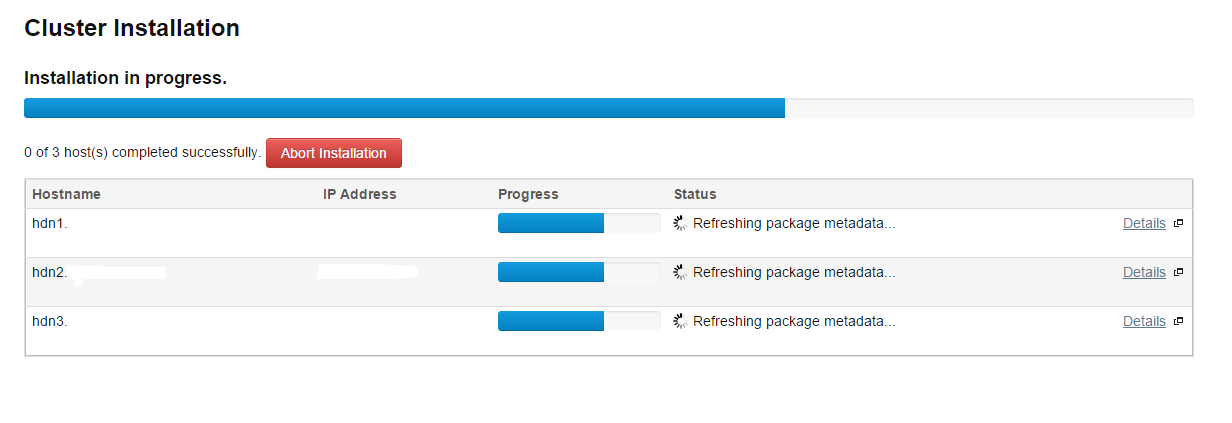
If the installation is going on as follows, it means everything is ok:
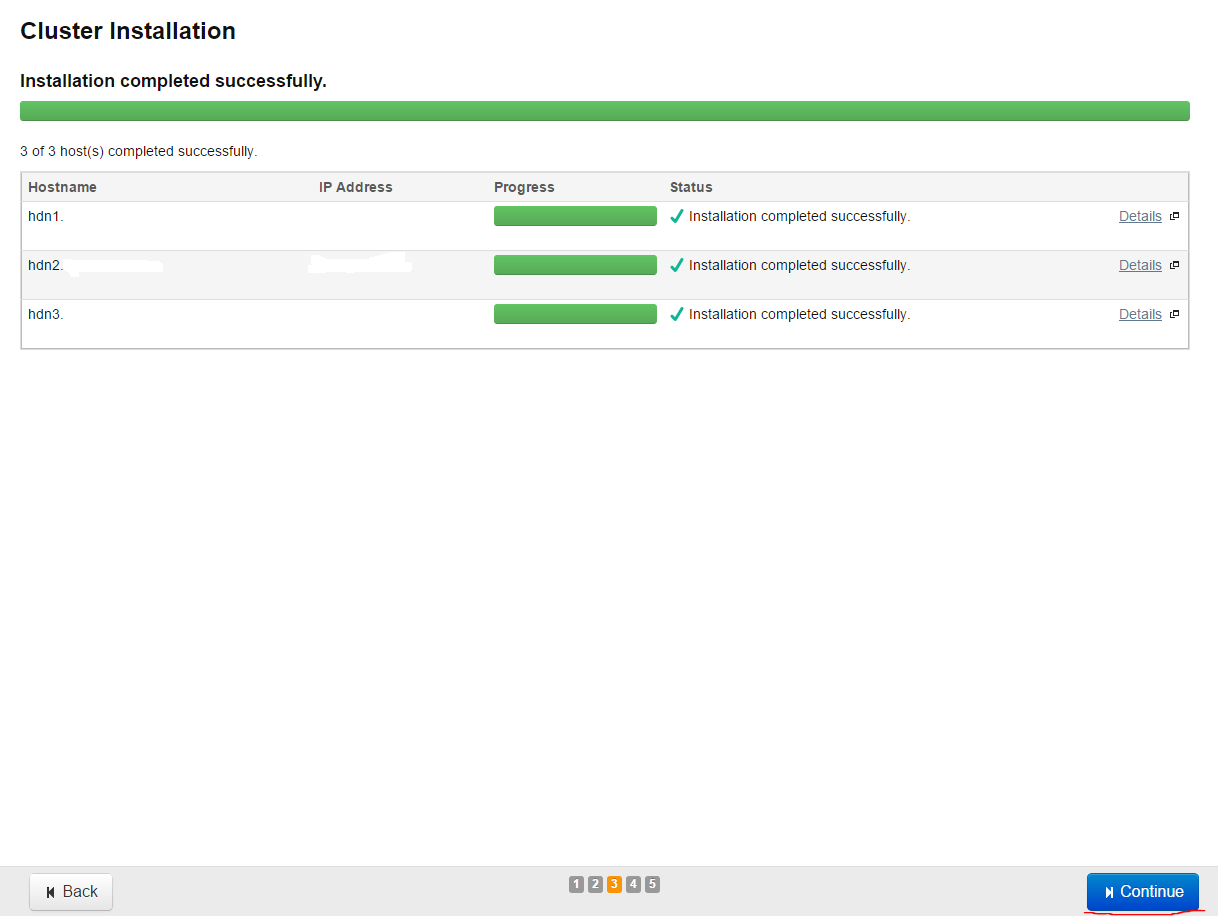
After the installation in all nodes finishes the successful result will be as below(Press Continue to go on):
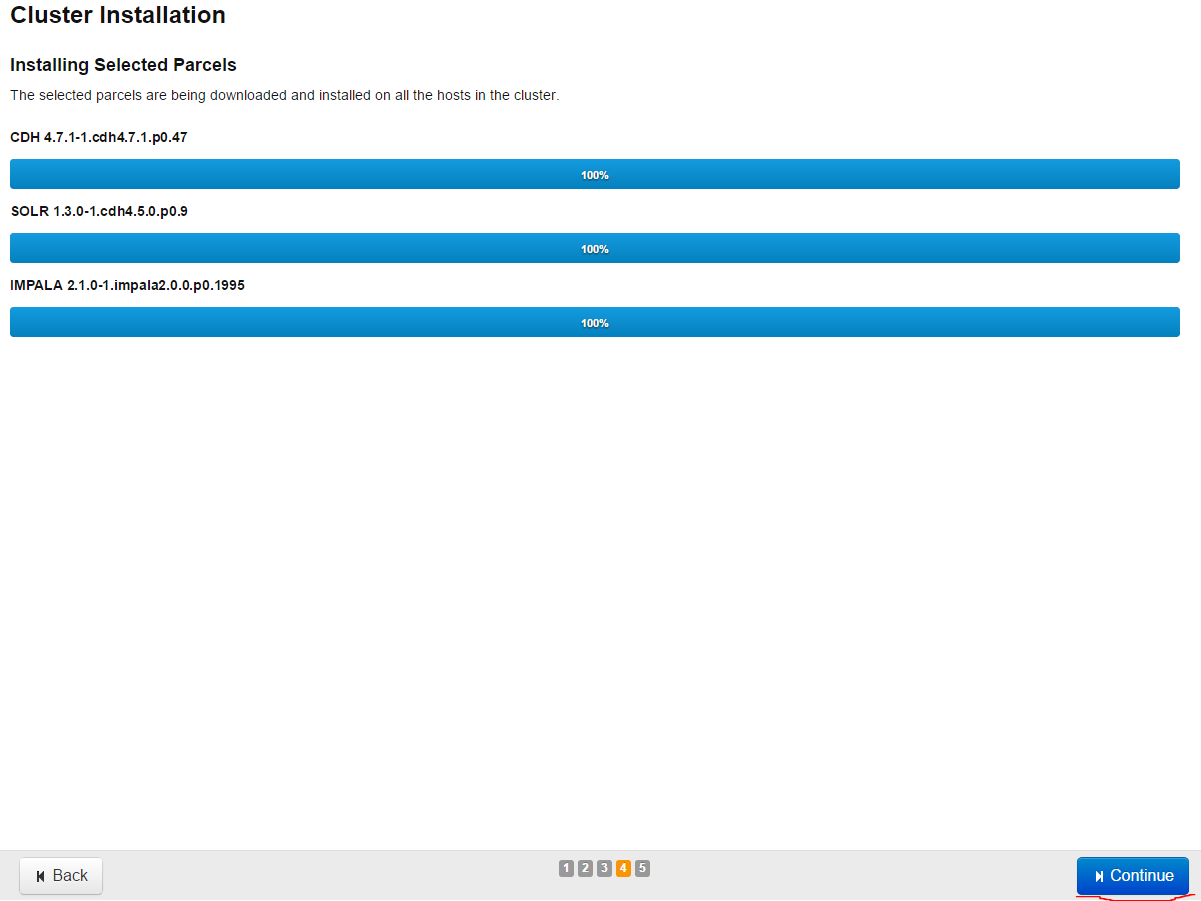
Then the parcels we have choosen will start installation and successful result will be as follows(Press Continue)
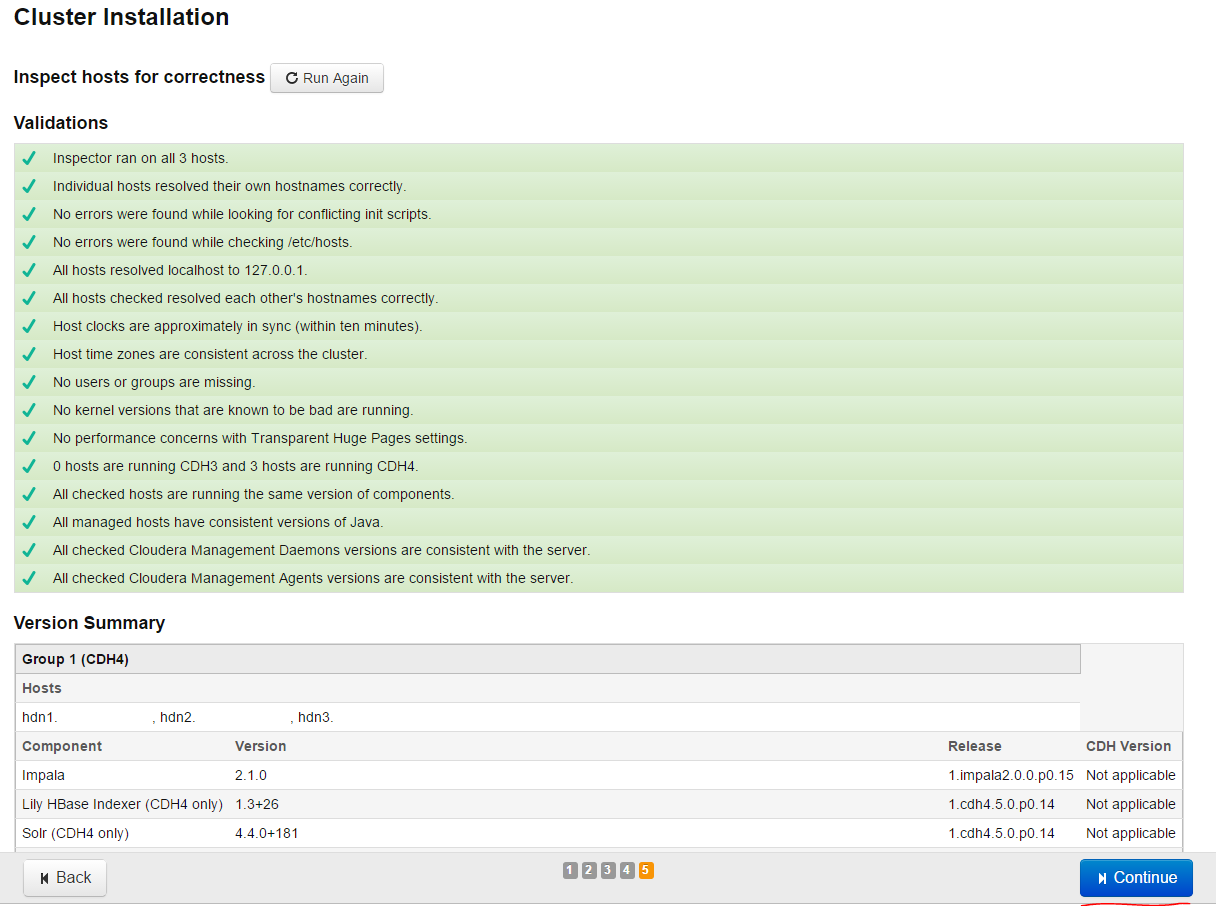
There will be testing in our nodes and successful result will be as follows(press Continue and go on):
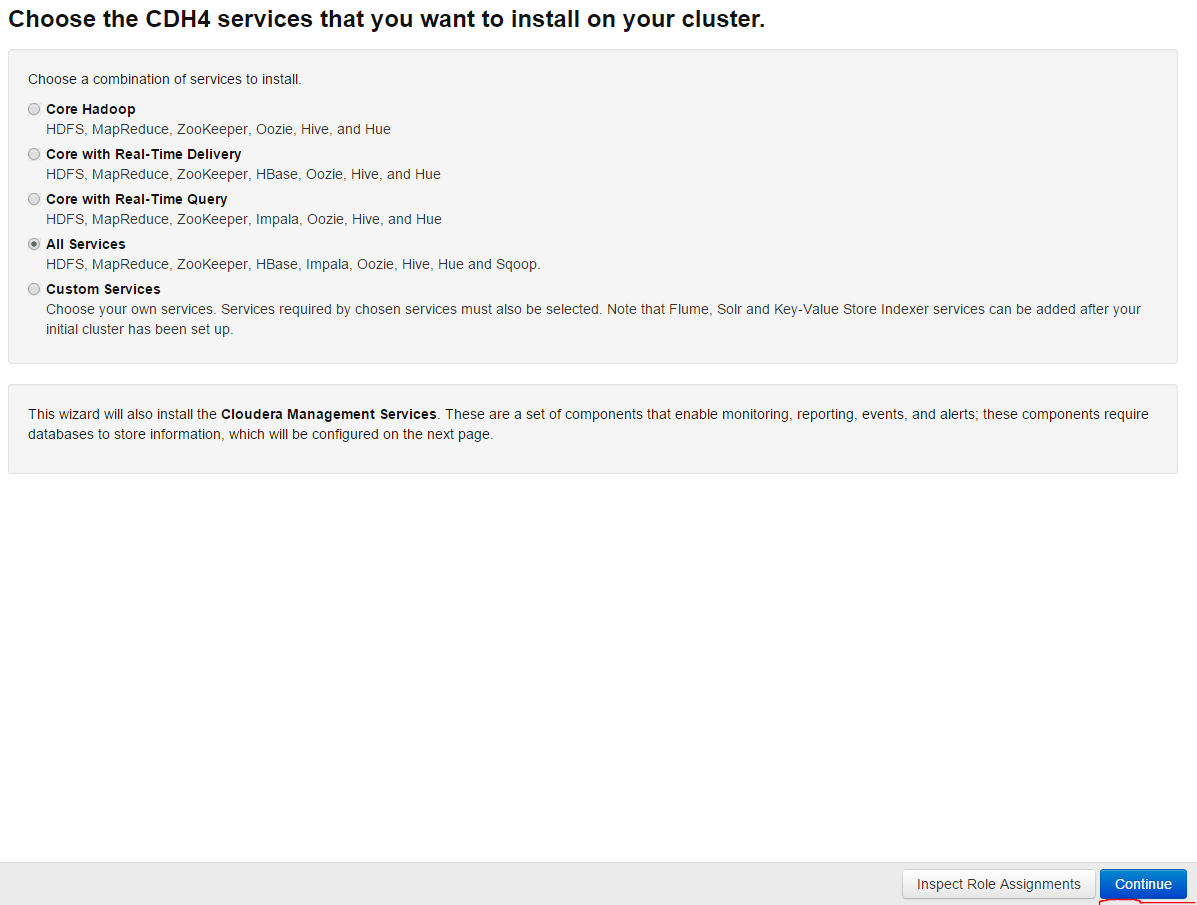
For installation we choose all services and press Continue:
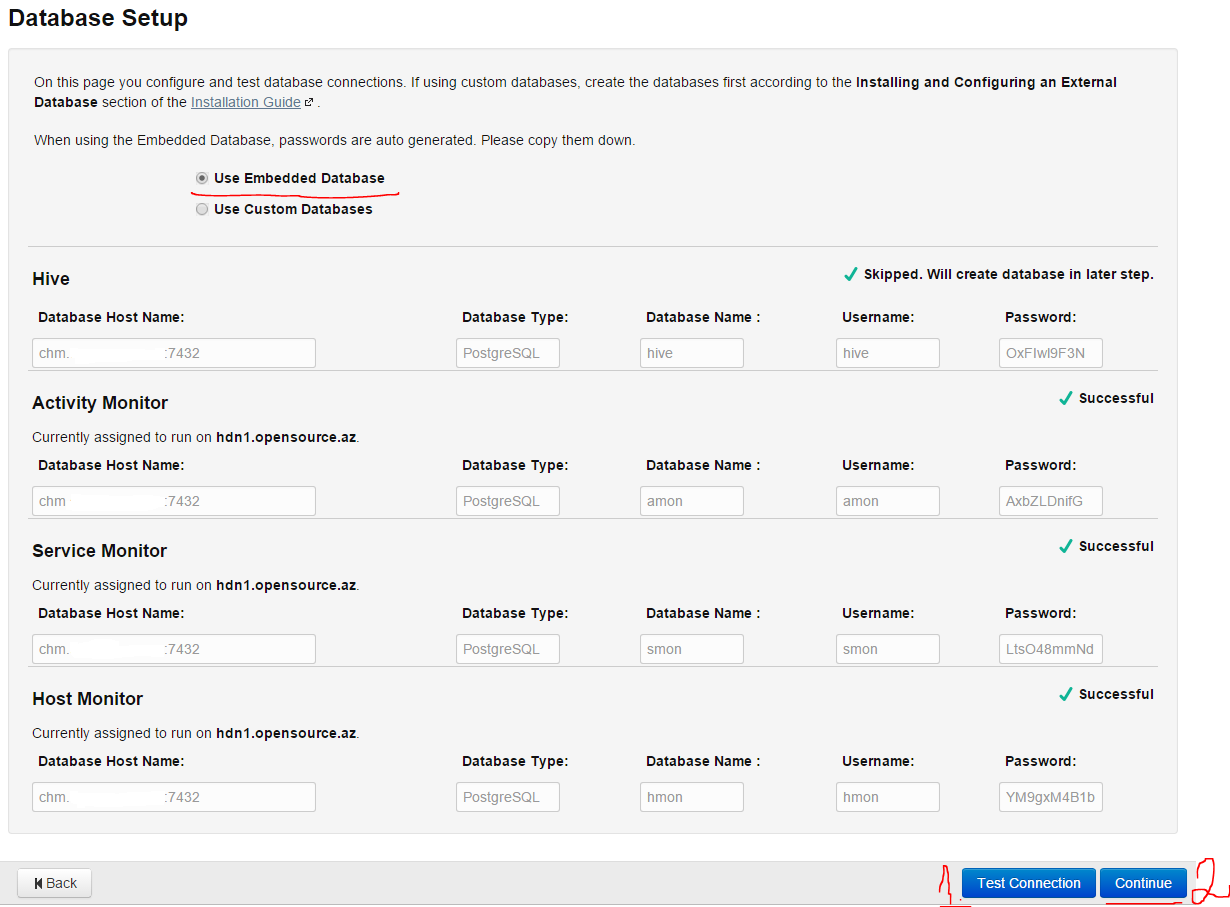
In opened page choice of database remains the default database and press Test Connection button in order to test the connection, then press Continue and go on:
On the next page everything remains as default and press Continue
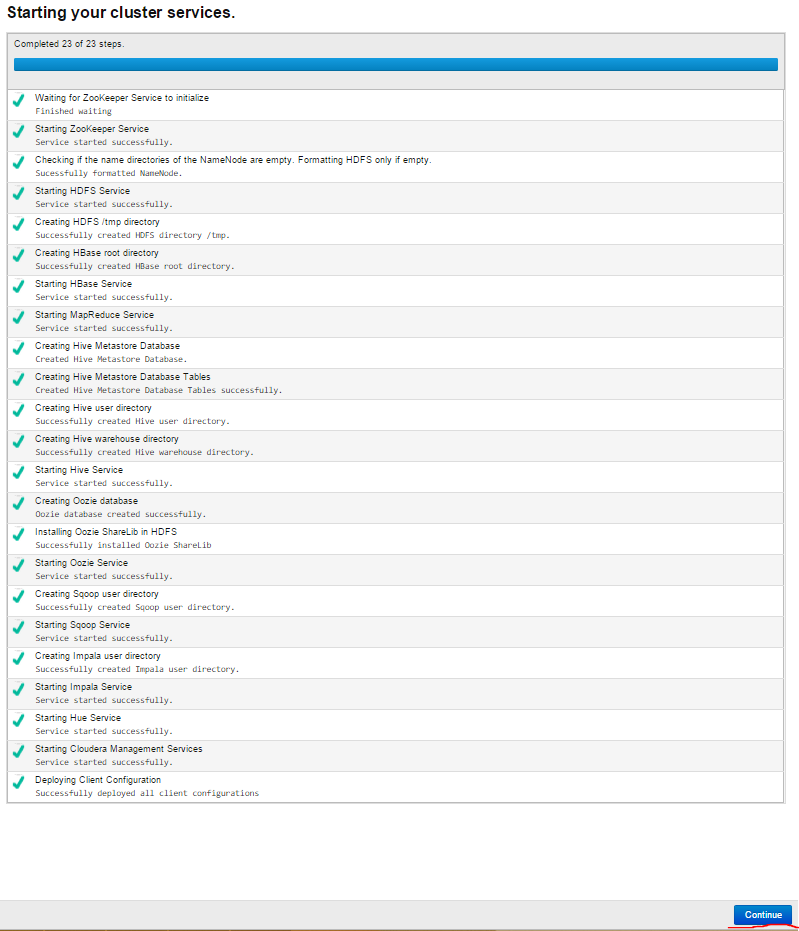
The Cluster services are started. The successful result will be as follows:
Result congratulation page is printed, our work ends successfully:

At the end Our Cluster with its services must be as follows:
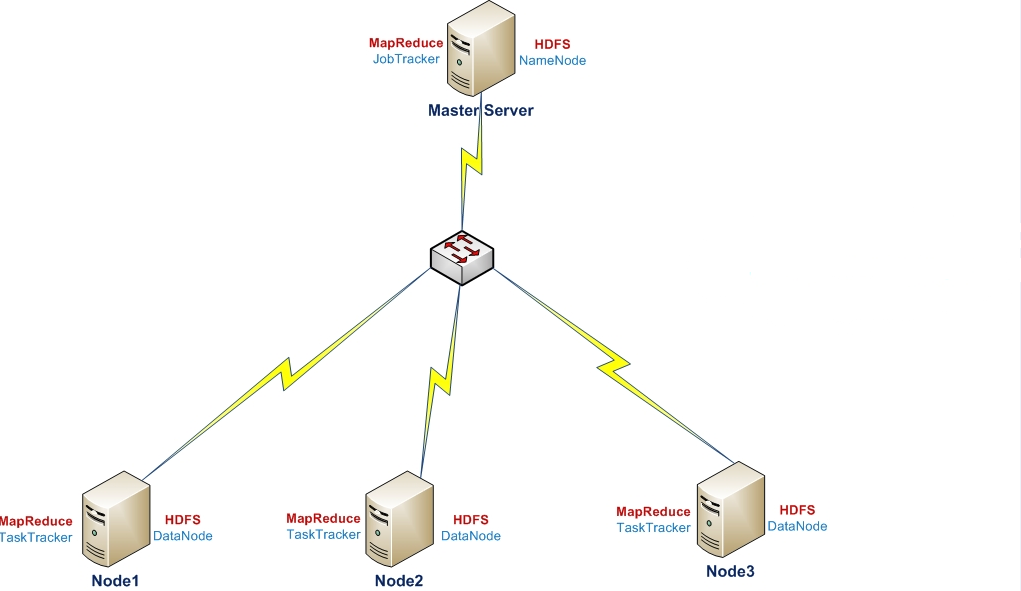
MapReduce – it is shared computing model which is created by Google. It is used paralel computing of big databases in computer cluster.(A few petabayt).
MapReduce – it is environment for reporting of some collection of shared exercises by using computer. It consists of two parts Map and Reduce. In the Map step start processing of incoming datas. For that one of machines (master node – JobTracker)takes the incoming task, divides them into parts and sends them for initial processing to other(ishchi node-lara Tasktracker) machines. In Reduce step the information pre-processed before is closed. The main node takes the result from worker node and form the result. The advance of MapReduce is doing exercises parallel and it is the rapid result. MapReduce is closely integrated with HDFS and fulfill the exercises in HDFS nodes where datas are saved.
HDFS – shared file system, which is shared among many nodes. The main skills are below:
* HDFS remains files in blocks and the capacity of block is at least 64MB. (This capacity in most file systems is about 4-32KB)
* HDFS in reading big sized files is very fast, but in small sized files is not affective.
* HDFS is optimized to write once to file system and is read many times.
* Instead of producing fault in disk, HDFS replicates to other disks. Each block where files arrange are saved in several cluster Nodes and HDFS NameNode is always monitoring reports sended from DataNodes, in order that blocks that are on reguired replication factor, will not be deleted when there is a fault. Each depo Node starts the process, which is called DataNode and controls the blocks on the same machine and these DataNodes is conroling by NameNode (master server)that in other machine.
HDFS and MapReduce is already in cluster as a software and has general caracters
* Each of them in cluster has coordinating(Master/Coordinator) and working( manage) architecture.
* Monitoring the processing faults and the strong of master node cluster for both software(NameNode for HDFS and MapReduce for JobTracker).
* The running process in both server(NameNode for HDFS and MapReduce for JobTracker) is respondent for completing the work on physical host, which takes the exercises from its master(NameNode for HDFS and MapReduce for JobTracker) and give information back about the strong/progress of cluster.
Hadoop uses these components in three mode as below:
* Local Free mode: It is a default mode which we show in PI example. In this case all components belong to Hadoop (NameNode, DataNode, JobTracker ve TaskTracker) work only on Java.
* Virtual–Shared mode: In this case each Hadoop component works separately on JVM process and they connect with each other by network socket. It can be called as minicluster on full functional host (in this case we have to do changes in core-site.xml, hdfs-site.xml and mapred-site.xml files).
* Full shared mode: In this mode Hadoop works in several machines which will be divided contolling and running processes(as NameNode and JobTracker).
YARN
MapReduce is almost completely changed in Hadoop-0.23 and MapReduce 2.0(MRv2) version is published or published as under the name YARN. The purpose of MRv2 was divide the two main tasks into separate daemon on JobTracker (contoling resources and planning/monitoring). The purpose was existing ApplicationMaster(AM) for each program and global ResourceManager(RM) Program is simple jobs on MapReduce or DAGs of jobs. ResourceManager exists in every slave Node, but NodeManager organizes processing of datas. ResourceManager is the last instance, which gives access to resources for programs in system. ApplicationMaster considered for each program is a created environment by special libraries, which takes the agreement of dividing of resources from ResourceManager and takes execution jobs and monitoring tasks from NodeManager.
ResourceManager is consist of two main components: Scheduler(planner) and ApplicationsManager.
Scheduler(planner) – is responsible for sharing resources of different started programs, which has similar power restriction. Scheduler (planner)does only planning of jobs and does not interfere to monitoring/tracking of any resource. It does not guarantee restarting of work if any fails in unsuccess jobs. It is planning resource needs of programs with the logic resource Conteyner. Container includes HDD,CPU,RAM and network. In the first version only RAM was.
Scheduler – has politics remotely accessible plugin, which is respondent sharing cluster resources(programs) among different queues. CapacityScheduler and FairScheduler distributors can be example as a plugin for MapReduce distributive.
CapacityScheduler – supports hierarchic queues, in order to create conditions for sharing among the known resources of cluster. ApplicationsManager is respondent to get job-tasks, come to an agreement with ApplicationsManager to execute specific programs and if there is an error it starts ApplicationMaster container again.
NodeManager – an environment agent for each machine, which is respondent container and using resources (CPU, HDD, RAM and Network) with production reports(ResourceManager/Scheduler).
Application Master is respondent for each program to come to an agreement with resource container taken from Schedule and looking at its working status.
MRV2 has API functionality that can come into compliance with previous Hadoop-1.x versions. It means that, all MapReduce jobs will work with MRv2 with only recompilation without any changes.
Install Hadoop on UBUNTU 14.04 x64 server for test and start
# apt-get update – Update all repos lists.
# apt-get install default-jdk – Install Java
# java -version – Look at Java version “1.7.0_79”
java version “1.7.0_79”
OpenJDK Runtime Environment (IcedTea 2.5.5) (7u79-2.5.5-0ubuntu0.14.04.2)
OpenJDK 64-Bit Server VM (build 24.79-b02, mixed mode)
# addgroup hadoop – Add system group with name hadoop
Adding group `hadoop’ (GID 1002) …
Done.
# adduser –ingroup hadoop hduser – Create a user of hduser and add the user to hadoop group.
Adding user `hduser’ …
Adding new user `hduser’ (1001) with group `hadoop’ …
Creating home directory `/home/hduser’ …
Copying files from `/etc/skel’ …
Enter new UNIX password:
Retype new UNIX password:
passwd: password updated successfully
Changing the user information for hduser
Enter the new value, or press ENTER for the default
Full Name []:
Room Number []:
Work Phone []:
Home Phone []:
Other []:
Is the information correct? [Y/n] Y
root@hdfsnode1:~# su – hduser – login to system with the name hduser
hduser@hdfsnode1:~$ ssh-keygen -t rsa -P “” – Generate one SSH key pair(this key is for not asking password when our server enter itself from localhost).
Generating public/private rsa key pair.
Enter file in which to save the key (/home/hduser/.ssh/id_rsa):
Created directory ‘/home/hduser/.ssh’.
Your identification has been saved in /home/hduser/.ssh/id_rsa.
Your public key has been saved in /home/hduser/.ssh/id_rsa.pub.
The key fingerprint is:
50:6b:f3:fc:0f:32:bf:30:79:c2:41:71:26:cc:7d:e3 hduser@hdfsnode1
The key’s randomart image is:
+–[ RSA 2048]—-+
| .oo.o |
| . .o=. o |
| . + . o . |
| o = E |
| S + |
| . + |
| O + |
| O o |
| o.. |
+—————–+
$ cat $HOME/.ssh/id_rsa.pub >> $HOME/.ssh/authorized_keys
$ sudo adduser hduser sudo – do sudo hduser in order to execute some needed comands
Download Hadoop from the internet and open archieve.
$ wget http://mirrors.sonic.net/apache/hadoop/common/hadoop-2.6.0/hadoop-2.6.0.tar.gz
$ tar xvzf hadoop-2.6.0.tar.gz
$ sudo mkdir /usr/local/hadoop
$ sudo cp -R hadoop-2.6.0/* /usr/local/hadoop – Copy Hadoop to our created folder.
$ sudo chown -R hduser:hadoop /usr/local/hadoop – Change this folder owner to hduser and group to Hadoop.
Correct the configuration files.
The configuration will be done in the following files:
~/.bashrc
/usr/local/hadoop/etc/hadoop/hadoop-env.sh
/usr/local/hadoop/etc/hadoop/core-site.xml
/usr/local/hadoop/etc/hadoop/mapred-site.xml.template
/usr/local/hadoop/etc/hadoop/hdfs-site.xml
$ update-alternatives –config java – Find Java address, add change .bashrc file as needs.
There is only one alternative in link group java (providing /usr/bin/java): /usr/lib/jvm/java-7-openjdk-amd64/jre/bin/java
Nothing to configure.
$ vi ~/.bashrc – Add the following variables to file
#HADOOP VARIABLES START
export JAVA_HOME=/usr/lib/jvm/java-7-openjdk-amd64
export HADOOP_INSTALL=/usr/local/hadoop
export PATH=$PATH:$HADOOP_INSTALL/bin
export PATH=$PATH:$HADOOP_INSTALL/sbin
export HADOOP_MAPRED_HOME=$HADOOP_INSTALL
export HADOOP_COMMON_HOME=$HADOOP_INSTALL
export HADOOP_COMMON_LIB_NATIVE_DIR=$HADOOP_INSTALL/lib/native
export HADOOP_HDFS_HOME=$HADOOP_INSTALL
export CLASSPATH=/usr/local/hadoop/etc/hadoop:/usr/local/hadoop/share/hadoop/common/lib/*:/usr/local/hadoop/share/hadoop/common/*:/usr/local/hadoop/share/hadoop/hdfs:/usr/local/hadoop/share/hadoop/hdfs/lib/*:/usr/local/hadoop/share/hadoop/hdfs/*:/usr/local/hadoop/share/hadoop/yarn/lib/*:/usr/local/hadoop/share/hadoop/yarn/*:/usr/local/hadoop/share/hadoop/mapreduce/lib/*:/usr/local/hadoop/share/hadoop/mapreduce/*:/contrib/capacity-scheduler/*.jar
export YARN_HOME=$HADOOP_INSTALL
export HADOOP_COMMON_LIB_NATIVE_DIR=$HADOOP_INSTALL/lib/native
export HADOOP_OPTS=”-Djava.library.path=$HADOOP_INSTALL/lib”
export JAVA_LIBRARY_PATH=$HADOOP_INSTALL/lib/native:$JAVA_LIBRARY_PATH
#HADOOP VARIABLES END
Find Java Compiler address:
$ which javac
/usr/bin/javac
$ readlink -f /usr/bin/javac
/usr/lib/jvm/java-7-openjdk-amd64/bin/javac
Correct the following changes in /usr/local/hadoop/etc/hadoop/hadoop-env.sh file:
export JAVA_HOME=${JAVA_HOME}
Configure /usr/local/hadoop/etc/hadoop/core-site.xml file. This file is read when Hadoop starts and needed politics apply and starts Hadoop. Create tmp folder for Hadoop and give access to group by created user for new folder:
$ sudo mkdir -p /app/hadoop/tmp
$ sudo chown hduser:hadoop /app/hadoop/tmp
Open /usr/local/hadoop/etc/hadoop/core-site.xml file and add the following lines to among <configuration></configuration> tags:
<property>
<name>hadoop.tmp.dir</name>
<value>/app/hadoop/tmp</value>
<description>A base for other temporary directories.</description>
</property>
<property>
<name>fs.default.name</name>
<value>hdfs://localhost:54310</value>
<description> Default name of file system. URI scheme and accesses define the apply of file system. Uri scheme defines (fs.SCHEME.impl) file system configuration of apply naming class. It is used to define host, port, etc. for Uri file system.</description>
</property>
Copy from template file to original file for defining MapReduce environment:
$ cp /usr/local/hadoop/etc/hadoop/mapred-site.xml.template /usr/local/hadoop/etc/hadoop/mapred-site.xml
/usr/local/hadoop/etc/hadoop/mapred-site.xml file explains which environment will be used when MapReduce starts. Add the following lines among <configuration></configuration> tags:
<property>
<name>mapred.job.tracker</name>
<value>localhost:54311</value>
<description> MapReduce defines host and port for starting JobTracker. If you use “local” structure, so jobtracker works in order to minimize the job.
</description>
</property>
Configure /usr/local/hadoop/etc/hadoop/hdfs-site.xml file. This file will participate in cluster and must be configured on each node. Just in this file the folders which namenode and datanode will use are shown. Before doing changes in file we have to create two folders, which will organize datanode and namenode for installing Hadoop. Create needed folders:
$ sudo mkdir -p /usr/local/hadoop_store/hdfs/namenode
$ sudo mkdir -p /usr/local/hadoop_store/hdfs/datanode
$ sudo chown -R hduser:hadoop /usr/local/hadoop_store
Open /usr/local/hadoop/etc/hadoop/hdfs-site.xml file and add the following lines between <configuration></configuration> tags:
<property>
<name>dfs.replication</name>
<value>1</value>
<description> Default block replication. The actual number of replication can be defined when file is created. If the number is not defined in the process of creation, the default number will be applied.
</description>
</property>
<property>
<name>dfs.namenode.name.dir</name>
<value>file:/usr/local/hadoop_store/hdfs/namenode</value>
</property>
<property>
<name>dfs.datanode.data.dir</name>
<value>file:/usr/local/hadoop_store/hdfs/datanode</value>
</property>
$ hadoop namenode –format – Format Hadoop file system.
Note: This commant must be executed before Hadoop starts. If the command is entered again, don’t forget that the any information in content of file system will be destroyed.
Start Hadoop
To start start-all.sh script is enough to start one-node cluster(Also you can do it by starting start-dfs.sh and start-yarn.sh scripts)
$ cd /usr/local/hadoop/sbin
hduser@hdfsnode1:/usr/local/hadoop/sbin$ ls start-*
start-all.cmd start-all.sh start-balancer.sh start-dfs.cmd start-dfs.sh start-secure-dns.sh start-yarn.cmd start-yarn.sh
hduser@hdfsnode1:/usr/local/hadoop/sbin$ start-all.sh
$ jps – Test the working
13576 NodeManager
13438 ResourceManager
13089 DataNode
13287 SecondaryNameNode
19965 Jps
12928 NameNode
$ sudo netstat -plten | grep java – Look listened sockets
[sudo] password for hduser:
tcp 0 0 0.0.0.0:50070 0.0.0.0:* LISTEN 1001 49558 12928/java
tcp 0 0 0.0.0.0:50010 0.0.0.0:* LISTEN 1001 50816 13089/java
tcp 0 0 0.0.0.0:50075 0.0.0.0:* LISTEN 1001 49000 13089/java
tcp 0 0 0.0.0.0:50020 0.0.0.0:* LISTEN 1001 49628 13089/java
tcp 0 0 127.0.0.1:54310 0.0.0.0:* LISTEN 1001 50482 12928/java
tcp 0 0 0.0.0.0:50090 0.0.0.0:* LISTEN 1001 49739 13287/java
tcp6 0 0 :::8088 :::* LISTEN 1001 51548 13438/java
tcp6 0 0 :::8030 :::* LISTEN 1001 53408 13438/java
tcp6 0 0 :::8031 :::* LISTEN 1001 53401 13438/java
tcp6 0 0 :::8032 :::* LISTEN 1001 53413 13438/java
tcp6 0 0 :::8033 :::* LISTEN 1001 52462 13438/java
tcp6 0 0 :::8040 :::* LISTEN 1001 53736 13576/java
tcp6 0 0 :::8042 :::* LISTEN 1001 52673 13576/java
tcp6 0 0 :::50062 :::* LISTEN 1001 53729 13576/java
To stop the Hadoop you must execute stop-all.sh script in the /usr/local/hadoop/sbin address(Or stop-dfs.sh and stop-yarn.sh scripts) At the end you can look at http://hdfsnode1.unixmen.com:50070/ by WEB
su – hduser
cd /usr/local/hadoop/bin
hadoop jar /usr/local/hadoop/share/hadoop/mapreduce/hadoop-mapreduce-examples-2.6.0.jar pi 4 1000
Some tests in HDFS
hadoop fs -ls / – Look at available file system
hadoop fs -mkdir /user/hadoop – Create folder
echo “Some sentence for test.” >> testhdfs.txt – Write the sentence to file system for testing.
hadoop fs -copyFromLocal testhdfs.txt /user/hadoop/ – Copy the file from Linux file system to HDFS
hadoop fs –ls – Look at file system.
Found 1 items
-rw-r–r– 1 hduser supergroup 24 2015-05-13 02:41 testhdfs.txt
hadoop fs -cat /user/hadoop/testhdfs.txt – Read the line from HDFS
The sentence to test.
rm testhdfs.txt – Delete the file from Linux FS, in order to copy from HDFS to EXT4.
hadoop fs -copyToLocal /user/hadoop/testhdfs.txt . -Copy the file from HDFS to Linux file system.
Test HelloWorld in MapReduce (word count)
- Our first work is to create folder and copy the file to the folder:
$ hadoop fs -mkdir data
$ hadoop fs -cp testhdfs.txt data
$ hadoop fs -ls data
Found 1 items
-rw-r–r– 1 hduser supergroup 24 2015-05-13 03:25 data/testhdfs.txt
- Execute the foolowing command, do the word calculating:
$ hadoop jar /usr/local/hadoop/share/hadoop/mapreduce/hadoop-mapreduce-examples-2.6.0.jar wordcount data out
- Execute the next command, look at the created files:
$ hadoop fs -ls out
Found 2 items
-rw-r–r– 1 hduser supergroup 0 2015-05-13 03:38 out/_SUCCESS
-rw-r–r– 1 hduser supergroup 32 2015-05-13 03:38 out/part-r-00000
- Then look at the result:
$ hadoop fs -cat out/part-r-00000
Some 1
Sentence 1
for 1
test. 1
Note: In our example we used wordcount but, if you want to see the list of opportunities in mapreduce, we have to enter the hadoop jar /usr/local/hadoop/share/hadoop/mapreduce/hadoop-mapreduce-examples-2.6.0.jar command.
You can look at file system by 50070 port http://hdfsnode1.unixmen.com:50070/


